This article describes , what is maven multi-module project , how we can create a maven multi module architecture and why we need this architecture also how you can create a multi module maven project in spring boot.
Maven multi module project architecture

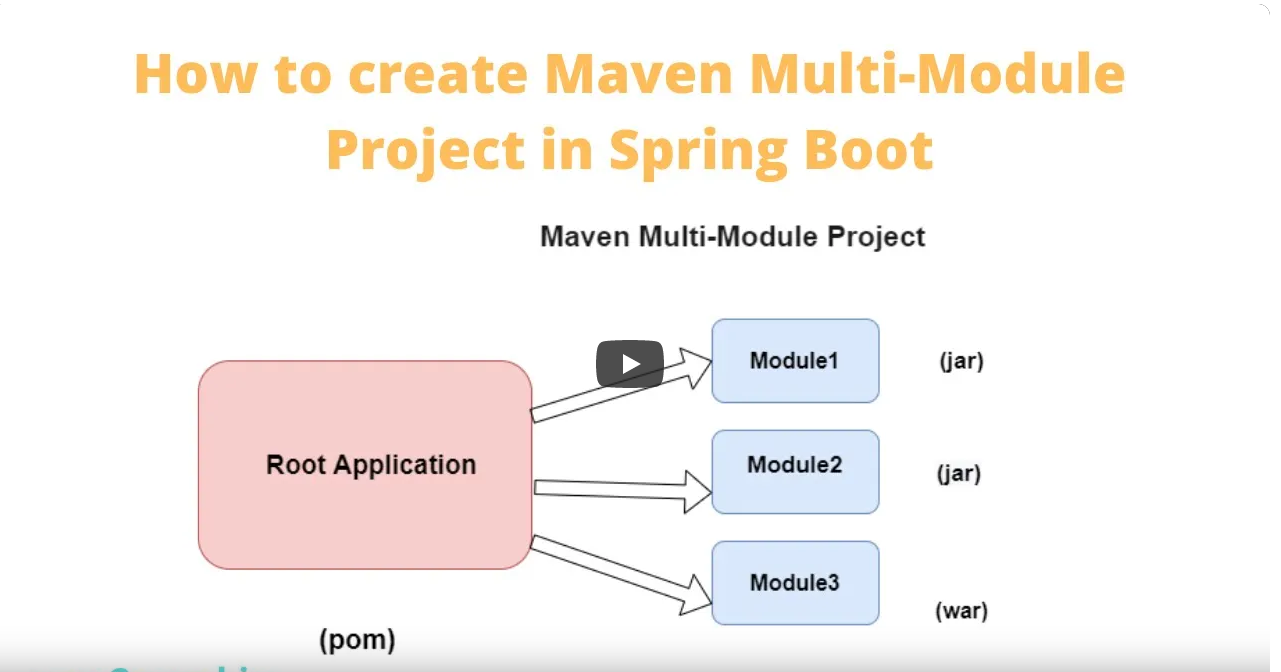
In the Spring Boot project, we have the Root Application as the Parent project will contains some sub module projects. Then we have Multi-Module project, from that the Root Application will manage all modules, and all common dependencies will be inherited by the child module projects.
In this article, we will use the Spring Tool Suite 4 (STS) to create and develop the sample of maven multi-module project.
Create ParentApp as root application project
Step 1: Open Spring Tool Suite 4

Step 2: Go to File -> New -> Spring Starter Project

Step 3: Create new Spring Starter Project

Step 4: Choose Spring Boot version and select project dependencies

Step 5: Another important you need to remember in the Maven Multi-Module project, the Root Application (the ParentApp project) packaging type should be POM

And here is full content of pom.xml file
<?xml version="1.0" encoding="UTF-8"?>
<project xmlns="http://maven.apache.org/POM/4.0.0" xmlns:xsi="http://www.w3.org/2001/XMLSchema-instance"
	xsi:schemaLocation="http://maven.apache.org/POM/4.0.0 https://maven.apache.org/xsd/maven-4.0.0.xsd">
	<modelVersion>4.0.0</modelVersion>
	<parent>
		<groupId>org.springframework.boot</groupId>
		<artifactId>spring-boot-starter-parent</artifactId>
		<version>2.7.16</version>
		<relativePath/> <!-- lookup parent from repository -->
	</parent>
	<groupId>com.favtuts</groupId>
	<artifactId>ParentApp</artifactId>
	<version>0.0.1-SNAPSHOT</version>
	<packaging>pom</packaging>
	<name>ParentApp</name>
	<description>Demo project for maven multi module project in Spring Boot</description>
	<properties>
		<java.version>1.8</java.version>
	</properties>
	<dependencies>
		<dependency>
			<groupId>org.springframework.boot</groupId>
			<artifactId>spring-boot-starter-data-jpa</artifactId>
		</dependency>
		<dependency>
			<groupId>org.springframework.boot</groupId>
			<artifactId>spring-boot-starter-web</artifactId>
		</dependency>

		<dependency>
			<groupId>com.mysql</groupId>
			<artifactId>mysql-connector-j</artifactId>
			<scope>runtime</scope>
		</dependency>
		<dependency>
			<groupId>org.springframework.boot</groupId>
			<artifactId>spring-boot-starter-tomcat</artifactId>
			<scope>provided</scope>
		</dependency>
		<dependency>
			<groupId>org.springframework.boot</groupId>
			<artifactId>spring-boot-starter-test</artifactId>
			<scope>test</scope>
		</dependency>
	</dependencies>

	<build>
		<plugins>
			<plugin>
				<groupId>org.springframework.boot</groupId>
				<artifactId>spring-boot-maven-plugin</artifactId>
			</plugin>
		</plugins>
	</build>

</project>
Create new Maven Modules
Step 1: Right click on ParentApp project, then choose the menu New -> Other -> Maven -> Maven Module , then click Next button:

Step 2: Provide the maven module name is DataLayer, then click Next button:

Step 3: Provide name and description for the new maven module, then click Finish button

<project xmlns="http://maven.apache.org/POM/4.0.0" xmlns:xsi="http://www.w3.org/2001/XMLSchema-instance" xsi:schemaLocation="http://maven.apache.org/POM/4.0.0 https://maven.apache.org/xsd/maven-4.0.0.xsd">
  <modelVersion>4.0.0</modelVersion>
  <parent>
    <groupId>com.favtuts</groupId>
    <artifactId>ParentApp</artifactId>
    <version>0.0.1-SNAPSHOT</version>
  </parent>
  <artifactId>DataLayer</artifactId>
  <name>DataLayer</name>
  <description>data access layer</description>
</project>
Step 4: Similar we can create new Maven module with name is ServiceLayer

<project xmlns="http://maven.apache.org/POM/4.0.0" xmlns:xsi="http://www.w3.org/2001/XMLSchema-instance" xsi:schemaLocation="http://maven.apache.org/POM/4.0.0 https://maven.apache.org/xsd/maven-4.0.0.xsd">
  <modelVersion>4.0.0</modelVersion>
  <parent>
    <groupId>com.favtuts</groupId>
    <artifactId>ParentApp</artifactId>
    <version>0.0.1-SNAPSHOT</version>
  </parent>
  <artifactId>ServiceLayer</artifactId>
  <name>ServiceLayer</name>
  <description>service layer for business logic</description>
</project>
Step 5: Also create the final Maven module with name is ApiLayer , also notes that we need to change the packaging to WAR , because this api layer will be deployed in some containers like Jboss, Tomcat, or Weblogic web servers.

<project xmlns="http://maven.apache.org/POM/4.0.0" xmlns:xsi="http://www.w3.org/2001/XMLSchema-instance" xsi:schemaLocation="http://maven.apache.org/POM/4.0.0 https://maven.apache.org/xsd/maven-4.0.0.xsd">
  <modelVersion>4.0.0</modelVersion>
  <parent>
    <groupId>com.favtuts</groupId>
    <artifactId>ParentApp</artifactId>
    <version>0.0.1-SNAPSHOT</version>
  </parent>
  <artifactId>ApiLayer</artifactId>
  <packaging>war</packaging>
  <name>ApiLayer</name>
  <description>demo application for creating api end point</description>
</project>
So you can see in the pom.xml file in the Root Application project it automatically add 3 new maven modules

	<modules>
		<module>DataLayer</module>
		<module>ServiceLayer</module>
		<module>ApiLayer</module>
	</modules>
By this way, you can add more any maven modules into your application.
Writing codes for DataLayer
Step 1: Right click on src/main/java , then choose New -> Package: com.favtuts.sb

Step 2: Create new package entity and repository under the package com.favtuts.sb


Step 3: Add new User for entity class

Step 4: After provide all private members, the we need to generate all getter or setter methods for the User class. Right click on the blank at the bottom of the class -> choose Source -> Generate Getters and Setters

Then select all fields for generation, and the insertion point, then click the Generate button.

Now we have the full content of User class.

package com.favtuts.sb.entity;

import javax.persistence.Column;
import javax.persistence.Entity;
import javax.persistence.GeneratedValue;
import javax.persistence.GenerationType;
import javax.persistence.Id;
import javax.persistence.Table;

@Entity
@Table(name="user")
public class User {

	@Id
	@GeneratedValue(strategy = GenerationType.AUTO)
	@Column(name = "id")
	private Long id;

	@Column(name = "name")
	private String name;

	@Column(name = "email")
	private String email;

	public Long getId() {
		return id;
	}

	public void setId(Long id) {
		this.id = id;
	}

	public String getName() {
		return name;
	}

	public void setName(String name) {
		this.name = name;
	}

	public String getEmail() {
		return email;
	}

	public void setEmail(String email) {
		this.email = email;
	}


}
Step 5: create new UserRepository interface under the package com.favtuts.sb.repository

package com.favtuts.sb.repository;

import org.springframework.data.jpa.repository.JpaRepository;
import org.springframework.stereotype.Repository;

import com.favtuts.sb.entity.User;

@Repository
public interface UserRepository extends JpaRepository<User, Long> {

}
You can see inside the DataLayer maven module, it automatically inherit all common dependencies example the Spring Boot framework library (Spring-Data-JPA) that we already declared in the ParentApp maven project.
Step 6: Create configuration file application.properties for Spring JPA DataSource.