Most Spring Tutorials available online teach you how to create/secure a Rest API with Spring boot. However, sometimes there will be specific use cases where you will need to create/secure REST API without using spring boot. This tutorial aims to help you create a REST application without using Spring Boot at all.
Note: If you don’t wanna use even the Spring framework, then you can read on how to create REST API in Java without Spring.
What you’ll build
A Spring REST service which will simply accept a name as a path variable in the request and say hello with that name in the response

What you’ll need
- Spring Tool Suite 4
- JDK 11
- MySQL Server 8
- Maven
Tech Stack
- Spring 5
- JDK 11
- Log4j 2
Bootstrap your application
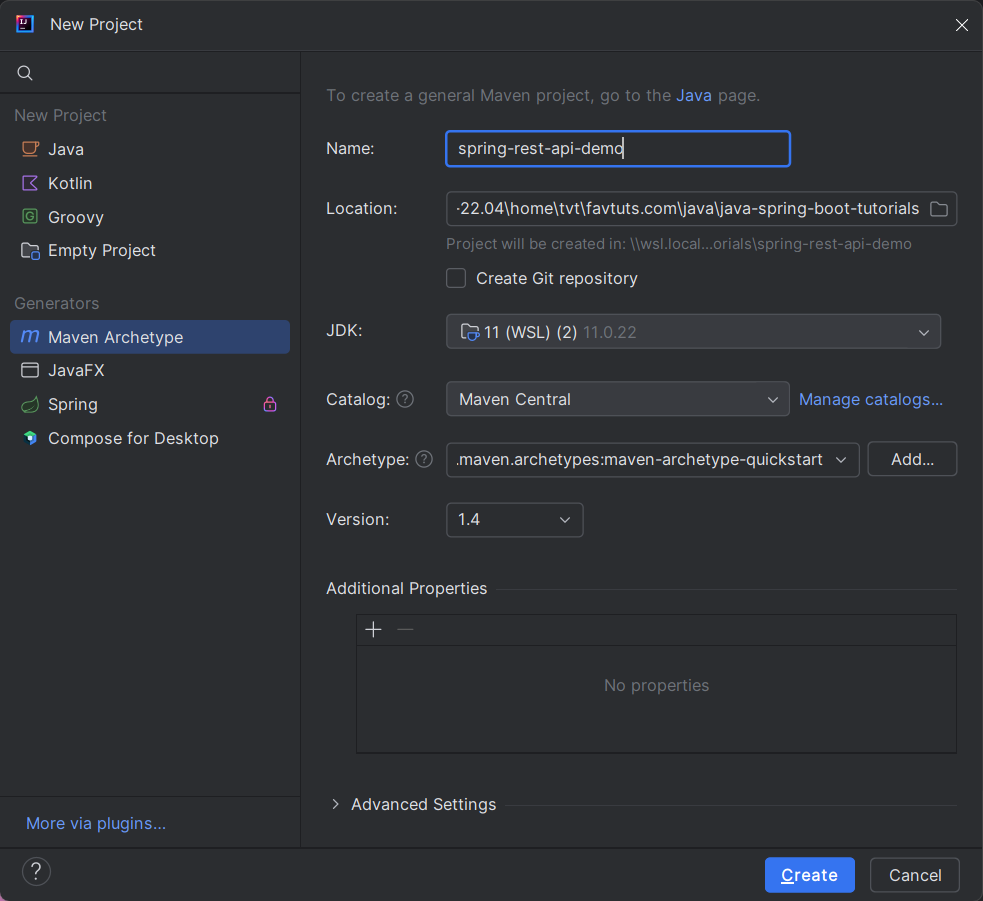
Let’s bootstrap the application by creating a maven project in STS or IntelliJ IDEA
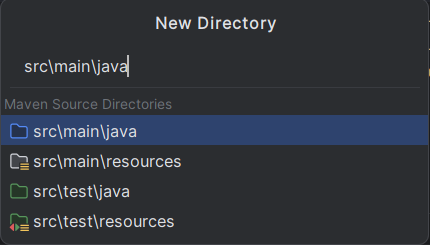
Then create directories (src/main/java and src/main/resources)
Project Dependencies
pom.xml
<project xmlns="http://maven.apache.org/POM/4.0.0" xmlns:xsi="http://www.w3.org/2001/XMLSchema-instance"
  xsi:schemaLocation="http://maven.apache.org/POM/4.0.0 http://maven.apache.org/maven-v4_0_0.xsd">
  <modelVersion>4.0.0</modelVersion>
  <groupId>com.favtuts</groupId>
  <artifactId>spring-rest-api-demo</artifactId>
  <packaging>war</packaging>
  <version>0.0.1-SNAPSHOT</version>
  <name>spring-rest-api-demo Maven Webapp</name>
  <url>http://maven.apache.org</url>
    <properties>
        <java-version>11</java-version>
        <spring.version>5.2.3.RELEASE</spring.version>
        <hibernate.version>5.4.1.Final</hibernate.version>
    </properties>
    <dependencies>
        <!-- Spring Web MVC -->
        <dependency>
            <groupId>org.springframework</groupId>
            <artifactId>spring-webmvc</artifactId>
            <version>${spring.version}</version>
        </dependency>
        <!-- Required for converting JSON data to Java object and vice versa -->
        <dependency>
            <groupId>com.fasterxml.jackson.core</groupId>
            <artifactId>jackson-databind</artifactId>
            <version>2.9.10.1</version>
        </dependency>
        <!-- Servlet API -->
        <dependency>
            <groupId>javax.servlet</groupId>
            <artifactId>javax.servlet-api</artifactId>
            <version>3.0.1</version>
            <scope>provided</scope>
        </dependency>
        <dependency>
            <groupId>log4j</groupId>
            <artifactId>log4j</artifactId>
            <version>1.2.17</version>
        </dependency>
    </dependencies>
    <build>
        <finalName>SpringRestApiDemo</finalName>
        <pluginManagement>
            <plugins>
                <plugin>
                    <groupId>org.apache.maven.plugins</groupId>
                    <artifactId>maven-compiler-plugin</artifactId>
                    <version>2.3.2</version>
                    <configuration>
                        <source>${java-version}</source>
                        <target>${java-version}</target>
                    </configuration>
                </plugin>
                <plugin>
                    <groupId>org.apache.maven.plugins</groupId>
                    <artifactId>maven-war-plugin</artifactId>
                    <version>3.2.3</version>
                    <configuration>
                        <warSourceDirectory>src/main/webapp</warSourceDirectory>
                        <warName>SpringRestJwt</warName>
                    </configuration>
                </plugin>
            </plugins>
        </pluginManagement>
    </build>
</project>
Spring Configuration
SpringWebInitializer.java
WebApplicationContext can be configured using web.xml or Java-based configuration as shown below
SpringWebInitializer class extends Spring’s AbstractAnnotationConfigDispatcherServletInitializer to configure the WebApplicationContext.
package com.javachinna.config;

import org.springframework.web.servlet.support.AbstractAnnotationConfigDispatcherServletInitializer;

public class SpringWebInitializer extends AbstractAnnotationConfigDispatcherServletInitializer {

    @Override
    protected Class[] getServletConfigClasses() {
        return new Class[] { WebConfig.class };
    }

    @Override
    protected String[] getServletMappings() {
        return new String[] { "/" };
    }

    @Override
    protected Class[] getRootConfigClasses() {
        return new Class[] {};
    }
}
WebConfig.java
WebConfig class implements WebMvcConfigurer to configure the Jackson message converters
@EnableWebMvc annotation is used to enable Spring MVC support
@ComponentScan annotation is used with the @Configuration annotation to tell Spring the packages to scan for annotated components.
package com.javachinna.config;

import java.util.List;

import org.springframework.context.annotation.ComponentScan;
import org.springframework.context.annotation.Configuration;
import org.springframework.http.converter.HttpMessageConverter;
import org.springframework.http.converter.json.MappingJackson2HttpMessageConverter;
import org.springframework.web.servlet.config.annotation.EnableWebMvc;
import org.springframework.web.servlet.config.annotation.WebMvcConfigurer;

@EnableWebMvc
@Configuration
@ComponentScan("com.javachinna")
public class WebConfig implements WebMvcConfigurer {

    @Override
    public void configureMessageConverters(List<HttpMessageConverter<?>> converters) {
        converters.add(new MappingJackson2HttpMessageConverter());
    }
}
Create REST Controller
GreetController.java
Controller class for exposing a GET REST API
package com.javachinna.controller;

import org.apache.log4j.Logger;
import org.springframework.ui.ModelMap;
import org.springframework.web.bind.annotation.GetMapping;
import org.springframework.web.bind.annotation.PathVariable;
import org.springframework.web.bind.annotation.RestController;

@RestController
public class GreetController {

    private Logger logger = Logger.getLogger(GreetController.class);

    @GetMapping("/greet/{name}")
    public String greet(@PathVariable String name, ModelMap model) {
        String greet = "Hello!!! " + name + " How are You?";
        logger.info(greet);
        return greet;
    }
}
Log4J Configuration
log4j.properties
# Root logger option
log4j.rootLogger=DEBUG, stdout, file
# Redirect log messages to console
log4j.appender.stdout=org.apache.log4j.ConsoleAppender
log4j.appender.stdout.Target=System.out
log4j.appender.stdout.layout=org.apache.log4j.PatternLayout
log4j.appender.stdout.layout.ConversionPattern=%d{yyyy-MM-dd HH:mm:ss} %-5p %c{1}:%L - %m%n

# Redirect log messages to a log file
log4j.appender.file=org.apache.log4j.RollingFileAppender
#outputs to Tomcat home
log4j.appender.file.File=${catalina.home}/logs/myapp.log
log4j.appender.file.MaxFileSize=5MB
log4j.appender.file.MaxBackupIndex=10
log4j.appender.file.layout=org.apache.log4j.PatternLayout
log4j.appender.file.layout.ConversionPattern=%d{yyyy-MM-dd HH:mm:ss} %-5p %c{1}:%L - %m%n
Build Application
Run mvn clean install command to clean and build the war file
Deploy Application
Deploy the generated war file in a server like tomcat and hit the URL http://localhost:8080/SpringRestJwt/greet/Chinna
Conclusion
That’s all folks. In this article, we have developed a simple Spring REST service without using Spring Boot. Thank you for reading