Docker simplifies and accelerates our workflow while giving developers the liberty to innovate with their choice of tools, application stacks, and deployment environments for every project. Docker uses storage drivers to manage the contents of the image layers and the writable container layer. In this blog, I’ve covered everything about Docker Storage. There are many places inside Docker (both at the engine level and container level) that use or work with storage.
What Are Containers
Historically, application development, availability & reliability was getting difficult. So we had to come up with better tools that why containers were born. A container is a standard unit of software that packages up code and all its dependencies so the application runs quickly and reliably from one computing environment to another. The container is an important topic to know to start ur learning with Docker and Kubernetes.
Note: Know more about Containers and Docker Vs Virtual Machines
Docker Overview

Docker is an open platform for developing, shipping, and running applications. Docker enables you to separate your applications from your infrastructure so you’ll deliver software quickly. With Docker, you’ll manage your infrastructure within the same ways you manage your applications. It provides the power to package and run an application during a loosely isolated environment called a container.
Also read: AKS Cluster is a Kubernetes cluster, which is created on the Azure Kubernetes Service (AKS) by Microsoft is one of the leading managed K8s services.
What Is Docker Storage?

Containers don’t write data permanently to any storage location. Docker storage must be configured if you would like your container to store data permanently. The data doesn’t prevail when the container is deleted (using the remove command); this happens because when the container is deleted, the writable layer is also deleted. If the data is stored outside the container you can use it even if the container no longer exists.
If a container crashes and can’t be restored/restarted the data is gone! But, normally containers can be restarted and continued – in that case, the data is not lost. So, it’s always advisable moreover mandatory to mount the data outside the container.
For instance, the following sequence from the docker docs illustrates how container startup work. Note that the data is not lost here until the container is removed.
  # Start a new container
  $ JOB=$(sudo docker run -d ubuntu /bin/sh -c "while true; do echo Hello world; sleep 1; done")

  # Stop the container
  $ sudo docker stop $JOB

  # Start the container
  $ sudo docker start $JOB

  # Restart the container
  $ sudo docker restart $JOB

  # SIGKILL a container
  $ sudo docker kill $JOB

  # Remove a container
  $ sudo docker stop $JOB # Container must be stopped to remove it
  $ sudo docker rm $JOB
Whenever you execute a docker run the command you start a new container with fresh data. The data is based on the image you provide and that data is consistent unless you rebuild the image.
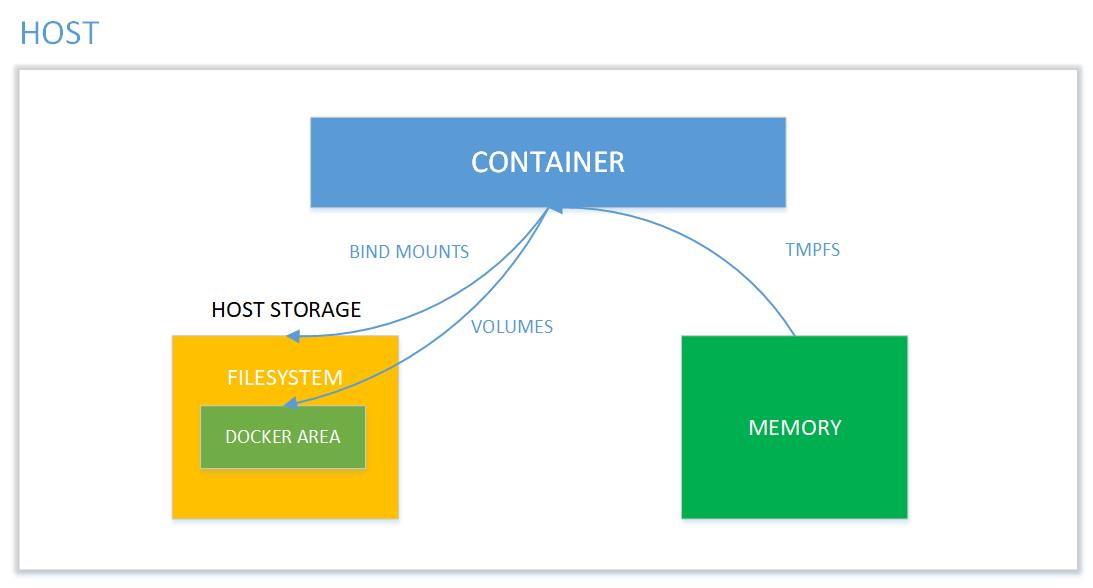
If you are wondering why can’t containers just hold all the data, it is because the containers are designed to be small, run quickly, with all backend storage outside the container. When defined without Docker storage, containers store their data in so-called layers for which they need a storage driver. However, it’s possible to preserve the condition of the container in 3 ways. The primary 2 ways use the host’s storage space: Volumes and Bind Mounts. The third way writes directly on to the host memory (tmpfs) and may be used for security reasons.
So, how should you set up a docker to keep your data intact? Let us learn about how to tackle this in the upcoming part of the blog!
Read this blog to know about what is Kubernetes Pod which is an important component of Kubernetes.
Manage Data In Docker
By default, all files created inside a container are stored on a writable container layer. This suggests that:
- The data doesn’t persist when that container no longer exists, and are often difficult to urge the data out of the container if another process needs it.
- A container’s writable layer is tightly coupled to the host machine where the container is running. You can’t easily move the data somewhere else.
- Writing into a container’s writable layer requires a storage driver to manage the filesystem.
Docker Storage Types

Docker storage distinguishes three storage types. Two types are permanent: Docker volumes and bind Mounts and the third way of writing data is tmpfs. From the container perspective, it doesn’t know what sort of storage is in use.
The difference between these is, volumes have a dedicated filesystem on the host (/var/lib/ docker/volumes) and are directly controlled through the Docker CLI. On the other hand, bind mounts use any available host filesystem. Whereas tmfs, uses the host memory.
Docker Volume Use Case
Docker volume is the most commonly used technology for the permanent storage of container data. Docker volume is managed by Docker itself and has a dedicated filesystem on the host, doesn’t depend upon the filesystem structure on the host. Docker volumes are explicitly managed via the Docker command line and can be created alone or during container initialization. The command used is docker volume create.
When stopping or deleting a container, Docker volume remains permanently stored. The volumes are often manually deleted with the docker volume prune command. Multiple containers can be connected to the same Docker volume.
| Command | Description |
| docker volume create | Create a volume |
| docker volume inspect | Display detailed information on one or more volumes |
| docker volume Is | List volumes |
| docker volume prune | Remove all unused local volumes |
| docker volume rm | Remove one or more volumes |
Docker Volume Use Cases
- To share data between multiple containers.
- Backup and restore data.
- Connect to a remote location (cloud).
- Dedicated container-only filesystem.
Check Out: What is Docker Compose? Click here
Docker Bind Mount
Docker bind mount is the second permanent storage option but with more limited options than Docker volume. It can’t be managed via Docker CLI and is totally dependent on the availability of the filesystem of the host. A host filesystem can be created when running a container. Bind mounts are a sort of superset of Volumes (named or unnamed).
Commands:
bind mount: note that the host path should start with ‘/’. Use $(pwd) for convenience.
docker container run -v /host-path:/container-path image-nameunnamed volume: creates a folder in the host with an arbitrary name
docker container run -v /container-path image-namenamed volume: should not start with ‘/’ as this is reserved for bind mount. ‘volume-name’ is not a full path here. the command will cause a folder to be created with path “/var/lib/docker/volume-name” in the host.
docker container run -v volume-name/container-path image-nameAlso Check: Docker Tutorial for Beginners. Click here
tmpfs Mounts
tmpfs is a third storage option that is not permanent like Docker volume or bind mount. The data is written directly on to the host’s memory and deleted when the container is stopped. Very useful when it involves sensitive data that you simply don’t want to be permanent. A really significant difference is that containers can’t share tmpfs space unless they’re running on Linux OS. Two flags are used when creating tmpfs volume: tmpfs and mount. Mount flag is newer and supports multiple options during container startup. Temporary filesystems are written to RAM (or to your swap file if RAM is filling up) and not to the host or the container’s own filesystem layer at Docker.com: Docker tmpfs.
Commands:
docker run -d --name tmptest --mount type=tmpfs,destination=/app nginx:latestdocker run -d --name tmptest --tmpfs /app nginx:latestNetwork File System (NFS)

When you create a container, you are going to be fairly limited to the amount of space in that container. This is exacerbated when you run multiple containers on the same host. So, to get around that, you could mount an NFS share at the start of the container. With NFS, my storage limits are only what my storage provider dictates. Access to a unified set of data across all containers. One thing you’ll notice while learning Docker is that the container OS is nothing like a virtual machine. These containers are essentially thin clients and are missing some functionality by design.
Creating The NFS Docker Volume :
Here is the command to create an NFS type Docker volume in reading / write access from an existing NFS export :
# docker volume create --driver local --opt type=nfs --opt o=addr=<adresse ip serveur nfs>,rw --opt device=:<chemin export nfs> <nom du volume NFS Docker>Check Out: How to fix Vulnerabilities in Docker Images. Click here
Docker Storage Driver

Docker storage driver is liable for creating a container write layer to log all the changes during container runtime. When a container is started with an image, all layers that are part of the image are locked and read-only. Changes are written to the recording layer and deleted when the container is stopped. The driver creates a Union filesystem that allows filesystems to be shared from all layers. This is the default way to store data in a container unless the storage technologies described above are used. It’s important to notice that an additional driver layer brings additional performance overhead. It’s not recommended to use the default storage option for write-intensive containers like database systems.