Have you ever wondered where does your data get stored on the cloud? I am sure you must have. So, let me help those who are curious about it.
In this post, we will discuss one of the Storage Services in Azure provided by Microsoft.
Microsoft offers various options to its users to store their data like Azure Blob Storage, Disk Storage, File Storage, Queue Storage, and Table Storage. Each storage option has different capabilities and specific objectives.
Azure Blob Storage
Binary Large Object is the storage arena for text, audio, images, and video. Every blob resides inside a container. Blob storage act as the persistent store, where the data is stored for a long time. Three options include Private, Public Container, and Public Blob.
One of the advantages of Blob Storage is that it offers zone-wise redundant processes. Different copies of data are created in the same zone or across two separate zones in a zone redundant. So, creating copies in two distinct zones helps in data recovery. If one of the zones faces any failure, then the Azure redundant process can still help retain data. It even allows data read options from another location.

There are many ways to access data in Blob Storage, for example, through Storage Explorer, by building an SDK tool kit or using PowerShell. With the help of PowerShell, we can also manage and supervise the Azure storage account.
Blob Storage Features
The vital features of Blob Storage are as follows:
- Store Unstructured Data – All the unstructured data like images, videos, and audio can be stored in Blob.
- Scalable and Availability – It has a zone replication process that helps store the copy of data and stands on high availability characteristics.
- Secured – Blob provides utmost security by following encryption technology, RBAC, and Active Directory.
- Data Lake Optimisation – It also supports a multi-protocol access system that helps provide insights into the workloads. File namespace and WORM also help in optimising the data.
- Cloud Applications – Moreover, it is built keeping in mind the storage demand for developing mobile and web applications. Blob Storage also supports various languages such as Python, Java, Node.Js, and .Net. To conduct low-latency sessions, Blob is built with SSD storage toes.
- Cost-effectiveness – Blob storage contains different tiers that help store a massive amount of data in a cost-efficient manner. Due to its lifecycle management, it becomes easy to manage those huge volume data.
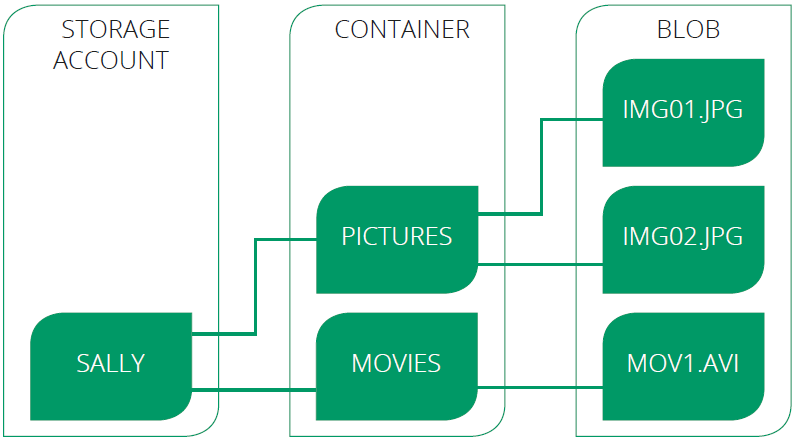
Resources of Blob Storage
Blob storage includes three types of resources explained below:

- Storage Account – In Storage Account, you specify the namespace for the data. Objects stored in Azure Storage will have unique address linked to the individual account.
- Container – It acts as a directory that helps establish and manage the blobs. The storage account can contain numerous containers, which can hold blobs of various range. Container’s names are always specified in lowercases.
- Blob – Blobs are objects in the form of unstructured data, including images, audio, video, and files. The different solutions for migrating the data into the Azure Blob Storage include Azure Data Factory, AzCopy, BlobFuse, Azure service, Azure Data Box, etc.
Types of Blob Storage
There are three types of Blob Storage, as explained below:
- Block Blobs – In this storage option, individual blocks with unique IDs are created. It is mainly used for uploading big-size data. Block Blob stores data in block series and then conglomerate them into a single document file. Block Blob helps in achieving throughput and uploading the process faster. The size of the Block Blob is 200 GB.
- Page Blobs – They are the default type and used for page compilation. Page Blob is used for conducting a read and write operation. Data of the virtual machines are stored as virtual documents and files on the page blob. It can store files of size 8 TiB. For the virtual machine, it acts as disks.
- Append Blobs – The Append Blob is specifically customized to increase efficiency. It can also help in logging the data directly from the VMs.
Blob Storage Pricing
Hot Access – Data that is frequently used is stored in hot storage. It stores data utilized during migration processing. The storage cost is higher than Cool and Archive access but, the access cost is lower than the other two.
Cool Access – This tier helps store the data that is not accessed frequently. Its storage cost is lower, but the access cost is more than the Hot tier. It contains data that is going to stay for 30 days or more.
Archive Access – Data in this tier is stored for more than 180 days. The data stored in this tier are seldom accessed. It has a lower storage cost but a higher accessing cost. Also, it takes time while retrieving the data because data is often considered to be in offline mode.
Why Choose Azure Blob Storage?
Microsoft provides so many storage options, like File, Disk, Archive, etc. Hence it is necessary to understand when should one opt for Blob Storage. Here are the following instances:
- Azure Blob Storage is created for storing unstructured data. One can opt for Blob Storage for streaming audio and video files.
- Likewise, Blob storage is also used for storing data during backup, archiving, restoring, and recovering. Extensive volume data used for analysis by Azure services are also stored here.
- Similarly, one can go for Blob Storage when uploading large files. Azure Blob storage breaks the large files into smaller chunks, and these chunks get uploaded individually. After uploading these chunks, they get merged into a single initial file.
- Blob storage is also used to serve images directly to gateways.
- Azure Blob storage also allows the storage of files and documents for providing distributed access.
- In addition to it, it can also be used for off-loading excess content from the servers to minimise the load.
- It is also used for Big Data analysis by Azure Data Lake, an extension of Azure Blob Storage.
Note: Learn more about Azure Data Lake.
Steps To Create Azure Blob Storage
Step 1) Log in to Azure Portal (Please make sure you have a subscription before doing all this. If you created a free account for the first time, you’ll already have a FREE TRIAL subscription for 1 month).
Step 2) The first and foremost step in creating Blob Storage is setting up the ‘Storage Account’. To create one, log in to the Azure portal, then click on ‘Storage Accounts‘.

Step 3: After clicking on Storge Account, the following screen will appear and then click on ‘+ New‘ to proceed further.

Step 4: After clicking on New, it will take you to the next page and asks you to fill in the following details:
- Subscription – It tells you about the billing, invoice details, and the current subscription.
- Resource Group – If you are creating a new resource group, it will show (New) before the name.
- Storage Account name – Specify the name of the account.
- Region – Specify your region or location.
- Performance – It offers two types of performance option. Standard (uses HDD Hard Disk Drives to store data) Premium ( uses SSD Solid-State Drives to store data)
- Redundancy – Through Redundancy, Azure ensures that data is protected at times of failure.
Click on ‘Create‘, after filling in all the details.

Step 5: Azure Storage Account provides four types of Redundancy Storage as shown in the below sample. We will go with Geo-redundant Storage (GRS) for the demo purpose.

Step 6: When you click on the ‘Create’ button, it takes you to the next screen that shows the deployment status. After deployment gets completed, click on ‘Go to resource‘.

Step 7: The following screen will appear, showing an ‘Overview’ of the created Storage Account. The next step is to click on ‘Containers‘ to select Blob Storage. We have chosen the ‘Hot Access‘ tier for a demo purpose. One can choose according to their requirements.

Step 8: Now, we have to create a new Container for that click on ‘+ Container‘.

Step 9: After clicking on + Container, it will ask to fill in the container’s name (it should be unique) and select access level. For the demo purpose, we have selected Blob Public Level access. Click ‘Create‘ to proceed further.

Step 10: Hence we have successfully created the blob storage as we can see container k21 appears under the storage.

Step 11: Next, select the Storage Account and click on ‘ Access keys‘ to find the connection string. Website’s code gets authenticated to interact with created Storage Account through this Connection Strings. All you need to do here is copy the connection string and paste it into the website’s code, and you are good to go.

Conclusion
Companies are growing and moving towards a better digital platform. With the evolving world of the Internet and Cloud, companies now need multi-layer patterns and applications to fit business needs. I think Azure Blob Storage helps achieve and leverage the growing demand of the business data and provides a platform for its storage. Due to its availability and accessibility capabilities, it has become a hot choice for the companies and has accomplished their business need. I hope this blog has enhanced your understanding of Azure Blob Storage. Keep Reading.