You might be using Azure for various reasons, and there might be a time when you get stuck in deploying the required resources. This blog will help you learn about ARM (Azure Resource Manager) templates and how they are beneficial in automating the deployment. I will cover the following topics in this blog.
What are ARM Templates?

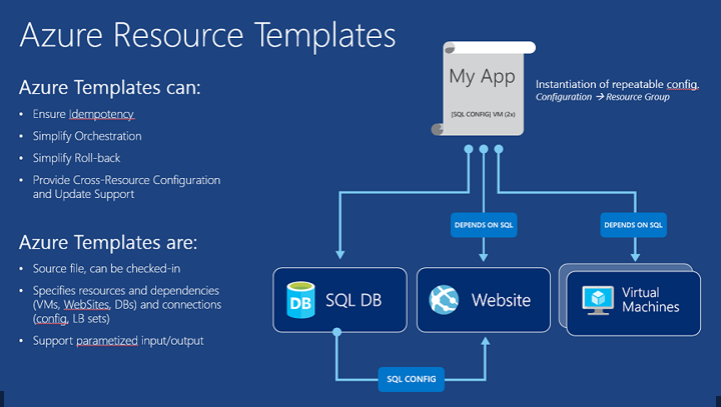
ARM (Azure Resource Manager) template is a block of code that defines the infrastructure and configuration for your project. These templates use a declarative syntax to let you define your deployment in the form of JSON (JavaScript Object Notation) files. All the resources and their properties are defined in this template. This helps in automating the deployment process in a constant flow.
Advantages of ARM Template
ARM Template provides multiple advantages over the deployment process.
- Using ARM Templates, we can declare network infrastructure, storage and any other resources.
- Over the development lifecycle, ARM Templates allows the deployment of resources repeatedly in a consistent manner.
- User can deploy templates parallelly, and only one command is sufficient to deploy all your resource settings.
- Templates can be divided into different modules. In other words, templates can be broken into multiple templates so that a parent template can consist of small templates.
- The PowerShell or Bash Scripts can be added to the templates using deployment scripts.
- The working of ARM Templates can be tested using the ARM template toolkit.
- A user can see the preview of the template. All the resources that are being created or deleted in this template will be shown in the preview.
- A user can integrate templates with Continuous Integration (CI) and Continuous Deployment (CD) tools to automate the release.
Also Read: Our blog post on Azure Networking.
Understanding ARM Template
If you are familiar with programming and codes, it will be easier for you to understand the template code. If not, then I will explain you in short and simple terms.
Template Format
The ARM Template file contains various key-value pairs in the JSON format. For example, below, you can see a format of an ARM Template.
{
"$schema": "https://schema.management.azure.com/schemas/2015-01-01/deploymentTemplate.json#",
"contentVersion": "1.0.0",
"parameters":{},
"variables":{},
"functions":[],
"resources": [],
"outputs":{}
}- Schema – This ‘schema’ defines the location of the JSON file and specifies the version of the template language that you want to use in this template. This schema depends on the purpose of your deployment. Some schema types are listed below.
- Resource Group Deployment – https://schema.management.azure.com/schemas/2019-04-01/deploymentTemplate.json#
- Subscription Group Deployment – https://schema.management.azure.com/schemas/2018-05-01/subscriptionDeploymentTemplate.json#
- Management Group Deployment – https://schema.management.azure.com/schemas/2019-08-01/managementGroupDeploymentTemplate.json#
- Tenant Group Deployment – https://schema.management.azure.com/schemas/2019-08-01/tenantDeploymentTemplate.json#
- Content Version – It specifies the version of the templates. This version can be any number that you want to give to your template.
Parameters
Parameters in a template define the configuration. These parameters are used in run time or during deployment. In a parameter, we need to define the name, type, values and properties. We can also set some allowed values and default values to the parameters, so when a value is not passed during deployment, then the default or allowed values will be used. Below is an example of parameters that defines the type and the default value of username and password for the VM (Virtual Machine).
"parameters": {
 "adminUsername": {
  "type": "string",
  "defaultValue": "Admin",
  "metadata": {
   "description": "Username for the Virtual Machine."
    }
  },
  "adminPassword": {
   "type": "securestring",
   "defaultValue": "12345",
   "metadata": {
    "description": "Password for the Virtual Machine."
    }
  }
}
Variables
Variables define values used throughout the template. In simple words, you can define a short name for a specific value that can be used anywhere in the template. Variables also become an advantage when you want to update all the values and reference in a template. Then you can update the variable and its value only.
"variables": {
 "nicName": "myVMNic",
 "addressPrefix": "10.0.0.0/16",
 "subnetName": "Subnet",
 "subnetPrefix": "10.0.0.0/24",
 "publicIPAddressName": "myPublicIP",
 "virtualNetworkName": "MyVNet"
}
Functions
In a template, the function contains the steps and procedures to be followed. It is just like a variable that defines the steps performed when called in a template. The below example of the function defines the unique name for the resources.
"functions": [
 {
  "namespace": "contoso",
  "members": {
   "uniqueName": {
    "parameters": [
      {
       "name": "namePrefix",
       "type": "string"
      }
    ],
    "output": {
     "type": "string",
     "value": "[concat(toLower(parameters('namePrefix')), uniqueString(resourceGroup().id))]"
         }
       }
     }}],
Resources
All the azure resources are defined here that makes the deployment. For creating a resource, we need to set up the type, name, location, version and properties of the resource that needs to be deployed. We can also use the variables and parameters here that are defined in the ‘variables’ section. Below is the example of declaring the resources in a template.
"resources": [
 {
  "type": "Microsoft.Network/publicIPAddresses",
  "name": "[variables('publicIPAddressName')]",
  "location": "[parameters('location')]",
  "apiVersion": "2018-08-01",
  "properties": {
    "publicIPAllocationMethod": "Dynamic",
    "dnsSettings": {
    "domainNameLabel": "[parameters('dnsLabelPrefix')]"
    }
  }
}
],
Outputs
Output defines the result that you want to see when a template runs. In simple words, the final words that you want to see when a template is successfully deployed. In the below example, the hostname with a value fetched from the public IP address name.
"outputs": {
 "hostname": {
  "type": "string",
  "value": "[reference(variables('publicIPAddressName')).dnsSettings.fqdn]"
 }
}
Also Check: What is Azure Service Bus?
Azure Quickstart Templates
Azure Quickstart Templates are ready to deploy sample templates. The Microsoft community creates these templates. You will find various Azure Quickstart templates on Microsoft’s official site like creating a VM (Virtual Machine), deploying the VM, etc. A beginner can use these quickstart templates to get familiar with the concept.
You can visit the portal from here.
After visiting the Azure QuickStart Template portal, you will see some template samples. Click on any sample and then choose ‘Browse on Github‘. Next, you can click on the ‘Visualize‘ button to see the preview of templates. Finally, you can choose the ‘Deploy‘ option to deploy the template to your Azure Portal.
Also Read: Our blog post on Azure Bastion.
Create and Deploy ARM Templates
After learning the format of the ARM Templates, we are ready to learn the process of creating and deploying ARM templates. For writing a template, any JSON editor will work. Also, Visual Studio Code is a tool provided by Microsoft for writing codes in various formats, including JSON. You can get Visual Studio Code from the official Microsoft website or store. No tool is required by the users with access to Azure Portal as the platform already contains built-in editors. So, we will use Azure Portal in this blog and assume that you have Azure access. Now, visit and log in to your Azure Portal. Then, follow the steps with us to create and deploy ARM Templates.
Create Resource
Cross-check the highlighted URL in the image below. Now, the first step is to create resources in the Azure Portal.

Check the above image. You will find the options to create a resource in Azure Portal. Click on the ‘Create a Resource‘ button.

In the next window, you will see various options listed to create a resource. Some of these options are to create Windows, Ubuntu, Web App, SQL Database etc. We will use a template for creating resources, so click on the search bar. Search template and click on ‘Template Deployment (deploy using custom template)’ as highlighted in the above image.

Template Deployment (deploy using custom template) window will open up. Now, click on the ‘Create‘ button as shown in the above image.
Build Your Own Template
Azure Portal will show the ‘Custom Deployment‘ window after clicking the ‘Create‘ button in the previous steps.

To create a template from scratch, click on the ‘Build your own template in the editor‘ option as highlighted in the above image. Also, if you want to import your own create a template, you can pick the same option.

Now, Azure Portal will open the ‘Template Editor‘ window. Here a simple format of the ARM Template will be available in the editor. Using the format, you can write and add your own code in the editor. The highlighted menu at the top in the above image are options that you can pick to add a resource, use a quickstart template, load your template file and download the created template.
Use QuickStart Template
Creating a template from scratch might be complicated for you, especially when you are a beginner. In Azure Portal, you can use quickstart templates instead of creating a template from the start.

For using quickstart templates, instead of opting for the ‘Build your own template in the editor‘, we will follow the below steps.
Step 1) Click on the ‘Quickstart template‘ radio button.
Step 2) Click on the drop-down button to see all the quickstart templates you can use. Next, search for the template that you want to use. Here, we choose a basic template to create a storage account and enable security on it.
Step 3) Click on the ‘Edit template‘ to modify and make changes in your quickstart template before deploying.

In the template editor window, you can make the required changes. On the left side of the editor window are the parameters, variables and resources that this code will create. You can also use the above menu for downloading this template. When you are ready with the template code, click on the ‘Save‘ button as highlighted in the above image. After saving the template, another window will open to confirm all the resources that this template will create. After completing all the verification, you are ready to deploy your template and purchase the resources.
Conclusion
ARM Templates is a JSON file that orders Azure Manager to create, update and deploy resources. From this blog, we learned about ARM Template and why they are useful in deploying the resources. Also, we are now familiar with the template and how we can create and deploy it in Azure.