Introduction
As probably you know that building a software project typically consists of such tasks as downloading dependencies, putting additional jars on a classpath, compiling source code into binary code, running tests, packaging compiled code into deployable artifacts such as a JAR, WAR, and ZIP files, and deploying these artifacts to an application server or repository.
Apache Maven automates these tasks, minimizing the risk of humans making errors while building the software manually and separating the work of compiling and packaging our code from that of code construction.
What is Maven?
Apache Maven is a software project management and comprehension tool and as such provides a way to help with managing:
- Builds
- Documentation
- Reporting
- Dependencies
- SCMs
- Releases
- Distribution
A more formal definition of Apache Maven: Maven is a project management tool which encompasses a project object model, a set of standards, a project lifecycle, a dependency management system, and logic for executing plugin goals at defined phases in a lifecycle. When you use Maven, you describe your
a project using a well-defined project object model, Maven can then apply cross-cutting logic from a set of shared (or custom) plugins.
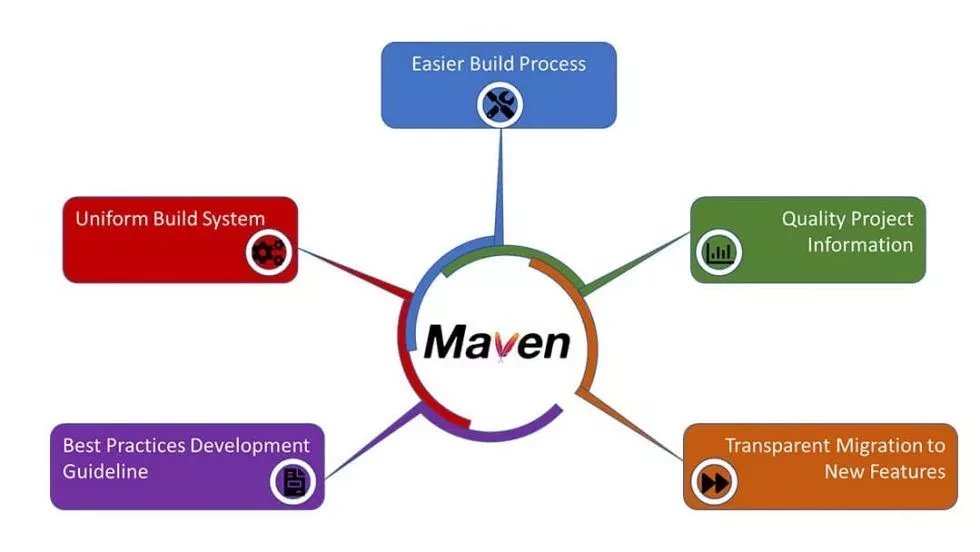
Maven’s Objectives
Maven’s primary goal is to allow a developer to comprehend the complete state of a development effort in the shortest period of time. In order to attain this goal there are several areas of concern that Maven attempts to deal with:
- Making the build process easy
- Providing a uniform build system
- Providing quality project information
- Providing guidelines for best practices development
- Allowing transparent migration to new features
What is the Build Tool?
A build tool takes care of everything for building a process. It does the following:
- Generates source code (if the auto-generated code is used)
- Generates documentation from source code
- Compiles source code
- Packages compiled code into a JAR of a ZIP file
- Installs the packaged code in the local repository, server repository, or central repository
Key features of Maven
Apache Maven can be used in environments where common build tools like GNU Make or Apache Ant were used. The key features of Maven are:
- Convention over configuration: Maven tries to avoid as much configuration as possible, by choosing real-world default values and supplying project templates (archetypes).
- Dependency management: It is possible to define dependencies to other projects. During the build, the Maven build system resolves the dependencies and it also builds the dependent projects if needed.
- Repository: Project dependencies can be loaded from the local file system, from the Internet or public repositories. The company behind the Maven project also provides a central repository called Maven Central.
- Extensible via plug-ins: The Maven build system is extensible via plug-ins, which allows keeping the Maven core small. The Maven core does for example not know how to compile Java source code, this is handled by the compiler plug-in
Comparing Maven with Ant
Let’s compare Maven and Ant with an example so that you can understand easily. When you use Ant, you supply Ant with specific instructions for compiling and packaging your output. Look at the following example of a simple build.xml file:
<project name="my-project" default="dist" basedir=".">
	<description>simple example build file</description>
	<!-- set global properties for this build -->
	<property name="src" location="src/main/java" />
	<property name="build" location="target/classes" />
	<property name="dist" location="target" />
	<target name="init">
		<!-- Create the time stamp -->
		<tstamp />
		<!-- Create the build directory structure used by compile -->
		<mkdir dir="${build}" />
	</target>
	<target name="compile" depends="init" description="compile the source ">
		<!-- Compile the java code from ${src} into ${build} -->
		<javac srcdir="${src}" destdir="${build}" />
	</target>
	<target name="dist" depends="compile" description="generate the distribution">
		<!-- Create the distribution directory -->
		<mkdir dir="${dist}/lib" />
		<!-- Ouput into ${build} into a MyProject-${DSTAMP}.jar file -->
		<jar jarfile="${dist}/lib/MyProject-${DSTAMP}.jar" basedir="${build}" />
	</target>
	<target name="clean" description="clean up">
		<!-- Delete the ${build} and ${dist} directory trees -->
		<delete dir="${build}" />
		<delete dir="${dist}" />
	</target>
</project>
In this simple Ant example, you can see how you have to tell Ant exactly what to do. There is a compile goal which includes the javac task that compiles the source in the src/main/java directory to the target/classes directory.
You have to tell Ant exactly where your source is, where you want the resulting bytecode to be stored, and how to package this all into a JAR file. While there are some recent developments that help make Ant less procedural, a developer’s experience with Ant is in coding a procedural language written in XML.
Contrast the previous Ant example with a Maven example. In Maven, to create a JAR file from some Java source, all you need to do is create a simple pom.xml, place your source code in ${basedir}/ src/main/java and then run mvn install from the command line.
The same Ant example can be achieved using maven in a very simple way:
<project>
    <modelVersion>4.0.0</modelVersion>
    <groupId>org.sonatype.mavenbook</groupId>
    <artifactId>my-project</artifactId>
    <version>1.0-SNAPSHOT</version>
</project>
Running mvn install from the command line will process resources, compile the source, execute unit tests, create a JAR, and install the JAR in a local repository for reuse in other projects.
The differences between Ant and Maven in this example are:
Apache Ant
- Ant doesn’t have formal conventions like a common project directory structure or default behavior. You have to tell Ant exactly where to find the source and where to put the output. Informal conventions have emerged over time, but they haven’t been codified into the product.
- Ant is procedural. You have to tell Ant exactly what to do and when to do it. You have to tell it to compile, then copy, then compress.
- Ant doesn’t have a lifecycle. You have to define goals and goal dependencies. You have to attach a sequence of tasks to each goal manually.
Apache Maven
- Maven has conventions. It knows where your source code is because you followed the convention. Maven’s Compiler plugin put the bytecode in
target/classes, and it produces a JAR file in a target. - Maven is declarative. All you had to do was create a
pom.xmlfile and put your source in the default directory. Maven took care of the rest. - Maven has a lifecycle which was invoked when you executed
mvn install.This command told Maven to execute a series of sequential lifecycle phases until it reached the install lifecycle phase. As a side effect of this journey through the lifecycle, Maven executed a number of default plugin goals which did things like compile and create a JAR.
Project Object Model – Pom.xml
The configuration of a Maven project is done via a Project Object Model (POM), represented by a pom.xml file. The POM describes the project, manages dependencies, and configures plugins for building the software. The POM also defines the relationships among modules of multi-module projects. Let’s look at the basic structure of a typical POM file:
<project
    xmlns="http://maven.apache.org/POM/4.0.0"
    xmlns:xsi="http://www.w3.org/2001/XMLSchema-instance"
  xsi:schemaLocation="http://maven.apache.org/POM/4.0.0 http://maven.apache.org/xsd/maven-4.0.0.xsd">
    <modelVersion>4.0.0</modelVersion>
    <groupId>com.favtuts.hibernate</groupId>
    <artifactId>hibernate-tutorial</artifactId>
    <version>0.0.1-SNAPSHOT</version>
    <packaging>pom</packaging>
    <name>hibernate-tutorial</name>
    <url>http://maven.apache.org</url>
    <properties>
        <project.build.sourceEncoding>UTF-8</project.build.sourceEncoding>
    </properties>
    <dependencies>
        <dependency>
            <groupId>junit</groupId>
            <artifactId>junit</artifactId>
            <version>3.8.1</version>
            <scope>test</scope>
        </dependency>
    </dependencies>
    <modules>
        <module>hibernate-xml-config-example</module>
        <module>hibernate-java-config-example</module>
        <module>hibernate-save-entity-example</module>
    </modules>
    <build>
        <sourceDirectory>src/main/java</sourceDirectory>
        <plugins>
            <plugin>
                <artifactId>maven-compiler-plugin</artifactId>
                <version>3.5.1</version>
                <configuration>
                    <source>1.8</source>
                    <target>1.8</target>
                </configuration>
            </plugin>
        </plugins>
    </build>
</project>
Let’s take a closer look at these constructs.
Project Identifiers
Maven uses a set of identifiers, also called coordinates, to uniquely identify a project and specify how the project artifact should be packaged:
- groupId – a unique base name of the company or group that created the project
- artifactId – a unique name of the project
- version – a version of the project
- packaging – a packaging method (e.g. WAR/JAR/ZIP)
The first three of these (groupId:artifactId:version) combine to form the unique identifier and are the mechanism by which you specify which versions of external libraries (e.g. JARs) your project will use.
Dependencies
These external libraries that a project uses are called dependencies. The dependency management feature in Maven ensures automatic download of those libraries from a central repository, so you don’t have to store them locally. This is a key feature of Maven and provides the following benefits:
- uses less storage by significantly reducing the number of downloads off remote repositories
- makes checking out a project quicker
- provides an effective platform for exchanging binary artifacts within your organization and beyond without the need for building artifact from source every time.
In order to declare a dependency on an external library, you need to provide the groupId, artifactId, and the version of the library.
Let’s take a look at an example:
<dependencies>
    <!-- https://mvnrepository.com/artifact/mysql/mysql-connector-java -->
    <dependency>
        <groupId>mysql</groupId>
        <artifactId>mysql-connector-java</artifactId>
        <version>8.0.13</version>
    </dependency>
    <!-- https://mvnrepository.com/artifact/org.hibernate/hibernate-core -->
    <dependency>
        <groupId>org.hibernate</groupId>
        <artifactId>hibernate-core</artifactId>
        <version>5.3.7.Final</version>
    </dependency>
</dependencies>
As Maven processes the dependencies, it will download Hibernate library into your local Maven repository.
Repositories
A repository in Maven is used to hold build artifacts and dependencies of varying types. The default local repository is located in the .m2/repository folder under the home directory of the user. If an artifact or a plug-in is available in the local repository, Maven uses it. Otherwise, it is downloaded from a central repository and stored in the local repository. The default central repository is a Maven Central. Some libraries, such as JBoss server, are not available at the central repository but are available at an alternate repository. For those libraries, you need to provide the URL to the alternate repository inside the pom.xml file:
<repositories>
    <repository>
        <id>JBoss repository</id>
        <url>http://repository.jboss.org/nexus/content/groups/public/</url>
    </repository>
</repositories>
Please note that you can use multiple repositories in your projects.
Properties
Custom properties can help to make your pom.xml file easier to read and maintain. In the classic use case, you would use custom properties to define versions for your project’s dependencies. Maven properties are value-placeholders and are accessible anywhere within a pom.xml by using the notation ${name}, where a name is the property. Let’s see an example:
<properties>
    <springboot.version>2.1.0.RELEASE</springboot.version>
</properties>
<dependencies>
    <dependency>
        <groupId>org.springframework.boot</groupId>
        <artifactId>spring-boot-starter-web</artifactId>
        <version>${springboot.version}</version>
    </dependency>
    <dependency>
        <groupId>org.springframework.boot</groupId>
        <artifactId>spring-boot-starter-test</artifactId>
        <version>${springboot.version}</version>
    </dependency>
</dependencies>
Now if you want to upgrade Spring to a newer version, you only have to change the value inside the <spring.version> property tag and all the dependencies using that property in their tags will be updated. Properties are also often used to define build path variables:
<properties>
    <project.build.folder>${project.build.directory}/tmp/</project.build.folder>
</properties>

<plugin>
    //...
    <outputDirectory>${project.resources.build.folder}</outputDirectory>
    //...
</plugin>
Build
The build section is also a very important section of the Maven POM. It provides information about the default Maven goal, the directory for the compiled project, and the final name of the application. The default build section looks like this:
<build>
    <defaultGoal>install</defaultGoal>
    <directory>${basedir}/target</directory>
    <finalName>${artifactId}-${version}</finalName>
    <filters>
        <filter>filters/filter1.properties</filter>
    </filters>
    //...

</build>
The default output folder for compiled artifacts is named the target, and the final name of the packaged artifact consists of the artifactId and version, but you can change it at any time.
Using Profiles
Another important feature of Maven is its support for profiles. A profile is basically a set of configuration values. By using profiles, you can customize the build for different environments such as Production/Test/Development:
<profiles>
    <profile>
        <id>production</id>
        <build>
            <plugins>
                <plugin>
                //...
                </plugin>
            </plugins>
        </build>
    </profile>
    <profile>
        <id>development</id>
        <activation>
            <activeByDefault>true</activeByDefault>
        </activation>
        <build>
            <plugins>
                <plugin>
                //...
                </plugin>
            </plugins>
        </build>
    </profile>
</profiles>
As you can see in the example above, the default profile is set to develop. If you want to run the production profile, you can use the following Maven command:
mvn clean install -PproductionStandard Directory Layout
We’ll explore the standard directory layout of a typical Maven project. Having a common directory layout would allow for users familiar with one Maven project to immediately feel at home in another Maven project. The advantages are analogous to adopting a site-wide look-and-feel.
A typical Maven project has a pom.xml file and a directory structure based on defined conventions:
└───maven-project
    ├───pom.xml
    ├───README.txt
    ├───NOTICE.txt
    ├───LICENSE.txt
    └───src
        ├───main
        │   ├───java
        │   ├───resources
        │   ├───filters
        │   └───webapp
        ├───test
        │   ├───java
        │   ├───resources
        │   └───filters
        ├───it
        ├───site
        └───assembly
The Root Directory
This directory serves as the root of every Maven project. Let’s take a closer look at the standard files and subdirectories that are typically found at root:
maven-project/pom.xml– defines dependencies and modules needed during the build lifecycle of a Maven projectmaven-project/LICENSE.txt– licensing information of the projectmaven-project/README.txt– summary of the projectmaven-project/NOTICE.txt– information about third-party libraries used in the projectmaven-project/src/main– contains source code and resources that become part of the artifactmaven-project/src/test– holds all the test code and resourcesmaven-project/src/it– usually reserved for integration tests used by the Maven Failsafe Pluginmaven-project/src/site– site documentation created using the Maven Site Pluginmaven-project/src/assembly– assembly configuration for packaging binaries
The src/main Directory
As the name indicates, src/main is the most important directory of a Maven project. Anything that is supposed to be part of an artifact, be it a jar or war, should be present here. Its subdirectories are:
src/main/java– Java source code for the artifactsrc/main/resources– configuration files and others such as i18n files, per-environment configuration files, and XML configurationssrc/main/webapp– for web applications, contains resources like JavaScript, CSS, HTML files, view templates, and imagessrc/main/filters– contains files that inject values into configuration properties in the resources folder during the build phase
The src/test Directory
The directory src/test is the place where tests of each component in the application reside. Note that none of these directories or files will become part of the artifact. Let’s see its subdirectories:
src/test/java– Java source code for testssrc/test/resources– configuration files and others used by configuration properties in the resources folder during the test phase
Summary
src/main/java | Application/Library sources |
src/main/resources | Application/Library resources |
src/main/filters | Resource filter files |
src/main/webapp | Web application sources |
src/test/java | Test sources |
src/test/resources | Test resources |
src/test/filters | Test resource filter files |
src/it | Integration Tests (primarily for plugins) |
src/assembly | Assembly descriptors |
src/site | Site |
LICENSE.txt | Project’s license |
NOTICE.txt | Notices and attributions required by libraries that the project depends on |
README.txt | Project’s readme |
Create a Maven Simple Project
On to creating your first project! In order to create the simplest of Maven projects, execute the following from the command line:
mvn -B archetype:generate \
  -DarchetypeGroupId=org.apache.maven.archetypes \
  -DgroupId=com.mycompany.app \
  -DartifactId=my-app
Note that the whole command should be a single line. After build success, we will see the below output in the command line console.
[INFO] Generating project in Batch mode
[INFO] No archetype defined. Using maven-archetype-quickstart (org.apache.maven.archetypes:maven-archetype-quickstart:1.0)
[INFO] ----------------------------------------------------------------------------
[INFO] Using following parameters for creating project from Old (1.x) Archetype: maven-archetype-quickstart:1.0
[INFO] ----------------------------------------------------------------------------
[INFO] Parameter: basedir, Value: /java/maven-projects
[INFO] Parameter: package, Value: com.mycompany.app
[INFO] Parameter: groupId, Value: com.mycompany.app
[INFO] Parameter: artifactId, Value: my-app
[INFO] Parameter: packageName, Value: com.mycompany.app
[INFO] Parameter: version, Value: 1.0-SNAPSHOT
[INFO] project created from Old (1.x) Archetype in dir: /java/maven-projects/my-app
[INFO] ------------------------------------------------------------------------
[INFO] BUILD SUCCESS
[INFO] ------------------------------------------------------------------------
[INFO] Total time:  5.522 s
[INFO] Finished at: 2022-04-28T10:38:22+07:00
[INFO] ------------------------------------------------------------------------
Once you have executed this command, you will notice a few things have happened. First, you will notice that a directory named my-app has been created for the new project, and this directory contains a file named pom.xml that should look like this:
<project xmlns="http://maven.apache.org/POM/4.0.0"
  xmlns:xsi="http://www.w3.org/2001/XMLSchema-instance"
  xsi:schemaLocation="http://maven.apache.org/POM/4.0.0
                      http://maven.apache.org/xsd/maven-4.0.0.xsd">
  <modelVersion>4.0.0</modelVersion>
  <groupId>com.mycompany.app</groupId>
  <artifactId>my-app</artifactId>
  <packaging>jar</packaging>
  <version>1.0-SNAPSHOT</version>
  <name>Maven Quick Start Archetype</name>
  <url>http://maven.apache.org</url>
  <dependencies>
    <dependency>
      <groupId>junit</groupId>
      <artifactId>junit</artifactId>
      <version>4.11</version>
      <scope>test</scope>
    </dependency>
  </dependencies>
</project>
The above pom.xml contains the Project Object Model (POM) for this project. The POM is the basic unit of work in Maven. This is important to remember because Maven is inherently project-centric in that everything revolves around the notion of a project. In short, the POM contains every important piece of information about your project and is essentially a one-stop-shopping for finding anything related to your project. Understanding the POM is important and new users are encouraged to refer to the Introduction to the POM.
This is a very simple POM but still displays the key elements every POM contains, so let’s walk through each of them to familiarize you with the POM essentials:
- project – This is the top-level element in all Maven pom.xml files.
- modelVersion – This element indicates what version of the object model this POM is using. The version of the model itself changes very infrequently but it is mandatory in order to ensure the stability of use if and when the Maven developers deem it necessary to change the model.
- groupId – This element indicates the unique identifier of the organization or group that created the project. The groupId is one of the key identifiers of a project and is typically based on the fully qualified domain name of your organization. For example,
org.apache.maven.pluginsis the designated groupId for all Maven plugins. - artifactId – This element indicates the unique base name of the primary artifact being generated by this project. The primary artifact for a project is typically a JAR file. Secondary artifacts like source bundles also use the artifactId as part of their final name. A typical artifact produced by Maven would have the form -. (for example,
myapp-1.0.jar). - packaging – This element indicates the package type to be used by this artifact (e.g. JAR, WAR, EAR, etc.). This not only means if the artifact produced is JAR, WAR, or EAR but can also indicate a specific lifecycle to use as part of the build process. (The lifecycle is a topic we will deal with further on in the guide. For now, just keep in mind that the indicated packaging of a project can play a part in customizing the build lifecycle.) The default value for the packaging element is JAR so you do not have to specify this for most projects.
- version – This element indicates the version of the artifact generated by the project. Maven goes a long way to help you with version management and you will often see the SNAPSHOT designator in a version, which indicates that a project is in a state of development. We will discuss the use of snapshots and how they work further on in this guide.
- name – This element indicates the display name used for the project. This is often used in Maven’s generated documentation.
- url – This element indicates where the project’s site can be found. This is often used in Maven’s generated documentation.
- description – This element provides a basic description of your project. This is often used in Maven’s generated documentation.
For a complete reference of what elements are available for use in the POM please refer to our POM Reference. Now let’s get back to the project at hand.
After the archetype generation of your first project you will also notice that the following directory structure has been created:
+ my-app
|-- pom.xml
`-- src
    |-- main
    |   `-- java
    |       `-- com
    |           `-- mycompany
    |               `-- app
    |                   `-- App.java
    `-- test
        `-- java
            `-- com
                `-- mycompany
                    `-- app
                        `-- AppTest.java
As you can see, the project created from the archetype has a POM, a source tree for your application’s sources, and a source tree for your test sources. This is the standard layout for Maven projects (the application sources reside in ${basedir}/src/main/java and test sources reside in ${basedir}/src/test/java, where ${basedir} represents the directory containing pom.xml). If you were to create a Maven project by hand this is the directory structure that we recommend using. This is a Maven convention and to learn more about it you can read our Introduction to the Standard Directory Layout.
How do I compile my application sources?
Change to the directory where pom.xml is created by archetype:generate and execute the following command to compile your application sources:
mvn compileYou may have encountered with compile errors:
[ERROR] COMPILATION ERROR :
[INFO] -------------------------------------------------------------
[ERROR] Source option 5 is no longer supported. Use 6 or later.
[ERROR] Target option 1.5 is no longer supported. Use 1.6 or later.
[INFO] 2 errors
[INFO] -------------------------------------------------------------
It means that:
- You are using JDK9 or later
- Your project uses maven-compiler-plugin with an old version which defaults to Java 5.
You have three options to solve this
- Downgrade to JDK7 or JDK8 (meh)
- Use maven-compiler-plugin version or later, because
NOTE: Since 3.8.0 the default value has changed from 1.5 to 1.6 See https://maven.apache.org/plugins/maven-compiler-plugin/compile-mojo.html#target
<plugin> <groupId>org.apache.maven.plugins</groupId> <artifactId>maven-compiler-plugin</artifactId> <version>3.8.0</version> </plugin> - Indicate to the maven-compiler-plugin to use source level 6 and target 6 (or later).
Best practice recommended by https://maven.apache.org/plugins/maven-compiler-plugin/Also note that at present the default source setting is 1.6 and the default target setting is 1.6, independently of the JDK you run Maven with. You are highly encouraged to change these defaults by setting source and target as described in Setting the -source and -target of the Java Compiler.
<plugin>
    <groupId>org.apache.maven.plugins</groupId>
    <artifactId>maven-compiler-plugin</artifactId>
    <configuration>
        <source>1.6</source>
        <target>1.6</target>
    </configuration>
</plugin>
or use<properties> <maven.compiler.source>1.6</maven.compiler.source> <maven.compiler.target>1.6</maven.compiler.target> </properties>
This guide on stackoverflow can help you to fix the issue. You can specify maven source/target version by adding these properties to your pom.xml file
<properties>
  <maven.compiler.source>1.6</maven.compiler.source>
  <maven.compiler.target>1.6</maven.compiler.target>
</properties>Upon executing this command you should see output like the following:
[INFO] ----------------------------------------------------------------------------
[INFO] Building Maven Quick Start Archetype
[INFO]    task-segment: [compile]
[INFO] ----------------------------------------------------------------------------
[INFO] artifact org.apache.maven.plugins:maven-resources-plugin: \
  checking for updates from central
...
[INFO] artifact org.apache.maven.plugins:maven-compiler-plugin: \
  checking for updates from central
...
[INFO] [resources:resources]
...
[INFO] [compiler:compile]
Compiling 1 source file to <dir>/my-app/target/classes
[INFO] ------------------------------------------------------------------------
[INFO] BUILD SUCCESS
[INFO] ------------------------------------------------------------------------
[INFO] Total time:  0.625 s
[INFO] Finished at: 2022-04-28T11:50:23+07:00
[INFO] ------------------------------------------------------------------------
The first time you execute this (or any other) command, Maven will need to download all the plugins and related dependencies it needs to fulfill the command. From a clean installation of Maven, this can take quite a while (in the output above, it took almost 4 minutes).
If you execute the command again, Maven will now have what it needs, so it won’t need to download anything new and will be able to execute the command much more quickly.
As you can see from the output, the compiled classes were placed in ${basedir}/target/classes, which is another standard convention employed by Maven. So, if you’re a keen observer, you’ll notice that by using the standard conventions, the POM above is very small and you haven’t had to tell Maven explicitly where any of your sources are or where the output should go. By following the standard Maven conventions, you can get a lot done with very little effort! Just as a casual comparison, let’s take a look at what you might have had to do in Ant to accomplish the same thing.
Now, this is simply to compile a single tree of application sources and the Ant script shown is pretty much the same size as the POM shown above. But we’ll see how much more we can do with just that simple POM!
How do I compile my test sources and run my unit tests?
Now you’re successfully compiling your application’s sources and now you’ve got some unit tests that you want to compile and execute.
Execute the following command:
mvn testUpon executing this command you should see output like the following:
[INFO] Scanning for projects...
[INFO]
[INFO] ----------------------< com.mycompany.app:my-app >----------------------
[INFO] Building Maven Quick Start Archetype 1.0-SNAPSHOT
[INFO] --------------------------------[ jar ]---------------------------------
[INFO]
[INFO] --- maven-resources-plugin:2.6:resources (default-resources) @ my-app ---
[WARNING] Using platform encoding (UTF-8 actually) to copy filtered resources, i.e. build is platform dependent!
[INFO] skip non existing resourceDirectory /java/maven-projects/my-app/src/main/resources
[INFO]
[INFO] --- maven-compiler-plugin:3.1:compile (default-compile) @ my-app ---
[INFO] Nothing to compile - all classes are up to date
[INFO]
[INFO] --- maven-resources-plugin:2.6:testResources (default-testResources) @ my-app ---
[WARNING] Using platform encoding (UTF-8 actually) to copy filtered resources, i.e. build is platform dependent!
[INFO] skip non existing resourceDirectory /java/maven-projects/my-app/src/test/resources
[INFO]
[INFO] --- maven-compiler-plugin:3.1:testCompile (default-testCompile) @ my-app ---
[INFO] Nothing to compile - all classes are up to date
[INFO]
[INFO] --- maven-surefire-plugin:2.12.4:test (default-test) @ my-app ---
[INFO] Surefire report directory: /java/maven-projects/my-app/target/surefire-reports

-------------------------------------------------------
 T E S T S
-------------------------------------------------------
Running com.mycompany.app.AppTest
Tests run: 1, Failures: 0, Errors: 0, Skipped: 0, Time elapsed: 0.005 sec

Results :

Tests run: 1, Failures: 0, Errors: 0, Skipped: 0

[INFO] ------------------------------------------------------------------------
[INFO] BUILD SUCCESS
[INFO] ------------------------------------------------------------------------
[INFO] Total time:  1.121 s
[INFO] Finished at: 2022-04-28T13:26:30+07:00
[INFO] ------------------------------------------------------------------------
If you simply want to compile your test sources (but not execute the tests), you can execute the following:
mvn test-compileDependency Scope
Dependency scope is used to limit the transitivity of a dependency, and also to affect the classpath used for various build tasks.
There are dependency 6 scopes available:
There are dependency 6 scopes available:
- compile – This is the default scope, used if none is specified. Compile dependencies are available in all classpaths of a project. Furthermore, those dependencies are propagated to dependent projects.
- provided – This is much like compile, but indicates you expect the JDK or a container to provide the dependency at runtime. For example, when building a web application for the Java Enterprise Edition, you would set the dependency on the Servlet API and related Java EE APIs to the scope provided because the web container provides those classes. This scope is only available on the compilation and test classpath and is not transitive.
- runtime – This scope indicates that the dependency is not required for compilation, but is for execution. It is in the runtime and test classpaths, but not the compile classpath.
- test – This scope indicates that the dependency is not required for normal use of the application, and is only available for the test compilation and execution phases. This scope is not transitive.
- system – This scope is similar to provided except that you have to provide the JAR which contains it explicitly. The artifact is always available and is not looked up in a repository.
- import (only available in Maven 2.0.9 or later) – This scope is only supported on a dependency of type pom in the section. It indicates the dependency to be replaced with the effective list of dependencies in the specified POM’s section. Since they are replaced, dependencies with a scope of the import do not actually participate in limiting the transitivity of a dependency.
Dependency Management
Dependency management is a mechanism for centralizing dependency information. When you have a set of projects that inherit a common parent it’s possible to put all information about the dependency in the common POM and have simpler references to the artifacts in the child POMs.
The mechanism is best illustrated by some examples. Given these two POMs which extend the same parent:
Project A:
<project>
  ...
  <dependencies>
    <dependency>
      <groupId>group-a</groupId>
      <artifactId>artifact-a</artifactId>
      <version>1.0</version>
      <exclusions>
        <exclusion>
          <groupId>group-c</groupId>
          <artifactId>excluded-artifact</artifactId>
        </exclusion>
      </exclusions>
    </dependency>
    <dependency>
      <groupId>group-a</groupId>
      <artifactId>artifact-b</artifactId>
      <version>1.0</version>
      <type>bar</type>
      <scope>runtime</scope>
    </dependency>
  </dependencies>
</project>
Project B:
<project>
  ...
  <dependencies>
    <dependency>
      <groupId>group-c</groupId>
      <artifactId>artifact-b</artifactId>
      <version>1.0</version>
      <type>war</type>
      <scope>runtime</scope>
    </dependency>
    <dependency>
      <groupId>group-a</groupId>
      <artifactId>artifact-b</artifactId>
      <version>1.0</version>
      <type>bar</type>
      <scope>runtime</scope>
    </dependency>
  </dependencies>
</project>
These two example POMs share a common dependency and each has one non-trivial dependency. This information can be put in the parent POM like this:
<project>
  ...
  <dependencyManagement>
    <dependencies>
      <dependency>
        <groupId>group-a</groupId>
        <artifactId>artifact-a</artifactId>
        <version>1.0</version>

        <exclusions>
          <exclusion>
            <groupId>group-c</groupId>
            <artifactId>excluded-artifact</artifactId>
          </exclusion>
        </exclusions>

      </dependency>

      <dependency>
        <groupId>group-c</groupId>
        <artifactId>artifact-b</artifactId>
        <version>1.0</version>
        <type>war</type>
        <scope>runtime</scope>
      </dependency>

      <dependency>
        <groupId>group-a</groupId>
        <artifactId>artifact-b</artifactId>
        <version>1.0</version>
        <type>bar</type>
        <scope>runtime</scope>
      </dependency>
    </dependencies>
  </dependencyManagement>
</project>
And then the two-child poms would become much simpler:
<project>
  ...
  <dependencies>
    <dependency>
      <groupId>group-a</groupId>
      <artifactId>artifact-a</artifactId>
    </dependency>

    <dependency>
      <groupId>group-a</groupId>
      <artifactId>artifact-b</artifactId>
      <!-- This is not a jar dependency, so we must specify type. -->
      <type>bar</type>
    </dependency>
  </dependencies>
</project>
<project>
  ...
  <dependencies>
    <dependency>
      <groupId>group-c</groupId>
      <artifactId>artifact-b</artifactId>
      <!-- This is not a jar dependency, so we must specify type. -->
      <type>war</type>
    </dependency>

    <dependency>
      <groupId>group-a</groupId>
      <artifactId>artifact-b</artifactId>
      <!-- This is not a jar dependency, so we must specify type. -->
      <type>bar</type>
    </dependency>
  </dependencies>
</project>
A second and very important use of the dependency management section is to control the versions of artifacts used in transitive dependencies. As an example consider these projects:
Project A:
<project>
 <modelVersion>4.0.0</modelVersion>
 <groupId>maven</groupId>
 <artifactId>A</artifactId>
 <packaging>pom</packaging>
 <name>A</name>
 <version>1.0</version>
 <dependencyManagement>
   <dependencies>
     <dependency>
       <groupId>test</groupId>
       <artifactId>a</artifactId>
       <version>1.2</version>
     </dependency>
     <dependency>
       <groupId>test</groupId>
       <artifactId>b</artifactId>
       <version>1.0</version>
       <scope>compile</scope>
     </dependency>
     <dependency>
       <groupId>test</groupId>
       <artifactId>c</artifactId>
       <version>1.0</version>
       <scope>compile</scope>
     </dependency>
     <dependency>
       <groupId>test</groupId>
       <artifactId>d</artifactId>
       <version>1.2</version>
     </dependency>
   </dependencies>
 </dependencyManagement>
</project>
Project B:
<project>
  <parent>
    <artifactId>A</artifactId>
    <groupId>maven</groupId>
    <version>1.0</version>
  </parent>
  <modelVersion>4.0.0</modelVersion>
  <groupId>maven</groupId>
  <artifactId>B</artifactId>
  <packaging>pom</packaging>
  <name>B</name>
  <version>1.0</version>
  <dependencyManagement>
    <dependencies>
      <dependency>
        <groupId>test</groupId>
        <artifactId>d</artifactId>
        <version>1.0</version>
      </dependency>
    </dependencies>
  </dependencyManagement>
  <dependencies>
    <dependency>
      <groupId>test</groupId>
      <artifactId>a</artifactId>
      <version>1.0</version>
      <scope>runtime</scope>
    </dependency>
    <dependency>
      <groupId>test</groupId>
      <artifactId>c</artifactId>
      <scope>runtime</scope>
    </dependency>
  </dependencies>
</project>
When maven is run on project B version 1.0 of artifacts a, b, c, and d will be used regardless of the version specified in their pom.
The a and c both are declared as dependencies of the project so version 1.0 is used due to dependency mediation. Both will also have runtime scope since it is directly specified. b is defined in B’s parent’s dependency management section and since dependency management takes precedence over dependency mediation for transitive dependencies, version 1.0 will be selected should it be referenced in a or c’s pom. b will also have compile scope.
Finally, since d is specified in B’s dependency management section, should d be a dependency (or transitive dependency) of a or c, version 1.0 will be chosen – again because dependency management takes precedence over dependency mediation and also because the current pom’s declaration takes precedence over its parent’s declaration. The reference information about the dependency management tags is available from the project descriptor reference.
Importing Dependencies
The examples in the previous section describe how to specify managed dependencies through inheritance. However, in larger projects, it may be impossible to accomplish this since a project can only inherit from a single parent.
To accommodate this, projects can import managed dependencies from other projects. This is accomplished by declaring a pom artifact as a dependency with a scope of “import”.
Project B:
<project>
  <modelVersion>4.0.0</modelVersion>
  <groupId>maven</groupId>
  <artifactId>B</artifactId>
  <packaging>pom</packaging>
  <name>B</name>
  <version>1.0</version>
  <dependencyManagement>
    <dependencies>
      <dependency>
        <groupId>maven</groupId>
        <artifactId>A</artifactId>
        <version>1.0</version>
        <type>pom</type>
        <scope>import</scope>
      </dependency>
      <dependency>
        <groupId>test</groupId>
        <artifactId>d</artifactId>
        <version>1.0</version>
      </dependency>
    </dependencies>
  </dependencyManagement>
  <dependencies>
    <dependency>
      <groupId>test</groupId>
      <artifactId>a</artifactId>
      <version>1.0</version>
      <scope>runtime</scope>
    </dependency>
    <dependency>
      <groupId>test</groupId>
      <artifactId>c</artifactId>
      <scope>runtime</scope>
    </dependency>
  </dependencies>
</project>
Assuming A is the pom defined in the preceding example, the end result would be the same. All of A’s managed dependencies would be incorporated into B except for d since it is defined in this pom.
Project X:
<project>
 <modelVersion>4.0.0</modelVersion>
 <groupId>maven</groupId>
 <artifactId>X</artifactId>
 <packaging>pom</packaging>
 <name>X</name>
 <version>1.0</version>
 <dependencyManagement>
   <dependencies>
     <dependency>
       <groupId>test</groupId>
       <artifactId>a</artifactId>
       <version>1.1</version>
     </dependency>
     <dependency>
       <groupId>test</groupId>
       <artifactId>b</artifactId>
       <version>1.0</version>
       <scope>compile</scope>
     </dependency>
   </dependencies>
 </dependencyManagement>
</project>
Project Y:
<project>
 <modelVersion>4.0.0</modelVersion>
 <groupId>maven</groupId>
 <artifactId>Y</artifactId>
 <packaging>pom</packaging>
 <name>Y</name>
 <version>1.0</version>
 <dependencyManagement>
   <dependencies>
     <dependency>
       <groupId>test</groupId>
       <artifactId>a</artifactId>
       <version>1.2</version>
     </dependency>
     <dependency>
       <groupId>test</groupId>
       <artifactId>c</artifactId>
       <version>1.0</version>
       <scope>compile</scope>
     </dependency>
   </dependencies>
 </dependencyManagement>
</project>
Project Z:
<project>
  <modelVersion>4.0.0</modelVersion>
  <groupId>maven</groupId>
  <artifactId>Z</artifactId>
  <packaging>pom</packaging>
  <name>Z</name>
  <version>1.0</version>
  <dependencyManagement>
    <dependencies>
      <dependency>
        <groupId>maven</groupId>
        <artifactId>X</artifactId>
        <version>1.0</version>
        <type>pom</type>
        <scope>import</scope>
      </dependency>
      <dependency>
        <groupId>maven</groupId>
        <artifactId>Y</artifactId>
        <version>1.0</version>
        <type>pom</type>
        <scope>import</scope>
      </dependency>
    </dependencies>
  </dependencyManagement>
</project>
In the example above Z imports, the managed dependencies from both X and Y. However, both X and Y contain dependency a. Here, version 1.1 of a would-be used since X is declared first and a is not declared in Z’s dependencyManagement.
This process is recursive. For example, if X imports another pom, Q, when Z is processed it will simply appear that all of Q’s managed dependencies are defined in X.
Imports are most effective when used for defining a “library” of related artifacts that are generally part of a multi-project build. It is fairly common for one project to use one or more artifacts from these libraries. However, it has sometimes been difficult to keep the versions in the project using the artifacts in sync with the versions distributed in the library. The pattern below illustrates how a “bill of materials” (BOM) can be created for use by other projects.
The root of the project is the BOM pom. It defines the versions of all the artifacts that will be created in the library. Other projects that wish to use the library should import this pom into the dependencyManagement section of their pom.
<project xmlns="http://maven.apache.org/POM/4.0.0" xmlns:xsi="http://www.w3.org/2001/XMLSchema-instance"
    xsi:schemaLocation="http://maven.apache.org/POM/4.0.0 http://maven.apache.org/xsd/maven-4.0.0.xsd">
  <modelVersion>4.0.0</modelVersion>
  <groupId>com.test</groupId>
  <artifactId>bom</artifactId>
  <version>1.0.0</version>
  <packaging>pom</packaging>
  <properties>
    <project1Version>1.0.0</project1Version>
    <project2Version>1.0.0</project2Version>
  </properties>
  <dependencyManagement>
    <dependencies>
      <dependency>
        <groupId>com.test</groupId>
        <artifactId>project1</artifactId>
        <version>${project1Version}</version>
      </dependency>
      <dependency>
        <groupId>com.test</groupId>
        <artifactId>project2</artifactId>
        <version>${project1Version}</version>
      </dependency>
    </dependencies>
  </dependencyManagement>
  <modules>
    <module>parent</module>
  </modules>
</project>
The parent sub-project has the BOM pom as its parent. It is a normal multi-project pom.
<project xmlns="http://maven.apache.org/POM/4.0.0" xmlns:xsi="http://www.w3.org/2001/XMLSchema-instance"
     xsi:schemaLocation="http://maven.apache.org/POM/4.0.0 http://maven.apache.org/xsd/maven-4.0.0.xsd">
  <modelVersion>4.0.0</modelVersion>
  <parent>
    <groupId>com.test</groupId>
    <version>1.0.0</version>
    <artifactId>bom</artifactId>
  </parent>

  <groupId>com.test</groupId>
  <artifactId>parent</artifactId>
  <version>1.0.0</version>
  <packaging>pom</packaging>

  <dependencyManagement>
    <dependencies>
      <dependency>
        <groupId>log4j</groupId>
        <artifactId>log4j</artifactId>
        <version>1.2.12</version>
      </dependency>
      <dependency>
        <groupId>commons-logging</groupId>
        <artifactId>commons-logging</artifactId>
        <version>1.1.1</version>
      </dependency>
    </dependencies>
  </dependencyManagement>
  <modules>
    <module>project1</module>
    <module>project2</module>
  </modules>
</project>
Next are the actual project poms.
<project xmlns="http://maven.apache.org/POM/4.0.0" xmlns:xsi="http://www.w3.org/2001/XMLSchema-instance"
     xsi:schemaLocation="http://maven.apache.org/POM/4.0.0 http://maven.apache.org/xsd/maven-4.0.0.xsd">
  <modelVersion>4.0.0</modelVersion>
  <parent>
    <groupId>com.test</groupId>
    <version>1.0.0</version>
    <artifactId>parent</artifactId>
  </parent>
  <groupId>com.test</groupId>
  <artifactId>project1</artifactId>
  <version>${project1Version}</version>
  <packaging>jar</packaging>

  <dependencies>
    <dependency>
      <groupId>log4j</groupId>
      <artifactId>log4j</artifactId>
    </dependency>
  </dependencies>
</project>

<project xmlns="http://maven.apache.org/POM/4.0.0" xmlns:xsi="http://www.w3.org/2001/XMLSchema-instance"
     xsi:schemaLocation="http://maven.apache.org/POM/4.0.0 http://maven.apache.org/xsd/maven-4.0.0.xsd">
  <modelVersion>4.0.0</modelVersion>
  <parent>
    <groupId>com.test</groupId>
    <version>1.0.0</version>
    <artifactId>parent</artifactId>
  </parent>
  <groupId>com.test</groupId>
  <artifactId>project2</artifactId>
  <version>${project2Version}</version>
  <packaging>jar</packaging>

  <dependencies>
    <dependency>
      <groupId>commons-logging</groupId>
      <artifactId>commons-logging</artifactId>
    </dependency>
  </dependencies>
</project>
The project that follows shows how the library can now be used in another project without having to specify the dependent project’s versions.
<project xmlns="http://maven.apache.org/POM/4.0.0" xmlns:xsi="http://www.w3.org/2001/XMLSchema-instance"
     xsi:schemaLocation="http://maven.apache.org/POM/4.0.0 http://maven.apache.org/xsd/maven-4.0.0.xsd">
  <modelVersion>4.0.0</modelVersion>
  <groupId>com.test</groupId>
  <artifactId>use</artifactId>
  <version>1.0.0</version>
  <packaging>jar</packaging>

  <dependencyManagement>
    <dependencies>
      <dependency>
        <groupId>com.test</groupId>
        <artifactId>bom</artifactId>
        <version>1.0.0</version>
        <type>pom</type>
        <scope>import</scope>
      </dependency>
    </dependencies>
  </dependencyManagement>
  <dependencies>
    <dependency>
      <groupId>com.test</groupId>
      <artifactId>project1</artifactId>
    </dependency>
    <dependency>
      <groupId>com.test</groupId>
      <artifactId>project2</artifactId>
    </dependency>
  </dependencies>
</project>
Finally, when creating projects that import dependencies beware of the following:
Do not attempt to import a pom that is defined in a sub-module of the current pom. Attempting to do that will result in the build failing since it won’t be able to locate the pom. Never declare the pom importing a pom as the parent (or grandparent, etc) of the target pom. There is no way to resolve the circularity and an exception will be thrown. When referring to artifacts whose poms have transitive dependencies the project will need to specify versions of those artifacts as managed dependencies.
Not doing so will result in a build failure since the artifact may not have a version specified.
Guide to Maven Repository
A maven repository is a directory of packaged JAR files with the pom.xml file. Maven searches for dependencies in the repositories. There are 3 types of maven repositories:
- Local Repository
- Central Repository
- Remote Repository
- Local Repository – Folder location on the local Dev machine
- Central Repository – Repository provided by Maven community
- Remote Repository – Organization owned custom repository
Maven searches for the dependencies in the following order:
Local repository -> Central repository -> Remote repository.
In simple words, when we run a Maven build, all the dependencies of our project (jars, plugin jars, other artifacts) are all stored locally for later use.
Types of Maven Repository
The Local Repository
The local repository of Maven is a folder location on the developer’s machine, where all the project artifacts are stored locally. When maven build is executed, Maven automatically downloads all the dependency jars into the local repository. Usually, this folder is named .m2. Here’s where the default path to this folder is – based on OS:
- Windows: C:\Users<User_Name>.m2
- Linux: /home/<User_Name>/.m2
- Mac: /Users/<user_name>/.m2
And of course, for both on Linux or Mac:
- Linux/Mac: ~/.m2
How to change the location of the Local Repository? We can change the location of the maven local repository by changing the settings.xml file. It is located in MAVEN_HOME/conf/settings.xml, for example, E:\apache-maven-3.1.1\conf\settings.xml. Let’s see the default code of the settings.xml file:
...
<settings xmlns="http://maven.apache.org/SETTINGS/1.0.0"
   xmlns:xsi="http://www.w3.org/2001/XMLSchema-instance"
   xsi:schemaLocation="http://maven.apache.org/SETTINGS/1.0.0 http://maven.apache.org/xsd/settings-1.0.0.xsd">
  <!-- localRepository
   | The path to the local repository maven will use to store artifacts.
   |
   | Default: ${user.home}/.m2/repository
  <localRepository>/path/to/local/repo</localRepository>
  -->

...
</settings>
Now change the path to the local repository. After changing the path of the local repository, it will look like this:
...
<settings xmlns="http://maven.apache.org/SETTINGS/1.0.0"
   xmlns:xsi="http://www.w3.org/2001/XMLSchema-instance"
   xsi:schemaLocation="http://maven.apache.org/SETTINGS/1.0.0 http://maven.apache.org/xsd/settings-1.0.0.xsd">
   <localRepository>e:/mavenlocalrepository</localRepository>

...
</settings>
As you can see, now the path of the local repository is e:/mavenlocalrepository.
Maven Central Repository
Maven’s central repository is located on the web. It has been created by the apache maven community itself.
The path of the central repository is http://repo1.maven.org/maven2/.
The central repository contains a lot of common libraries that can be viewed by this URL http://search.maven.org/#browse.
Maven Remote Repository
Maven remote repository is located on the web. Most of the libraries can be missing from the central repository such as the JBoss library etc, so we need to define a remote repository in the pom.xml file.
Let’s see the code to add the JUnit library in the pom.xml file:
<project xmlns="http://maven.apache.org/POM/4.0.0"
xmlns:xsi="http://www.w3.org/2001/XMLSchema-instance"
  xsi:schemaLocation="http://maven.apache.org/POM/4.0.0
http://maven.apache.org/xsd/maven-4.0.0.xsd">

  <modelVersion>4.0.0</modelVersion>

  <groupId>com.javaguides.app</groupId>
  <artifactId>my-app</artifactId>
  <version>1.0</version>
  <packaging>jar</packaging>

  <name>Maven Quick Start Archetype</name>
  <url>http://maven.apache.org</url>

  <dependencies>
    <dependency>
      <groupId>junit</groupId>
      <artifactId>junit</artifactId>
      <version>4.8.2</version>
      <scope>test</scope>
    </dependency>
  </dependencies>

</project>
You can search any repository from Maven’s official website mvnrepository.com.
Create a Simple Maven Project using Command Line
Pre-requisites
– Make sure that you have installed Java 8+ (if not checkout How to install and configure Java on Ubuntu 20.04).
– Make sure that you have installed Maven and configured an environment path ( if not check out How to install Maven and build apps with the mvn command line)
Creating a Maven Project
Let’s start a new Maven project, we use the Maven Archetype plugin from the command line.
You will need somewhere for your project to reside, create a directory somewhere and start a shell in that directory. On your command line, execute the following Maven goal:
mvn archetype:generate -DgroupId=com.companyname.projectname  \
-DartifactId=simple-maven-project  \
-Dpackage=com.companyname.projectname  \
-Dversion=1.0-SNAPSHOT
Note that whole command should be single line. After build success, we will see below output in command line console.
[INFO] ------------------------------------------------------------------------
[INFO] BUILD SUCCESS
[INFO] ------------------------------------------------------------------------
[INFO] Total time: 01:23 min
[INFO] Finished at: 2018-06-20T10:50:40+05:30
[INFO] ------------------------------------------------------------------------
Note that our project name: simple-maven-project
Maven Standard Directory Layout
Once we’ve generated a project, take a look at the directory structure Maven created under the simple directory:
simple-maven-project
|-- pom.xml
`-- src
    |-- main
    |   `-- java
    |       `-- com
    |           `-- mycompany
    |               `-- app
    |                   `-- App.java
    `-- test
        `-- java
            `-- com
                `-- mycompany
                    `-- app
                        `-- AppTest.java
This generated directory adheres to the Maven Standard Directory Layout. let’s understand these few basic directories:
- The Maven Archetype plugin creates a directory simple-maven-project that matches the
artifactId. This is known as the project’s base directory. - Every Maven project has what is known as a Project Object Model (POM) in a file named
pom.xml. This file describes the project, configures plugins, and declares dependencies. - Our project’s source code and resources are placed under src/main. In the case of our simple Java project this will consist of a few Java classes and some properties file. In web project, this could be the document root of a web application or configuration files for an application server. In a Java project, Java classes are placed in
src/main/javaand classpath resources are placed insrc/main/resources. - Our project’s test cases are located in
src/test. Under this directory, Java classes such as JUnit or TestNG tests are placed insrc/test/java, and classpath resources for tests are located insrc/test/resources.
App.java
The Maven Archetype plugin generated a single class com.companyname.projectname.App,which prints ‘Hello World!’
package com.companyname.projectname;

/**
 * Hello world!
 *
 */
public class App
{
    public static void main( String[] args )
    {
        System.out.println( "Hello World!" );
    }
}
Simple Project Object Model(pom.xml)
Every Maven project has what is known as a Project Object Model (POM) in a file named pom.xml. This file describes the project metadata, configures plugins, and declares dependencies.
<project xmlns="http://maven.apache.org/POM/4.0.0" xmlns:xsi="http://www.w3.org/2001/XMLSchema-instance"
  xsi:schemaLocation="http://maven.apache.org/POM/4.0.0 http://maven.apache.org/maven-v4_0_0.xsd">
  <modelVersion>4.0.0</modelVersion>
  <groupId>com.companyname.projectname</groupId>
  <artifactId>simple-maven-project</artifactId>
  <packaging>jar</packaging>
  <version>1.0-SNAPSHOT</version>
  <name>simple-maven-project</name>
  <url>http://maven.apache.org</url>
  <properties>
    <project.build.sourceEncoding>UTF-8</project.build.sourceEncoding>
    <maven.compiler.source>1.7</maven.compiler.source>
    <maven.compiler.target>1.7</maven.compiler.target>
  </properties>
  <dependencies>
    <dependency>
      <groupId>junit</groupId>
      <artifactId>junit</artifactId>
      <version>4.11</version>
      <scope>test</scope>
    </dependency>
  </dependencies>
</project>
Maven Build the Project
Go to the project directory and run the following commands to build this Maven project:
> cd simple-maven-project
> mvn install
The command line will print out various actions, and end with the following:
[INFO] ------------------------------------------------------------------------
[INFO] BUILD SUCCESS
[INFO] ------------------------------------------------------------------------
[INFO] Total time: 10.640 s
[INFO] Finished at: 2018-06-20T11:53:12+05:30
[INFO] ------------------------------------------------------------------------
You’ve just created, cleaned, compiled, tested, packaged, and installed the simplest possible Maven project.
Run Packaged JAR
You may test the newly compiled and packaged JAR with the following command:
java -cp target/simple-maven-project-1.0-SNAPSHOT.jar com.companyname.projectname.AppOutput:
Hello World!Useful Maven Commands
Create project
Create Java project with below maven command:
mvn archetype:generate \
-DgroupId=org.yourcompany.project \
-DartifactId=application
Create web project with below maven command:
mvn archetype:generate \
-DgroupId=org.yourcompany.project \
-DartifactId=application \
-DarchetypeArtifactId=maven-archetype-webapp
Create archetype from existing project
mvn archetype:create-from-projectMain phases
- clean — delete target directory
- validate — validate, if the project is correct
- compile — compile source code, classes stored in target/classes
- test — run tests
- package — take the compiled code and package it in its distributable format, e.g. JAR, WAR
- verify — run any checks to verify the package is valid and meets quality criteria
- install — install the package into the local repository
- deploy — copies the final package to the remote repository
Maven phase commands(Project Build Commands)
clean project: This command will delete target directory
mvn cleanvalidate project: validate the project is correct and all necessary information is available
mvn validatecompile project: compile source code, classes stored in target/classes
mvn compiletest project: run tests using a suitable unit testing framework
mvn testpackage project: take the compiled code and package it in its distributable format, such as a JAR /WAR
mvn packageverify project: run any checks to verify the package is valid and meets quality criteria
mvn verifyinstall project: install the package into the local repository, for use as a dependency in other projects locally
mvn installdeploy project: done in an integration or release environment, copies the final package to the remote repository for sharing with other developers and projects
mvn deploySkip running tests
Compiles the tests, but skips running them.
mvn install -DskipTests=trueSkips compiling the tests and does not run them.
mvn install -Dmaven.test.skip=trueProject Site Generation
Generate site without tests reports (tests are not executed):
mvn site:siteGenerate site with unit tests reports:
mvn test site:siteGenerate site with unit and integration tests reports:
mvn verify site:siteCode quality analysis
Analyse code quality with Sonar:
mvn clean install -DskipTests=true mvn sonar:sonarRead Sonar configuration guide.
Code coverage reporting
Notice: It is much more feasible to generate code coverage reports directly from IDE than from Maven. Write test, write code, run coverage for separated test, and check that all important branches are covered.
Generate Clover reports for unit tests:
mvn clover2:setup test clover2:aggregate clover2:cloverGenerate clover reports for unit and integration tests:
mvn clover2:setup verify clover2:aggregate clover2:cloverRead Clover configuration guide.
Dependency Management
Check dependencies for newer versions:
mvn versions:display-dependency-updatesCheck plugins for newer versions:
mvn versions:display-plugin-updatesCheck for newer versions defined as properties:
mvn versions:display-property-updatesDisplay project dependencies:
mvn dependency:treeAnalyze project dependencies:
mvn dependency:analyzeGetting Help
Display effective Maven settings:
mvn help:effective-settingsDisplay effective POM:
mvn help:effective-pomDisplay all profiles (from settings.xml and POMs hierarchy):
mvn help:active-profilesDisplay plugin goals (for m-compiler-p in the example below):
mvn compiler:helpDisplay plugin’s goal description (for goal compile in m-compiler-p in the example below):
mvn compiler:help -Dgoal=compile -DdetailHelp plugin — used to get relative information about a project or the system.
mvn help:describedescribes the attributes of a pluginmvn help:effective-pomdisplays the effective POM as an XML for the current build, with the active profiles factored in. Dependency plugin — provides the capability to manipulate artifacts.mvn dependency:analyzeanalyzes the dependencies of this projectmvn dependency:treeprints a tree of dependencies Compiler plugin — compiles your java code. Set language level with the following configuration:
<plugin>
 <groupId>org.apache.maven.plugins</groupId>
     <artifactId>maven-compiler-plugin</artifactId>
      <version>3.6.1</version>
      <configuration>
          <source>1.8</source>
          <target>1.8</target>
      </configuration>
</plugin>