What is Virtual Environment in Python ?
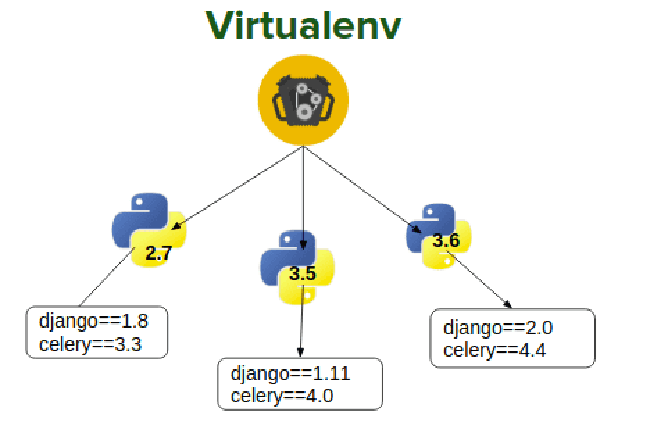
Virtual Environment is a kind of a container which runs specific version of Python and its modules. And it is used in the cases where you are working on two different project which has different dependencies. Say one of your project uses Django 1.11 and another one uses Django 2.0. In that case you will be needing Virtual Environment.
Why do we need to use Virtual Environment in Python?
There are cases when you are working on different projects and you want to have different versions of Python for different project say Python 3.7 and Python 3.8. Using, virtual environments, you can use different versions of Python as well as the modules installed in it.
For the purpose of this tutorial, I will be using MacOS but you can replicate the same on Windows and Linux using PowerShell and Command Line.
Virtualenv vs Venv? How to install Virtualenv?
Prior to Python 3 i.e. in Python 2.7, you will have to install the module called virtualenv to create virtual environments in Python. It is a third party module and you can still install virtualenv in Python 2.7 as well as Python 3 and above using pip.
pip install virtualenvBut Python 3 and above, ships with an inbuilt module called venv, which solves the same purpose as of virtualenv i.e. it helps to create and use virtual environments in Python.
How to create a Virtual Environment in Python?
We will be using venv to create virtual environment in Python as I assume that all of you are using Python 3 as the support for the legacy version i.e. Python 2.7 has already ended. However, if you are still using Python 2.7 just replace venv with virtualenv in all the codes to create a virtual environment in Python 2.7.
Now, to create a virtual environment in Python using venv your will have to use the following code :-
python -m venv [directory-as-name-of-the-env]With Python 2.7, let use this command:
virtualenv [directory-as-name-of-the-env]How to create a Virtual environment using different versions of Python?
If you want to create a virtual environment using a specific version of Python then first of all you must have that version installed in your computer and then you will have to check how you run that version of python e.g. in my system I can run Python 3.7 and Python3.8 using python3 and python3.8 respectively in the terminal.
So in order to create a Virtual Environment using Python version 3.7, I will have to use :
python3 -m venv [directory-as-name-of-the-env]**You must note that you can use the same code in Windows and Linux to create the Virtual Environments.
How to activate a Virtual Environment in Python?
In order to activate a virtual environment in Python, you will have to use the following command on MacOS and Linux
venv directory-as-name-of-the-env/bin/activateHowever, to activate the Virtual Environment on a Windows Machine, you will have to use the following command:-
. .\directory-as-name-of-the-env\Scripts\activateHow to deactivate the Virtual Environment in Python?
Once you finished working on your project, it’s a good habit to deactivate its venv. By deactivating, you basically leave the virtual environment. Without deactivating it, all other Python code you execute, even if it is outside of your project directory, will also run inside of it.
Luckily, deactivating your virtual environment couldn’t be simpler. Just enter this: deactivate. It works the same on all operating systems.
To deactivate the Virtual Environment on all the operating systems like MacOS, Linux and Windows, you just have to type deactivate in the terminal/powershell/command line.
deactivateDelete a venv created with Virtualenv or python -m venv
There’s no special command to delete a virtual environment if you used virtualenv or python -m venv to create your virtual environment, as is demonstrated in this article. When creating the virtualenv, you gave it a directory to create this environment in.
If you want to delete this virtualenv, deactivate it first and then remove the directory with all its content. On Unix-like systems and in Windows Powershell, you would do something like:
$ deactivate
# If your virtual environment is in a directory called 'venv':
$ rm -r venv
Shortcut to create a Virtual Environment in Python
Instead of naming the venv/virtual environment everytime, you can create a virtual environment with the name of the directory in which you are working by using a period (.) at the end. So, in order to create such virtual environment on all the operating systems, you will have to type the following command :-
python3 -m venv .And to activate this on MacOS and Linux
source bin/activateOn Windows:
. .\Scripts\activateHow a Python venv works
When you activate a virtual environment, your PATH variable is changed. On Linux and MacOS, you can see it for yourself by printing the path with echo $PATH.
$> echo $PATH
/home/tvt/workspace/tempfolder/new_python_project/venv/bin:/usr/local/sbin:/usr/local/bin:/usr/sbin:/usr/bin:/sbin:/bin:/usr/games:/usr/local/games:/snap/bin ...
As you can see, the bin directory of my venv is put in front of everything else, effectively overriding all the system-wide Python software. This works because when you enter a command that can’t be found in the current working directory, your OS starts looking at all the paths in the PATH variable. If your venv is there first, the OS will look there first before looking at system-wide directories like /usr/bin.
If you take a look inside the directory of your venv, you’ll see something like this:
(venv) $ tree
.
└── venv
    ├── bin
    │   ├── activate
    │   ├── activate.csh
    │   ├── activate.fish
    │   ├── Activate.ps1
    │   ├── dmypy
    │   ├── mypy
    │   ├── mypyc
    │   ├── pip
    │   ├── pip3
    │   ├── pip3.9
    │   ├── python -> python3
    │   ├── python3 -> /home/tvt/.pyenv/versions/3.9.6/bin/python3
    │   ├── python3.9 -> python3
    │   ├── stubgen
    │   └── stubtest
    ├── include
    ├── lib
    │   └── python3.9
    │       └── site-packages
You can see that:
- The Python command is made available both as
pythonandpython3, and the version is pinned to the version with which you created the venv by creating a symlink to it. - All packages you install end up in the site-packages directory.
- We have activation scripts for multiple shell types (bash, csh, fish)
- Pip is available under the names pip and pip3
Practicing venv to install Python packages
While working on a project, a Python programmer is always looking for libraries and modules that can make his coding part or testing part easy. Most programmers tend to use “pip” to install packages in Python.
Yes! “pip” works fantastically. But, sometimes when you are working on two different projects. You might require two different versions of the same library in these projects. When you install a Python library using “pip”, those packages are installed globally on your machine. It means there can only be one single version of that library across all the programs.
And, that’s where venv or a virtual environment comes as a savior. But, what is it?
A virtual environment aka virtualenv or venv is a Python environment but an isolated one. Just like a virtual machine running on your computer! So, to install all the different dependencies separated by the project, you must install your packages using venv.
Take a look at the global environment using the below command:
$> which pip3
/home/tvt/.pyenv/shims/pip3
Now, make a new directory “new_python_project” and it let’s create a virtual environment.
mkdir new_python_project
cd new_python_project
python3 -m venv ./venv
It will create a new virtual environment in the venv subdirectory of the new_python_project directory.
$> cd new_python_project
$> python3 -m venv ./venv
$> ls
venv
$> cd venv
$ venv> ls
bin  include  lib  lib64  pyvenv.cfg
Pretty much whole Python is installed in this directory. Now, activate the virtual environment using this command.
$> source ./venv/bin/activateIf you look for the new Python environment, it lives “ /venv/bin/pip3″.
(venv) $> which pip3
/home/tvt/workspace/tempfolder/new_python_project/venv/bin/pip3
I installed a new Python library in my venv by simple pip command. Mypy is a static type checker for Python 3 and Python 2.7. If you sprinkle your code with type annotations, mypy can type check your code and find common bugs
(venv) $> pip3 install mypy
Collecting mypy
  Downloading mypy-0.931-cp39-cp39-manylinux_2_5_x86_64.manylinux1_x86_64.manylinux_2_12_x86_64.manylinux2010_x86_64.whl (16.6 MB)
     |████████████████████████████████| 16.6 MB 5.3 MB/s
Collecting typing-extensions>=3.10
  Downloading typing_extensions-4.1.1-py3-none-any.whl (26 kB)
Collecting mypy-extensions>=0.4.3
  Using cached mypy_extensions-0.4.3-py2.py3-none-any.whl (4.5 kB)
Collecting tomli>=1.1.0
  Downloading tomli-2.0.1-py3-none-any.whl (12 kB)
Installing collected packages: typing-extensions, tomli, mypy-extensions, mypy
Successfully installed mypy-0.931 mypy-extensions-0.4.3 tomli-2.0.1 typing-extensions-4.1.1
And, now if you take a look at the libraries in pip3, you will find “mypy”, the recently installed one too.
(venv) $> pip3 list
Package           Version
----------------- -------
mypy              0.931
mypy-extensions   0.4.3
pip               21.1.3
setuptools        56.0.0
tomli             2.0.1
typing-extensions 4.1.1
Once mypy is installed, run it by using the mypy tool:
(venv) $ mypy program.pyThis command makes mypy type check your program.py file and print out any errors it finds. Mypy will type check your code statically: this means that it will check for errors without ever running your code, just like a linter.
Now, if you want to get out of the virtual environment, just simply give “deactivate” command and you will land in the global environment.
(venv) $> deactivate
$> which pip3
/home/tvt/.pyenv/shims/pip3
After deactivating, my Python environment changed! And, voila, using a virtual environment is this easy. You can now access that venv anytime, with just activate command i.e “source ./venv/bin/activate”.