
Amazon Web Services (AWS) has been a leader in cloud computing, providing robust and scalable solutions for developers worldwide. Among its many services, the AWS Serverless Application Model (AWS SAM) stands out for simplifying serverless application development. This comprehensive guide aims to equip cloud engineers with all the necessary knowledge to get started with AWS SAM, including step-by-step guides, practical scenarios, and essential how-tos.
What is AWS SAM?
AWS SAM (Serverless Application Model) is an open-source framework that enables you to build, test, and deploy serverless applications. SAM is designed to provide a simplified way to define the infrastructure of your serverless application, making it easier to manage and deploy.
Key Features of AWS SAM:
1. Simplified Infrastructure Definition: Use SAM templates to define your serverless application resources.
2. Local Testing and Debugging: Simulate AWS environments locally to test and debug your application.
3. Seamless Deployment: Deploy your serverless applications with ease using AWS CloudFormation.
4. Integration with AWS Services: Leverage built-in integration with AWS Lambda, API Gateway, DynamoDB, and other services.
Getting Started with AWS SAM
Prerequisites
Before diving into AWS SAM, ensure you have the following prerequisites:
1. AWS Account: Sign up for an AWS account if you don’t already have one.
2. AWS CLI: Install and configure the AWS Command Line Interface (CLI).
3. AWS SAM CLI: Install the AWS SAM CLI for local development and testing.
4. Docker: Install Docker to emulate the AWS Lambda runtime locally.
Installation
Step 1: Install AWS CLI
# On macOS:
brew install awscli
# On Windows:
choco install awscli
# On Linux:
sudo apt-get install awscli
Step 2: Configure AWS CLI
aws configureEnter your AWS Access Key ID, Secret Access Key, region, and output format.
Step 3: Install AWS SAM CLI
# On macOS:
brew tap aws/tap
brew install aws-sam-cli
# On Windows:
choco install aws-sam-cli
# On Linux:
curl -Lo sam-installation.sh https://raw.githubusercontent.com/aws/aws-sam-cli/main/installer/latest/install && sh sam-installation.sh
Step 4: Install Docker
Follow the Docker installation guide for your operating system.
Building Your First Serverless Application
Let’s create a simple serverless application using AWS SAM.
Step 1: Initialize the Project
sam initChoose a template for the project. For this example, we will use the “Hello World” template.
Step 2: Understand the Project Structure
After initialization, your project will have the following structure:
/hello-world
 |-- .aws-sam
 |-- events
 |-- hello_world
     |-- __init__.py
     |-- app.py
 |-- tests
 |-- template.yaml
– app.py: Contains the Lambda function code.
– template.yaml: Defines the AWS resources for the application.
Step 3: Define the Lambda Function
Edit `app.py` to define your Lambda function:
def lambda_handler(event, context):
   return {
       "statusCode": 200,
       "body": "Hello, World!"
   }
Step 4: Define Resources in `template.yaml`
AWSTemplateFormatVersion: '2010-09-09'
Transform: 'AWS::Serverless-2016-10-31'
Resources:
HelloWorldFunction:
Type: 'AWS::Serverless::Function'
Properties:
Handler: hello_world.app.lambda_handler
Runtime: python3.8
Events:
HelloWorld:
Type: Api
Properties:
Path: /hello
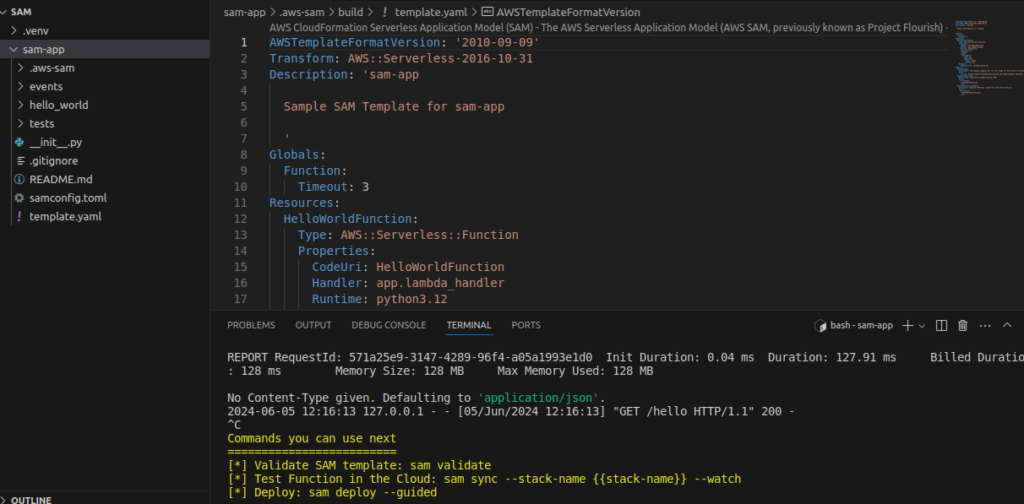
Method: getStep 5: Test Locally
Run the application locally to test it:
sam local start-apiNavigate to `http://127.0.0.1:3000/hello` in your browser to see the output.
Step 6: Deploy the Application
Package the Application
sam package --output-template-file packaged.yaml --s3-bucket <your-s3-bucket-name>Deploy the Application
sam deploy --template-file packaged.yaml --stack-name hello-world-stack --capabilities CAPABILITY_IAMStep 7: Verify Deployment
After deployment, verify the API Gateway endpoint and test your Lambda function.
$ curl https://lp0poifrb9.execute-api.us-east-1.amazonaws.com/Prod/hello
{"message": "hello world"}
Advanced Features of AWS SAM
Environment Variables
Set environment variables in `template.yaml`:
Properties:
 Environment:
   Variables:
     TABLE_NAME: "my-dynamodb-table"
Layers
Use AWS Lambda layers to share code across multiple functions:
Resources:
 MyLayer:
   Type: AWS::Serverless::LayerVersion
   Properties:
     LayerName: MyLayer
     Description: My shared layer
     ContentUri: ./layer
     CompatibleRuntimes:
       - python3.8
IAM Roles and Policies
Define IAM roles and policies for your Lambda functions:
Properties:
 Policies:
   - AWSLambdaBasicExecutionRole
   - DynamoDBCrudPolicy:
       TableName: !Ref MyDynamoDBTable
Events
Trigger Lambda functions with various event sources:
Events:
 HelloWorld:
   Type: Api
   Properties:
     Path: /hello
     Method: get
 DynamoDBEvent:
   Type: DynamoDB
   Properties:
     Stream: arn:aws:dynamodb:region:account-id:table/table-name/stream/label
Use Cases For AWS SAM
Scenario 1: Building a RESTful API
Use AWS SAM to build and deploy a RESTful API with multiple endpoints and Lambda functions.
Here’s the relevant part of the SAM template that creates the API:
Resources:
 HelloWorldFunction:
   Type: 'AWS::Serverless::Function'
   Properties:
     Handler: hello_world.app.lambda_handler
     Runtime: python3.8
     Events:
       HelloWorld:
         Type: Api
         Properties:
           Path: /hello
           Method: get
Explanation
- Type: ‘AWS::Serverless::Function: This line defines a new serverless function resource.
- Handler: Specifies the entry point for the Lambda function (the file and function to be executed).
- Runtime: Specifies the runtime environment for the Lambda function, such as Python 3.8.
- Events: This section defines the events that will trigger the Lambda function.
Api Event Source
- Type: Api: This specifies that the event source is an API Gateway.
- Properties: This section contains the configuration for the API Gateway endpoint.
- Path: The path for the API endpoint (in this case, `
/hello`). - Method: The HTTP method for the API endpoint (in this case, `
get`).
When you deploy this SAM template, AWS SAM automatically creates an API Gateway for the defined path and method, and it connects this API Gateway endpoint to the specified Lambda function.
Example SAM Template Creating an API
Here’s a complete example of a simple SAM template that creates an API Gateway endpoint:
AWSTemplateFormatVersion: '2010-09-09'
Transform: 'AWS::Serverless-2016-10-31'
Resources:
 HelloWorldFunction:
   Type: 'AWS::Serverless::Function'
   Properties:
     Handler: hello_world.app.lambda_handler
     Runtime: python3.8
     Events:
       HelloWorld:
         Type: Api
         Properties:
           Path: /hello
           Method: get
In this example, when you deploy the SAM application, it will create an API Gateway endpoint at `https://<api-id>.execute-api.<region>.amazonaws.com/Prod/hello` which triggers the `HelloWorldFunction` Lambda function whenever a GET request is made to this endpoint.
Additional API Configuration
AWS SAM also allows more advanced configurations for API Gateway, such as defining multiple endpoints, setting CORS, or integrating with custom authorizers. Here’s an example with more advanced API configurations:
Resources:
 MyApi:
   Type: 'AWS::Serverless::Api'
   Properties:
     StageName: Prod
     Cors:
       AllowHeaders: "'Content-Type,X-Amz-Date,Authorization,X-Api-Key,X-Amz-Security-Token'"
       AllowOrigin: "'*'"
       AllowMethods: "'GET,POST,OPTIONS'"

 HelloWorldFunction:
   Type: 'AWS::Serverless::Function'
   Properties:
     Handler: hello_world.app.lambda_handler
     Runtime: python3.8
     Events:
       HelloWorld:
         Type: Api
         Properties:
           RestApiId: !Ref MyApi
           Path: /hello
           Method: get
In this advanced example, a separate AWS::Serverless::Api resource named MyApi is defined, which allows for more detailed API Gateway configuration. The HelloWorldFunction then references this API resource using the RestApiId property.
Scenario 2: Data Processing Pipeline
Create a serverless data processing pipeline that triggers Lambda functions on S3 events, processes data, and stores results in DynamoDB.
Here’s a detailed guide to achieve this using AWS SAM (Serverless Application Model):
Step-by-Step Guide
Step 1: Create a New SAM Project
Create a new directory for your project and navigate into it.
mkdir s3-lambda-dynamodb-pipeline
cd s3-lambda-dynamodb-pipeline
Step 2: Initialize a SAM Project
Initialize a new SAM project.
sam initFollow the prompts to set up your project. Choose options that fit your needs, such as a Python runtime and a minimal template.
Step 3: Define the SAM Template
Create or edit the template.yaml file to define the necessary resources: an S3 bucket, a Lambda function, and a DynamoDB table.
AWSTemplateFormatVersion: '2010-09-09'
Transform: 'AWS::Serverless-2016-10-31'
Resources:
  S3Bucket:
    Type: AWS::S3::Bucket
    Properties:
      BucketName: !Sub '${AWS::StackName}-bucket'

  ProcessDataFunction:
    Type: AWS::Serverless::Function
    Properties:
      Handler: app.lambda_handler
      Runtime: python3.12
      CodeUri: .
      Policies:
        - AWSLambdaBasicExecutionRole
        - DynamoDBCrudPolicy:
            TableName: !Ref DynamoDBTable
        - Statement:
            Effect: Allow
            Action:
              - s3:GetObject
              - s3:PutObject
            Resource: !Sub 'arn:aws:s3:::${S3Bucket}/*'
      Environment:
        Variables:
          TABLE_NAME: !Ref DynamoDBTable

  DynamoDBTable:
    Type: AWS::DynamoDB::Table
    Properties:
      TableName: !Sub '${AWS::StackName}-table'
      AttributeDefinitions:
        - AttributeName: id
          AttributeType: S
      KeySchema:
        - AttributeName: id
          KeyType: HASH
      ProvisionedThroughput:
        ReadCapacityUnits: 5
        WriteCapacityUnits: 5

  LambdaInvokePermission:
    Type: AWS::Lambda::Permission
    Properties:
      Action: lambda:InvokeFunction
      FunctionName: !GetAtt ProcessDataFunction.Arn
      Principal: s3.amazonaws.com
      SourceArn: !Sub 'arn:aws:s3:::${S3Bucket}'

  CustomS3Notification:
    Type: Custom::S3Notification
    DependsOn: LambdaInvokePermission
    Properties:
      ServiceToken: !GetAtt CustomS3NotificationFunction.Arn
      BucketName: !Ref S3Bucket
      LambdaFunctionArn: !GetAtt ProcessDataFunction.Arn

  CustomS3NotificationFunction:
    Type: AWS::Lambda::Function
    Properties:
      Handler: index.handler
      Runtime: python3.12
      Code:
        ZipFile: |
          import boto3
          import cfnresponse

          s3 = boto3.client('s3')

          def handler(event, context):
              try:
                  if event['RequestType'] == 'Create':
                      bucket_name = event['ResourceProperties']['BucketName']
                      lambda_function_arn = event['ResourceProperties']['LambdaFunctionArn']
                      response = s3.put_bucket_notification_configuration(
                          Bucket=bucket_name,
                          NotificationConfiguration={
                              'LambdaFunctionConfigurations': [
                                  {
                                      'Events': ['s3:ObjectCreated:*'],
                                      'LambdaFunctionArn': lambda_function_arn
                                  }
                              ]
                          }
                      )
                  cfnresponse.send(event, context, cfnresponse.SUCCESS, {})
              except Exception as e:
                  print(f'Error: {e}')
                  cfnresponse.send(event, context, cfnresponse.FAILED, {'Message': str(e)})

      Role: !GetAtt CustomS3NotificationFunctionRole.Arn

  CustomS3NotificationFunctionRole:
    Type: AWS::IAM::Role
    Properties:
      AssumeRolePolicyDocument:
        Version: '2012-10-17'
        Statement:
          - Effect: Allow
            Principal:
              Service: lambda.amazonaws.com
            Action: sts:AssumeRole
      Policies:
        - PolicyName: CustomS3NotificationPolicy
          PolicyDocument:
            Version: '2012-10-17'
            Statement:
              - Effect: Allow
                Action:
                  - s3:PutBucketNotification
                Resource: !Sub 'arn:aws:s3:::${S3Bucket}'
              - Effect: Allow
                Action:
                  - logs:CreateLogGroup
                  - logs:CreateLogStream
                  - logs:PutLogEvents
                Resource: '*'

Outputs:
  S3BucketName:
    Description: Name of the S3 bucket
    Value: !Ref S3Bucket
  LambdaFunction:
    Description: ARN of the Lambda function
    Value: !GetAtt ProcessDataFunction.Arn
  DynamoDBTableName:
    Description: Name of the DynamoDB table
    Value: !Ref DynamoDBTable
This template accomplishes the following:
- Creates an S3 bucket.
- Creates a DynamoDB table.
- Creates a Lambda function (
ProcessDataFunction) that will process S3 events and interact with the DynamoDB table. - Grants the necessary permissions for the Lambda function to access the S3 bucket and DynamoDB table.
- Sets up an S3 bucket notification to trigger the Lambda function upon object creation using a custom Lambda function (
CustomS3NotificationFunction). - Outputs the names and ARNs of the created resources.
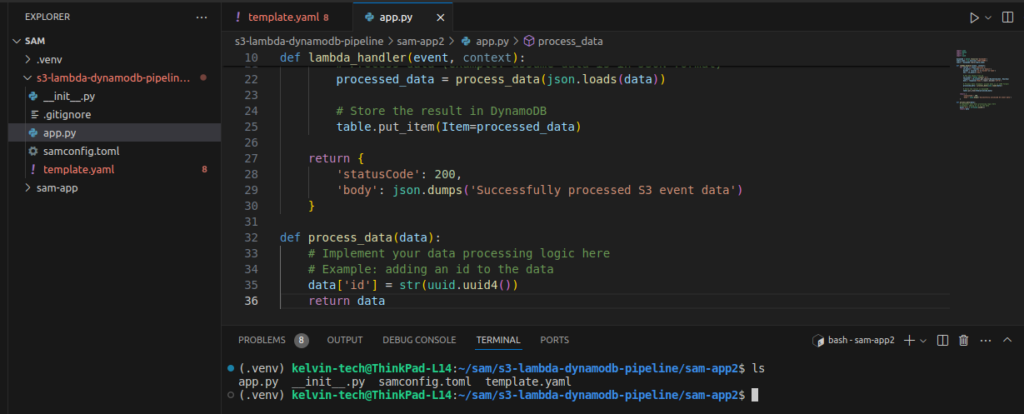
Step 4: Create the Lambda Function Code
Create a file named app.py in your project directory and add the following code to handle S3 events and process data:
import json
import boto3
import os
import uuid

dynamodb = boto3.resource('dynamodb')
table_name = os.environ['TABLE_NAME']
table = dynamodb.Table(table_name)

def lambda_handler(event, context):
    for record in event['Records']:
        s3_object = record['s3']['object']
        bucket = record['s3']['bucket']['name']
        key = s3_object['key']

        # Get the object from S3
        s3_client = boto3.client('s3')
        response = s3_client.get_object(Bucket=bucket, Key=key)
        data = response['Body'].read().decode('utf-8')

        # Process data (example: assume data is in JSON format)
        processed_data = process_data(json.loads(data))

        # Store the result in DynamoDB
        table.put_item(Item=processed_data)

    return {
        'statusCode': 200,
        'body': json.dumps('Successfully processed S3 event data')
    }

def process_data(data):
    # Implement your data processing logic here
    # Example: adding an id to the data
    data['id'] = str(uuid.uuid4())
    return data
Here’s my directory structure:
Step 5: Build and Deploy the SAM Application
Use the AWS SAM CLI to build and deploy your application.
sam build
sam deploy --guided
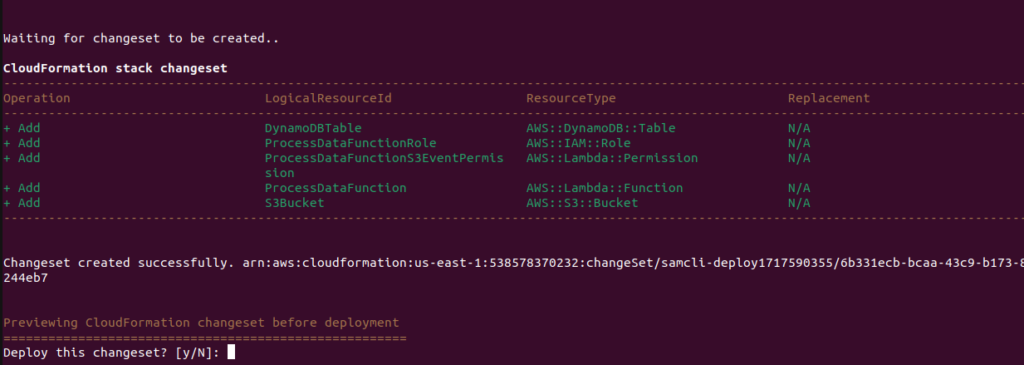

Follow the prompts to deploy your application. This will package your code, upload it to an S3 bucket, and deploy the resources specified in your template.yaml file.
IMPORTANT: if your build fails due to the error: ‘bucket-already-exists‘, change the s3-prefix in your samconfig.toml file.
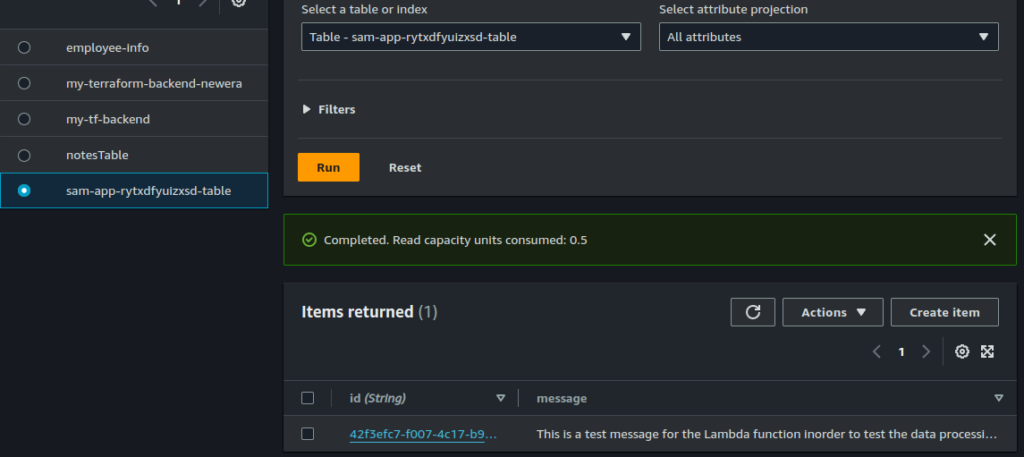
Step 6: Test the Pipeline
Create a sample test.json file and add the following content.
{
  "message": "This is a test message for the Lambda function inorder to test the data processing pipeline."
}
To test the setup, upload a file to the S3 bucket.
aws s3 cp test.json s3://<your-s3-bucket-name>/Check the DynamoDB table to verify that the processed data has been stored.
Complete Code and Template
template.yaml:
AWSTemplateFormatVersion: '2010-09-09'
Transform: 'AWS::Serverless-2016-10-31'
Resources:
  S3Bucket:
    Type: AWS::S3::Bucket
    Properties:
      BucketName: !Sub '${AWS::StackName}-bucket'

  ProcessDataFunction:
    Type: AWS::Serverless::Function
    Properties:
      Handler: app.lambda_handler
      Runtime: python3.12
      CodeUri: .
      Policies:
        - AWSLambdaBasicExecutionRole
        - DynamoDBCrudPolicy:
            TableName: !Ref DynamoDBTable
        - Statement:
            Effect: Allow
            Action:
              - s3:GetObject
              - s3:PutObject
            Resource: !Sub 'arn:aws:s3:::${S3Bucket}/*'
      Environment:
        Variables:
          TABLE_NAME: !Ref DynamoDBTable

  DynamoDBTable:
    Type: AWS::DynamoDB::Table
    Properties:
      TableName: !Sub '${AWS::StackName}-table'
      AttributeDefinitions:
        - AttributeName: id
          AttributeType: S
      KeySchema:
        - AttributeName: id
          KeyType: HASH
      ProvisionedThroughput:
        ReadCapacityUnits: 5
        WriteCapacityUnits: 5

  LambdaInvokePermission:
    Type: AWS::Lambda::Permission
    Properties:
      Action: lambda:InvokeFunction
      FunctionName: !GetAtt ProcessDataFunction.Arn
      Principal: s3.amazonaws.com
      SourceArn: !Sub 'arn:aws:s3:::${S3Bucket}'

  CustomS3Notification:
    Type: Custom::S3Notification
    DependsOn: LambdaInvokePermission
    Properties:
      ServiceToken: !GetAtt CustomS3NotificationFunction.Arn
      BucketName: !Ref S3Bucket
      LambdaFunctionArn: !GetAtt ProcessDataFunction.Arn

  CustomS3NotificationFunction:
    Type: AWS::Lambda::Function
    Properties:
      Handler: index.handler
      Runtime: python3.12
      Code:
        ZipFile: |
          import boto3
          import cfnresponse

          s3 = boto3.client('s3')

          def handler(event, context):
              try:
                  if event['RequestType'] == 'Create':
                      bucket_name = event['ResourceProperties']['BucketName']
                      lambda_function_arn = event['ResourceProperties']['LambdaFunctionArn']
                      response = s3.put_bucket_notification_configuration(
                          Bucket=bucket_name,
                          NotificationConfiguration={
                              'LambdaFunctionConfigurations': [
                                  {
                                      'Events': ['s3:ObjectCreated:*'],
                                      'LambdaFunctionArn': lambda_function_arn
                                  }
                              ]
                          }
                      )
                  cfnresponse.send(event, context, cfnresponse.SUCCESS, {})
              except Exception as e:
                  print(f'Error: {e}')
                  cfnresponse.send(event, context, cfnresponse.FAILED, {'Message': str(e)})

      Role: !GetAtt CustomS3NotificationFunctionRole.Arn

  CustomS3NotificationFunctionRole:
    Type: AWS::IAM::Role
    Properties:
      AssumeRolePolicyDocument:
        Version: '2012-10-17'
        Statement:
          - Effect: Allow
            Principal:
              Service: lambda.amazonaws.com
            Action: sts:AssumeRole
      Policies:
        - PolicyName: CustomS3NotificationPolicy
          PolicyDocument:
            Version: '2012-10-17'
            Statement:
              - Effect: Allow
                Action:
                  - s3:PutBucketNotification
                Resource: !Sub 'arn:aws:s3:::${S3Bucket}'
              - Effect: Allow
                Action:
                  - logs:CreateLogGroup
                  - logs:CreateLogStream
                  - logs:PutLogEvents
                Resource: '*'

Outputs:
  S3BucketName:
    Description: Name of the S3 bucket
    Value: !Ref S3Bucket
  LambdaFunction:
    Description: ARN of the Lambda function
    Value: !GetAtt ProcessDataFunction.Arn
  DynamoDBTableName:
    Description: Name of the DynamoDB table
Value: !Ref DynamoDBTableapp.py:
import json
import boto3
import os
import uuid

dynamodb = boto3.resource('dynamodb')
table_name = os.environ['TABLE_NAME']
table = dynamodb.Table(table_name)

def lambda_handler(event, context):
    for record in event['Records']:
        s3_object = record['s3']['object']
        bucket = record['s3']['bucket']['name']
        key = s3_object['key']

        # Get the object from S3
        s3_client = boto3.client('s3')
        response = s3_client.get_object(Bucket=bucket, Key=key)
        data = response['Body'].read().decode('utf-8')

        # Process data (example: assume data is in JSON format)
        processed_data = process_data(json.loads(data))

        # Store the result in DynamoDB
        table.put_item(Item=processed_data)

    return {
        'statusCode': 200,
        'body': json.dumps('Successfully processed S3 event data')
    }

def process_data(data):
    # Implement your data processing logic here
    # Example: adding an id to the data
    data['id'] = str(uuid.uuid4())
    return data
This Lambda function is triggered by an S3 event (S3 CreateObject event). It iterates through the S3 objects in the event, downloads them, processes the data (assuming JSON format), and stores the processed data in DynamoDB. Finally, it returns a success message.
To learn more about AWS lambda and it’s advanced features, read this post.
To learn more about DynamoDB and get a comprehensive undersanding of all it’s features, inlcuding code samples, read this post.
Scenario 3: Real-time Stream Processing
Build a real-time stream processing application using AWS Kinesis and AWS Lambda to analyze and process data streams.
Step-by-Step Guide
Step 1: Create a Kinesis Stream
First, create a Kinesis stream using the AWS Management Console or AWS CLI.
aws kinesis create-stream --stream-name MyKinesisStream --shard-count 1Step 2: Create an AWS SAM Template
Create a new directory for your project and a SAM template file.
mkdir kinesis-lambda-app
cd kinesis-lambda-app
touch template.yaml
Add the following content to the template.yaml file:
AWSTemplateFormatVersion: '2010-09-09'
Transform: 'AWS::Serverless-2016-10-31'
Resources:
  KinesisStream:
    Type: AWS::Kinesis::Stream
    Properties:
      ShardCount: 1

  KinesisLambdaFunction:
    Type: AWS::Serverless::Function
    Properties:
      Handler: app.lambda_handler
      Runtime: python3.9
      CodeUri: .
      Policies:
        - AWSLambdaKinesisExecutionRole
      Environment:
        Variables:
          STREAM_NAME: !Ref KinesisStream
      Events:
        KinesisEvent:
          Type: Kinesis
          Properties:
            Stream: !GetAtt KinesisStream.Arn
            StartingPosition: TRIM_HORIZON

Outputs:
  KinesisStreamName:
    Description: Name of the Kinesis stream
    Value: !Ref KinesisStream
  LambdaFunction:
    Description: ARN of the Lambda function
    Value: !GetAtt KinesisLambdaFunction.Arn
Step 3: Create the Lambda Function
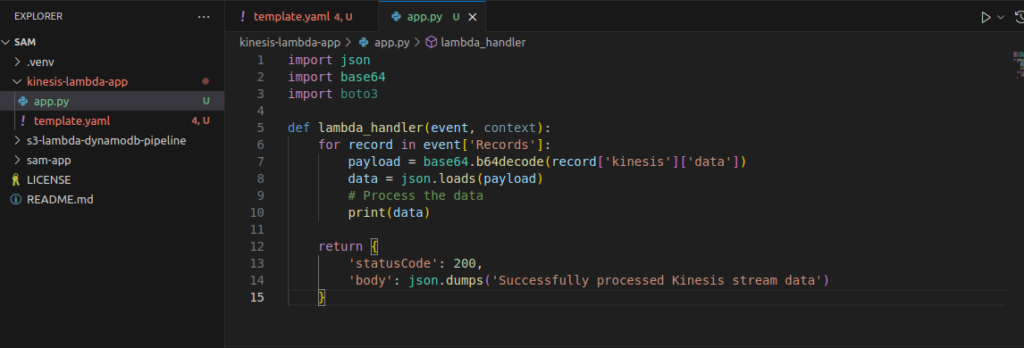
Create a new Python file named app.py in the same directory:
touch app.pyAdd the following code to app.py:
import json
import base64
import boto3

def lambda_handler(event, context):
    for record in event['Records']:
        payload = base64.b64decode(record['kinesis']['data'])
        data = json.loads(payload)
        # Process the data
        print(data)

    return {
        'statusCode': 200,
        'body': json.dumps('Successfully processed Kinesis stream data')
    }
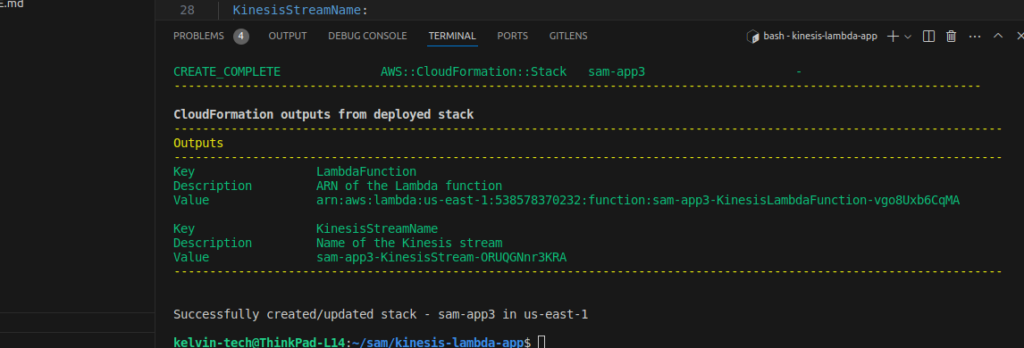
Step 4: Build and Deploy the SAM Application
Use the AWS SAM CLI to build and deploy your application.
sam build
sam deploy --guided
Follow the prompts to deploy your application. This will package your code, upload it to an S3 bucket, and deploy the resources specified in your template.yaml file.
Step 5: Test the Application
You can test the setup by putting records into the Kinesis stream.
aws kinesis put-record --stream-name MyKinesisStream --partition-key "partitionKey" --data '{"key": "value"}'Check the logs of your Lambda function to verify that it has processed the data. You can view the logs in the AWS CloudWatch Logs console.
Complete Code and Template
template.yaml:
AWSTemplateFormatVersion: '2010-09-09'
Transform: 'AWS::Serverless-2016-10-31'
Resources:
  KinesisStream:
    Type: AWS::Kinesis::Stream
    Properties:
      ShardCount: 1

  KinesisLambdaFunction:
    Type: AWS::Serverless::Function
    Properties:
      Handler: app.lambda_handler
      Runtime: python3.9
      CodeUri: .
      Policies:
        - AWSLambdaKinesisExecutionRole
      Environment:
        Variables:
          STREAM_NAME: !Ref KinesisStream
      Events:
        KinesisEvent:
          Type: Kinesis
          Properties:
            Stream: !GetAtt KinesisStream.Arn
            StartingPosition: TRIM_HORIZON

Outputs:
  KinesisStreamName:
    Description: Name of the Kinesis stream
    Value: !Ref KinesisStream
  LambdaFunction:
    Description: ARN of the Lambda function
Value: !GetAtt KinesisLambdaFunction.Arnapp.py:
import json
import base64
import boto3

def lambda_handler(event, context):
    for record in event['Records']:
        payload = base64.b64decode(record['kinesis']['data'])
        data = json.loads(payload)
        # Process the data
        print(data)

    return {
        'statusCode': 200,
        'body': json.dumps('Successfully processed Kinesis stream data')
    }
Best Practices for AWS SAM
1. Modularize Your Code: Organize your code into separate modules and functions for better maintainability.
2. Use Environment Variables: Manage configuration and sensitive data using environment variables.
3. Monitor and Optimize: Use AWS CloudWatch for monitoring and optimizing the performance of your serverless applications.
4. Security: Implement proper IAM roles and policies to secure your serverless application.
Final Thoughts on AWS SAM
AWS SAM simplifies the process of building, testing, and deploying serverless applications. By following this practical guide, cloud engineers can quickly get started with AWS SAM and leverage its powerful features to build scalable and efficient serverless applications. Whether you’re building a simple API, a data processing pipeline, or a real-time application, AWS SAM provides the tools and framework you need to succeed in the serverless world.
Start your serverless journey today with AWS SAM, and unlock the full potential of serverless computing.
N.B: You can find all the code used in this project here.
Happy Clouding !!!