
A great way to use AWS services while developing locally with SQS, S3, and Lambda examples.
When working with the leading cloud provider in the market, AWS, it is important to constantly use their native services. These services may not be open source, which makes it challenging to apply them for local development. However, when working in a local environment, it is necessary to simplify the process and concentrate on coding instead of dealing with administrative issues like IAM and other complications.
Today, I want to introduce you to a fantastic way of emulating cloud providers using Localstack. This service is incredibly easy to use and I highly recommend it for this specific purpose. With Localstack, you can emulate all the major AWS benefits, including
- Lambda, which is a serverless runtime for small functions
- S3, one of the most popular file storage systems,
- SQS for queuing your messages
- and many others (more than 80, as they claim)
Additionally, using this service can help you save a significant amount of money. While I won’t cover all the broad functionality, I will focus on some examples.
Running Localstack
First of all, let’s set up Localstack on our computer. There are multiple ways to perform it, but I will use their Docker image in this article. Let’s first pull this image.
docker pull localstack/localstackYou will also need a localstack and awscli-local packages to use them with your Docker container. A simple install with pip manager is enough.
pip install --upgrade localstack
pip install awscli-local
The final step is to run our Docker container, attaching the Docker socket. This is required for Lambda functions and other services that necessitate opening additional containers. We will elaborate on this later.
docker run \
  --rm -it \
  -p 4566:4566 \
  -p 4510-4559:4510-4559 \
  -v /var/run/docker.sock:/var/run/docker.sock \
  localstack/localstack
Let’s use the basic command to list S3 buckets in order to verify that everything is working correctly. We expect to receive a response and see logging in our Docker terminal.
awslocal s3api list-buckets
# INFO --- [   asgi_gw_0] localstack.request.aws     : AWS s3.ListBuckets => 200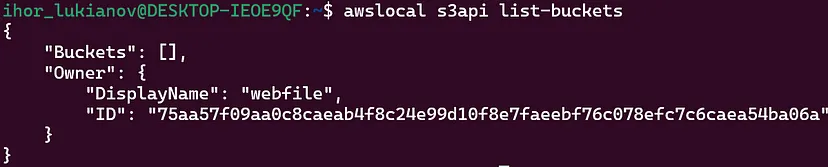
Let’s dive deeper into different services since everything is running. As we saw in the S3 example, we can start here with the basics.
Testing services
In the following examples, I will utilize the boto3 library in Python, which provides a great alternative to awscli commands. You can use boto3 with Localstack by specifying its endpoint URL.
import boto3

endpoint_url = "http://localhost.localstack.cloud:4566"

s3 = boto3.client("s3", endpoint_url=endpoint_url)
print(s3.list_buckets())
Simple Storage Service (S3)
In this section, we will discuss some fundamental functionalities that are essential for development purposes. Firstly, we will learn how to create a new bucket and work with objects on the S3 service.
To begin, let’s create a new bucket. Once the bucket is created, we will receive a response that includes the location of the new bucket. This bucket will be hosted in our Localstack container.
s3 = boto3.client("s3", endpoint_url=endpoint_url)

resp = s3.create_bucket(Bucket='test-bucket', CreateBucketConfiguration={
    'LocationConstraint': 'us-west-1'})

#'Location': 'http://test-bucket.s3.localhost.localstack.cloud:4566/'
We can now proceed with testing the process of adding an object to the recently created bucket. Once we have listed all the objects in the current bucket, we will be able to see the new object and its details such as size, storage class, and others. The functionality remains almost identical, and you do not need to interact directly with the AWS cloud.
response = s3.put_object(
    Body='test.txt',
    Bucket='test-bucket',
    Key='test.txt',
)

print(response)
# 'HTTPStatusCode': 200

list_obj_resp = s3.list_objects_v2(
    Bucket='test-bucket'
)

print(list_obj_resp['Contents'])
# [{'Key': 'test.txt',
# 'LastModified': datetime.datetime(2024, 3, 9, 10, 6, 7, tzinfo=tzutc()),
# 'Size': 8, 'StorageClass': 'STANDARD'}]
Simple Queue Service (SQS)
Amazon SQS is a popular service provided by AWS that offers message queuing capabilities for various applications, including microservices and distributed systems. In this article, we will focus on three main aspects of SQS:
- Creating a new queue
- Sending, receiving, and deleting messages from the queue
- Retrieving the URL of a newly created queue, which is required to send messages to it. Once you create a new queue, SQS will return a URL that can be used to send messages to the queue at a later time.
sqs = boto3.client('sqs', endpoint_url=endpoint_url)

create_queue_resp = sqs.create_queue(
    QueueName='test-queue',
)
print(create_queue_resp)
# 'QueueUrl': 'http://sqs.ap-southeast-1.localhost.localstack.cloud:4566/000000000000/test-queue'

list_queues_resp = sqs.list_queues()
queue_url = create_queue_resp['QueueUrls'][0]
print(list_queues_resp)
# 'QueueUrls': ['http://sqs.ap-southeast-1.localhost.localstack.cloud:4566/000000000000/test-queue']
The basic steps have been completed and we have successfully created our queue. Now, we need to verify its functionality by sending a message to it and ensuring that it has been received successfully. Below is the code block that requests the attributes of our queue along with the number of messages present in it.
message = json.dumps({"test": 1})
send_message_resp = sqs.send_message(
    QueueUrl=queue_url,
    MessageBody=message
)
print(send_message_resp)
# 'HTTPStatusCode': 200

get_att_resp = sqs.get_queue_attributes(
    QueueUrl=queue_url,
    AttributeNames=[
        'ApproximateNumberOfMessages',
        'QueueArn'
    ]
)
print(get_att_resp)
# {'ApproximateNumberOfMessages': '1', 'QueueArn': 'arn:aws:sqs:ap-southeast-1:000000000000:test-queue'}
On the other end, we should perform the receiving of this message and delete it from the queue. These are all pretty fundamental operations, but it’s great that you can do it all locally without touching the current cloud infrastructure.
#receive the message
received_message = sqs.receive_message(
    QueueUrl=queue_url,
    MaxNumberOfMessages=1
)

# delete received message
receipt_handle = received_message['Messages']['ReceiptHandle']
delete_message_resp = sqs.delete_message(
    QueueUrl=queue_url,
    ReceiptHandle=receipt_handle,
)

print(received_message['Messages']['Body'])
# '{"test": 1}'
After all these steps, we should see some successful logs in the Docker terminal.

Finally, let’s delete the queue, as we no longer need it. We will come back to this process just in a minute.
response = sqs.delete_queue(
    QueueUrl=queue_url
)
Lambda
As we come to the end of our discussion on AWS services, I’d like to cover Lambda, which is a crucial aspect of AWS. Developing Lambda functions on AWS can be confusing, but we can achieve the same functionality locally using Localstack. This allows us to customize the function to suit our needs better.
Let’s start by creating a basic hello world function that will print the classic message for every programmer. We need to zip the function since Lambda works with compressed files.
zip hello_world.zip hello_world.pyThis is the code for the simplest function for the demo purpose:
def handler(event, context):
    print("Hello, World!")
    # You can add more logic here if needed
    return {
        'statusCode': 200,
        'body': 'Hello, World!'
    }
As the next step, we can create a Lambda function using the zip file and generate a URL for manual triggering. Lambda is an extremely useful service that can be connected to other services like SQS. However, for now, let’s focus on using the URL for manual invocation.
endpoint_url = "http://localhost.localstack.cloud:4566"

lambda_client = boto3.client('lambda', endpoint_url=endpoint_url)

zip_filename = "hello_world.zip"
with open(zip_filename, 'rb') as f:
    create_resp = lambda_client.create_function(
        FunctionName="hello-python-test",
        Runtime="python3.10",
        Role="arn:aws:iam::000000000000:role/lambda-role",
        Handler="hello_world.handler",
        Code={'ZipFile': f.read()},
        MemorySize=128,
    )

    print(create_resp)

create_url_resp = lambda_client.create_function_url_config(
    FunctionName="hello-python-test",
    AuthType="NONE",
)

function_url = create_url_resp["create_url_resp"]
print(function_url)
Now let’s call the function manually with the following bash command. The response to it is our Hello World! message, where everything is just correct.
curl -X POST \
    'http://f5a7i6hg2qxbkrwtfq6ulflknt01mt7f.lambda-url.us-east-1.localhost.localstack.cloud:4566/' \
    -H 'Content-Type: application/json'
After the invocation, a new docker container is created specifically for this function to run in. This is done to create a container for our lambda runtime and is an easy and efficient way to get started.

Surely, you can create more complex scripts and develop them into ready functions. In the previous sections, we covered three large AWS services that work well for many companies. Now, let’s create something that is more relevant to real-world development.
Application with all services
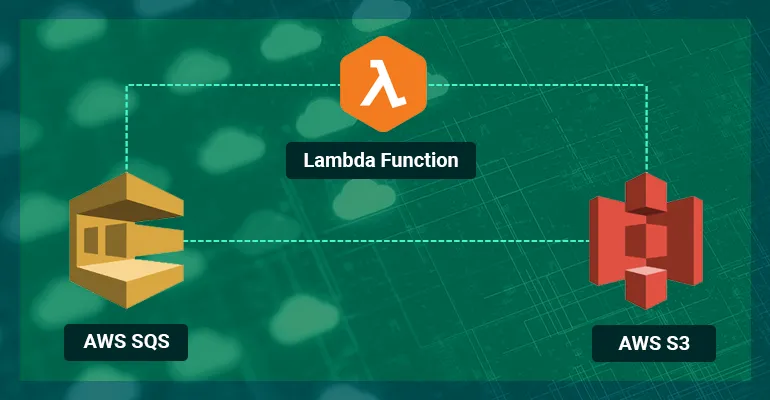
In the previous example, we learned how to use individual services separately. However, this approach may not be very useful in practice. The real power lies in building applications that use multiple components. Let’s create a simple Lambda function that can be triggered by SQS messages and can store them as an S3 object.
First of all, let’s define the infrastructure we need in a script for it. We need an S3 bucket and one SQS queue as a bare minimum.
import boto3

# use this endpoint for localstack
endpoint_url = "http://localhost.localstack.cloud:4566"

s3 = boto3.client("s3", endpoint_url=endpoint_url)
sqs = boto3.client('sqs', endpoint_url=endpoint_url)
lambda_client = boto3.client('lambda', endpoint_url=endpoint_url)

# create bucket for an application
create_bucket_resp = s3.create_bucket(Bucket='app-bucket', CreateBucketConfiguration={
    'LocationConstraint': 'us-west-1'})

# create queue for application
create_queue_resp = sqs.create_queue(
    QueueName='app-queue',
)
Great, now we can set up our consumer, which will be responsible for sending data to the queue every two seconds. The example is relatively simple and serves only as input for the queue. It’s important to note that the data you will be working with may come in different formats, so a significant portion of the work will involve writing code specific to your use case.
import boto3
import random
import json
import time

# use this endpoint for localstack
endpoint_url = "http://localhost.localstack.cloud:4566"

sqs = boto3.client('sqs', endpoint_url=endpoint_url)
list_queues_resp = sqs.list_queues()
queue_url = list_queues_resp['QueueUrls'][0]

while True:
    message = {random.randint(0, 100000): str(random.randint(1, 100000))}
    message = json.dumps(message)

    sqs.send_message(
        QueueUrl=queue_url,
        MessageBody=message
    )

    time.sleep(2)
We have a Lambda function that will retrieve data from a queue. Our goal is to extract some amount of the latest events from the queue and save it to a local CSV file. Once the data is saved, it can be transferred to an S3 bucket for storage. The input for this function is an event, which is retrieved from the SQS queue.
import boto3
import csv
import datetime
import os


def handler(event, context):
    print(event)

    # use this endpoint for localstack
    endpoint_url = "http://localhost.localstack.cloud:4566"

    filename = 'app_output-{date:%Y-%m-%d_%H:%M:%S}.txt'.format(date=datetime.datetime.now())
    with open(filename, 'w') as f:

        # using csv.writer method from CSV package
        write = csv.writer(f)

        write.writerows(event)

    s3 = boto3.client("s3", endpoint_url=endpoint_url)
    # put object to the app bucket
    put_object_resp = s3.put_object(
        Body=filename,
        Bucket='app-bucket',
        Key=filename,
    )

    os.remove(filename)
We can create a function based on the code we have written above. This example is similar to what we have done earlier. However, here we are creating an event source mapping that will trigger our Lambda function after 20 new messages are added to the SQS queue (BatchSize=20), or it will collect all the messages every 60 seconds (MaximumBatchingWindowInSeconds=60).
As you can see, we have our SQS queue as a source and provide the name of the function as a destination. You can read more on this approach here.
import boto3

endpoint_url = "http://localhost.localstack.cloud:4566"
lambda_client = boto3.client('lambda', endpoint_url=endpoint_url)

# creating function from zip file
zip_filename = "consumer.zip"
with open(zip_filename, 'rb') as f:
    create_resp = lambda_client.create_function(
        FunctionName="consumer",
        Runtime="python3.10",
        Role="arn:aws:iam::000000000000:role/lambda-role",
        Handler="consumer.handler",
        Code={'ZipFile': f.read()},
        MemorySize=128,
    )

# creating event source mapping, which allows read last 20 inputs to the SQS queue
event_source_resp = lambda_client.create_event_source_mapping(
    EventSourceArn='arn:aws:sqs:ap-southeast-1:000000000000:app-queue',
    FunctionName='consumer',
    Enabled=True,
    BatchSize=20,
    MaximumBatchingWindowInSeconds=60,
)
After listing objects in this bucket we will see, that two objects were created one after another. As we have a Python runtime on the Lambda side, it’s possible to make all kinds of transformations for your needs.
list_obj_resp = s3.list_objects_v2(
    Bucket='app-bucket'
)
print(list_obj_resp['Contents'])
It is even more professional to move this infrastructure on code with some IaC frameworks, like Terraform or AWS CloudFormation, but we won’t touch this broad topic today. However, Localstack also excellently works with them.
Other useful services
- Elastic Compute Cloud (EC2) — launching instances as other Docker containers and setting up networking.
- Identity and Access Management (IAM) — setting up administration rules.
- Kinesis — stream data and build services around it.
- Relational Database Service (RDS) (available only in the pro package) — use the database in your application. However, you can simply run an open-source database like PostgreSQL from another Docker container.
- Simple Notification Service (SNS) — in addition to SQS, which works together quite often.
These are just a couple of examples, you can find the full list of supported services in the Localstack documentation:
AWS Service Feature Coverage – Overview of the implemented AWS APIs and their level of parity with the AWS cloud. docs.localstack.cloud
Conclusions
In this article, we have discussed a very useful framework for local development on AWS services called Localstack. Through practical examples, we have discovered only a fraction of the local development power that this framework brings.
The benefits of this approach are many, starting with saving time on administrative issues and going all the way to reducing cost expenses. I believe that you can now build some simple code to work with S3, SQS, and Lambda functions. This combination is widely used in many companies, and you should definitely move in this direction.
What’s more, all these concepts are absolutely applicable to the actual AWS services. So when moving your code to production, you won’t need to rewrite and adapt it to some special standards. Surely, you can also test some of the examples above as a guideline.
Download Source Code
$ git clone https://github.com/favtuts/aws-localstack-practices.git
$ cd lambda-sqs-s3-stack