There are several courses available on this topic – Docker. Some of them are very short and do not serve any other purpose than a ‘Getting started course’, while others are super long and require you to spend several days to study and understand everything. My aim with this tutorial is hit a balance between conciseness and exhaustiveness.
The following section is more of an appreciation section for Docker. If you are already aware of what Docker is and how is it useful, you can save some time by skipping over to the next section.
- Introduction
- Docker File
- Basic Docker Commands
- Port and Volume Mapping
- Docker Networking
- Docker Storage
- Docker Compose
- Deleting Docker Entities
Introduction
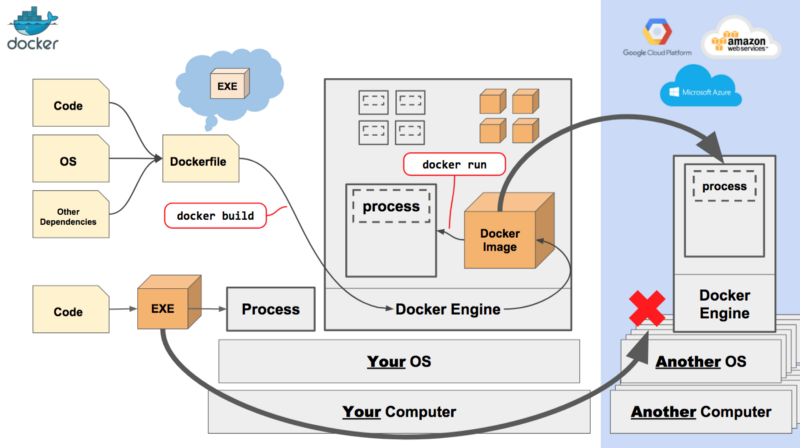
Docker is a tool designed to make creating, deploying, and running applications by using containers easier. Containers allow a developer to pack an application with all of the parts it needs, such as libraries and other dependencies, and ship it all out as one package.
When you have an application that requires multiple components to interact with each other, more often than not there will be a conflict in the version requirements of their dependent libraries. Once you have an agreement among all the components for the versions of their dependencies, adding another component or even upgrading one of them will break this agreement.

Docker solves this problem by putting each of these components into separate isolated environments, called ‘containers’, with their personal dependencies. All these containers still share the same kernel.

When compared with Virtual Machines, Docker containers are much lighter (lesser in size), require less time to spin-up, and aren’t completely isolated.


The question is not whether to use Virtual Machines or Docker Containers. The modern-day production deployments use both of them together. This architecture allows you to reduce the number of VMs which results in lesser consumption of resources and faster boot times.

Simply put, a docker image is a template of an application and its environment. We can spin-up multiple containers off a single image. An image contains everything needed to run the application for which it is built, including source code, libraries, configuration files, and environment variables. A docker container is a runtime instance of this image.

Docker image is a super powerful mechanism when it comes to scaling up your application. You can run as many containers as you require from a single image — all the containers will support the exact same dependencies. If you are using a container orchestrator, like Kubernetes, you merely need to state how many containers you want for a particular image and the orchestrator will create and maintain them on all of your Docker servers.
Upgrading production systems is seamless if you are using Docker Containers and have no downtime! You simply need to instruct the orchestrator that you want to run a new image version, and it gradually replaces every container with the one running the new version.
Docker File
Two very important aspects of becoming a Docker super user is the understanding of the Dockerfile and knowing your Docker commands. The idea of putting together this page is not to memorize but to familiarize yourself with available options. You can always revisit the page if you know what you are looking for.
Docker Commands
You can download and install Docker Community Edition for free. You can follow the instructions on Docker’s website, they are pretty straight forward and always latest.
Apart from the commands described below, I would like to refer you to a cheatsheet released by docker. They are now streamlining their commands, hence you’ll find several commands to do the exact same thing, for instance, removing an image can be done by either docker rmi or docker image rm command.
pull command
This command pulls an image from a docker public registry.
docker pull docker/whalesaybuild command
This command builds an image according to Dockerfile.
docker build [-t <name_of_image>] [-f <name_of_Dockerfile>] <path_to_Dockerfile>
run command
This command runs an instance of an image.
docker run --name nginx-container nginx:1.16
ps command
This command lists the docker containers.
docker ps
stop command
This command stops a running container(s).
docker stop nginx-containerrm command
This command removes a stopped container(s).
docker rm nginx-containerimages command
This command lists the docker images.
docker imagesrmi command
This command removes image(s).
docker rmi nginxattach command
This command attaches the terminal to a container running in the background (detached mode).
docker attach <container id or name>inspect command
This command returns details of the container in a JSON format.
docker inspect <container id or name>logs command
This command returns logs of the container running in the background (detached mode).
docker logs <container id or name>push command
This command pushes an image to your account on a docker public registry (dockerhub).
docker push sumeet/mlflow-postgresPort and Volume Mapping
In this section, we will learn how to map a port inside a docker container to a port of the docker host. More importantly, we will see how to have persistent storage.
To map a port on a host to a container we need to use the -p flag of the docker run command.
docker run -p <port_number_on_host>:<port_number_on_container> <image>The following command will run a container for mlflow and map port 7000 of this container to port 7000 of the docker host.
docker run -p 7000:7000 mlflow
Similarly, the following command will run a container for postgresql and map port 5432 of this container to port 5432 of the docker host.
docker run -p 5432:5432 postgresqlThe only important thing to note is that due to many to one association of containers and the host, once a service is already running on a port on the host we can not map another container to that port. Hence, in order to run another instance of postgresql on the host, we have to choose a port that is not in use.
docker run -p 1234:5432 postgresqlWe can similarly map a volume or a location on the host to a location inside the container for persistent storage.
docker run -v <location_on_host>:<location_on_container> <image>The following command will run an instance of postgresql and map /opt/db on the docker host to /home/db inside the container.
docker run -v /opt/db:/home/db postgresql
Docker Networking
How containers communicate with their host and each other!
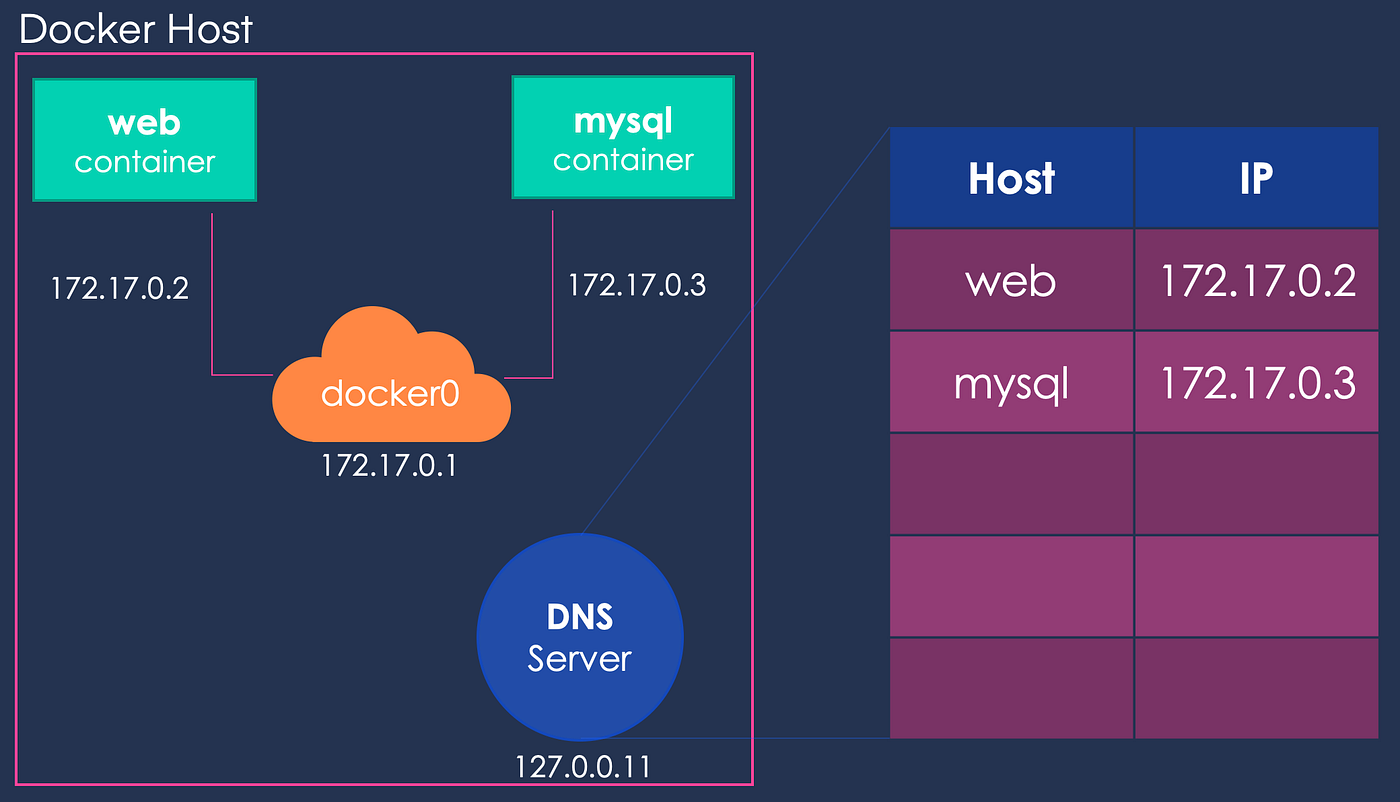
When you install docker it creates three networks automatically – Bridge, Host, and None. Of which, Bridge is the default network a container gets attached to when it is run. To attach the container to any other network you can use the –network flag of the run command.

The Bridge network assigns IPs in the range of 172.17.x.x to the containers within it. To access these containers from outside you need to map the ports of these containers to the ports on the host. Another automatically created network is Host. Selecting the Host network will remove any network isolation between the docker host and the containers. For instance, if you run a container on port 5000, it will be accessible on the same port on the docker host without any explicit port mapping. The only downside of this approach is that you can not use the same port twice for any container. Finally, the None network keeps the container in complete isolation, i.e. they are not connected to any network or container.
The containers can reach each other using their names. This is made possible by an Embedded DNS which runs on the address 127.0.0.11.
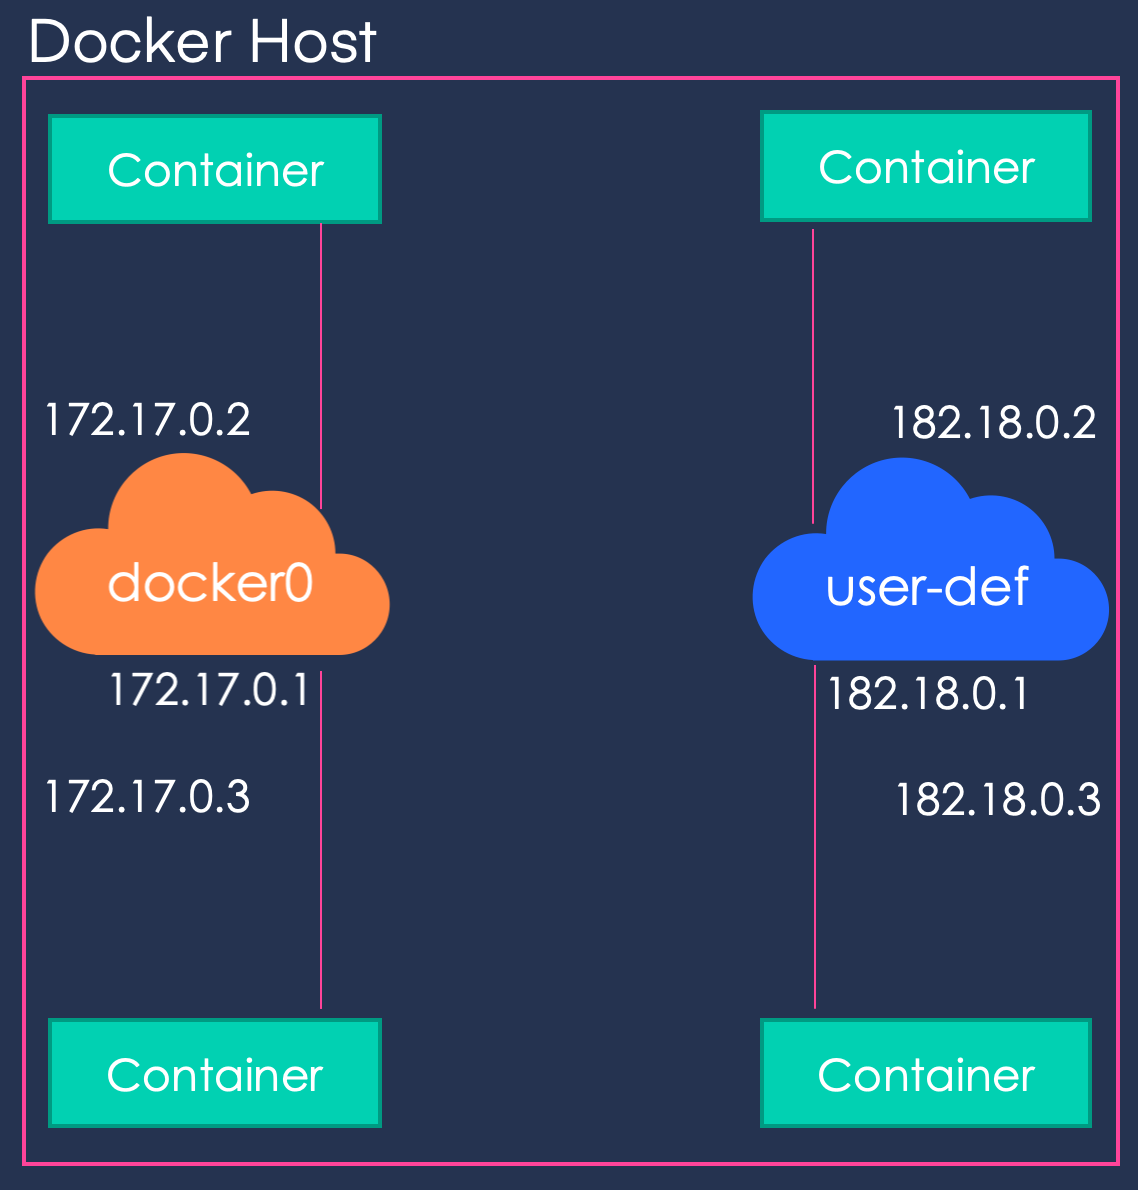
The containers get attached to the same network by default. What can we do if we want two containers on a separate network?

We can define a user-defined network for this purpose by using the following command and assigning this network when running the containers.
docker network create \
	--driver bridge \
	--subnet 182.18.0.0/16 \
	user-def
Docker Storage
In this section, we will discuss how docker stores data on the local file system, understand which layers are writable and would deepen our knowledge of persistent storage for containers.
On a linux system, docker stores data pertaining to images, containers, volumes, etc under /var/lib/docker.

When we run the docker build command, docker builds one layer for each instruction in the dockerfile. These image layers are read-only layers. When we run the docker run command, docker builds container layer(s), which are read-write layers.

You can create new files on the container, for instance, temp.txt in the image below. You can also modify a file that belongs to the image layers on the container, for instance, app.py in the image below. When you do this, a local copy of that file is created on the container layer and the changes only live on the container — this is called the Copy-on-Write mechanism. This is important as several containers and child images use the same image layers. The life of the files on the container is as long as the container is alive. When the container is destroyed, the files/modifications on it are also destroyed. To persist the data, we can use volume mapping techniques that we saw in the previous section.

You can create a docker volume by using the docker volume create command. This command will create a volume in the /var/lib/docker/volumes directory.
docker volume create data_volumeNow when you run the docker run command, you can specify which volume to use using the -v flag. This is called Volume Mounting.
docker run -v data_volume:/var/lib/postgres postgresIf the volume does not exist, docker creates one for you. Now, even if the container is destroyed the data will persist in the volume.
If you want to have your data on a specific location on the docker host or already have existing data on the disk, you can mount this location on the container as well. This is called Bind Mounting.
docker run -v /data/postgres:/var/lib/postgres postgres
Docker Compose
In this section, we will learn about Docker Compose, its file, and its commands, using a sample application developed by Docker called the Voting App.
The Voting App is a Flask application written in Python to vote between Cats and Dogs.

This vote is then transferred to Redis, which acts as an in-memory DB here. The worker application, written in .NET, then processes this vote and inserts it in the persistent database — the Postgres container here.

Finally, the result of the vote is displayed via a web application that is written in NodeJS.

I highly encourage you to clone this application and play around with it, even if you do not know anything about Docker Compose yet. If you can appreciate the fact that these services are running on 5 different containers you already have your motivation to continue reading.
git clone git@github.com:dockersamples/example-voting-app.git
cd example-voting-app/docker-compose up
Next, we look at the docker-compose file. It is a simple YAML file that starts with the service name and its details, including the image from which it is created, ports to map, other services to link to, etc.

Here we assume that every image is pre-build and available on the Docker Registry (Dockerhub in our case). To be able to build the services on our Docker Host, which is what we will do for the vote, result, and worker images, we have to replace the image attribute with the build attribute in the docker-compose file.

There are several versions of the docker-compose file due to its constant and fast development over the years. The change from version 1 to version 2 is moving of services into the services label and adding version label as the first line. Also, you do not need to the links anymore, as by default every container is connected to every other container using the Bridge network. depends_on was added to support the completion of building some containers before others in case of dependencies. Version 2 and version 3, for the limited scope of this tutorial, are largely the same. Just remember several features for Docker Swarm and other Container Orchestration software, like Kubernetes, were added in version 3 of docker-compose.

If you would like to isolate the traffic of the client-facing applications from the backend applications you can modify the docker-compose file by adding two networks — front-tier and back-tier and mention which service is on which network.
Note that this is not a complete docker-compose file and I have left out other details for brevity.

Running this docker-compose file will result in an application stack shown below.

If there is any docker-compose command that you need to remember — it is docker-compose up, as we saw with the voting app example. I am also providing a list of other commands as a reference.

In conclusion, with docker compose you could package and deliver a multi-container application that your clients can spin-up with a single command.
Deleting Docker Entities
Purging all unused or dangling Images, Containers, Volumes, and Networks
Docker provides a single command that will clean up any resources that are dangling (not associated with a container):
docker system pruneTo additionally remove any stopped containers and all unused images (not just dangling images), add the -a flag to the command:
docker system prune -aRemove all the images
docker rmi $(docker images -a -q)Remove all exited containers
docker rm $(docker ps -a -f status=exited -q)Stop and remove all the containers
docker stop $(docker ps -a -q)
docker rm $(docker ps -a -q)
References
- [1] Docker, Compose command-line reference (2020), Docker Documentation
- [2] Mumshad Mannambeth, Docker for the Absolute Beginners (2020), KodeKloud.com
- [3] Melissa Anderson, How To Remove Docker Images, Containers, and Volumes (2017), digitalocean.com