In a recent study, scientists have concluded that the Coronavirus also infects the Kubernetes pods 🤯 That is why we need to do Health Check for Kubernetes! Of course, I was kidding; but a health check or probe is indeed a method of checking the health of a Kubernetes pod. However, Kubernetes Readiness Probe and Kubernetes LivenessProbe help us with the health status of our applications.
What are Health Checks or Kubernetes Probes?
The process of checking the ‘health’ of Kubernetes to see if they are working correctly and receiving traffic is health checks, a.k.a, probes. It is used to monitor if instances of an application are running and responsive.

Yes, the Kubernetes detects the failures and restart pods; you are correct. But there are some situations where even K8s needs help when:
- The process hasn’t fully crashed, but it gets into a deadlock and doesn’t run anymore.
- The application isn’t technically in a deadlock. However, it can’t handle any requests.
Kubernetes resolve this by using probes. But, before we get to know them, I want to explain the lifecycle of Pods.
Lifecycle of a Kubernetes Pod
A Kubernetes pod is the most basic deployable, schedulable unit among all the other K8s objects. A pod consists of an application container(s), unique network IP, and storage resources that oversee how a container should run.
States of a Container
Kubernetes not only tracks the pod phases but also tracks the state of each container.

Running: The Running status states that a container is executing successfully.
Terminated: The termination state of a container is caused by either completion or failure from the running state.
Waiting: A container is Waiting when it is neither in Running nor in the Terminated state.
So, when your containers are not running, you do not want your users to get errors or no response from these containers. Consequently, the workaround is using the Kubernetes liveness and Kubernetes readiness probe.
Also Check: Our blog post on Kubernetes Prometheus. Click here
Why are Kubernetes Probes Important?
We all know how hard it gets to manage a distributed system. So, assuming that the separate components function independently, each part will keep running despite when other components have failed. Hence, sooner or later, an application may crash. Also, an app might still be in the initialization phase and not ready to receive and process requests.

K8s checks individual containers’ health to ascertain the overall pod health. But, you can only be assured of the system’s health if all of its components are running as desired. So, with probes, we can determine whether a container is dead or alive and decide if K8 s should momentarily halt other containers from accessing it.
Also Check: Our blog post on Kubernetes Deployment. Click here
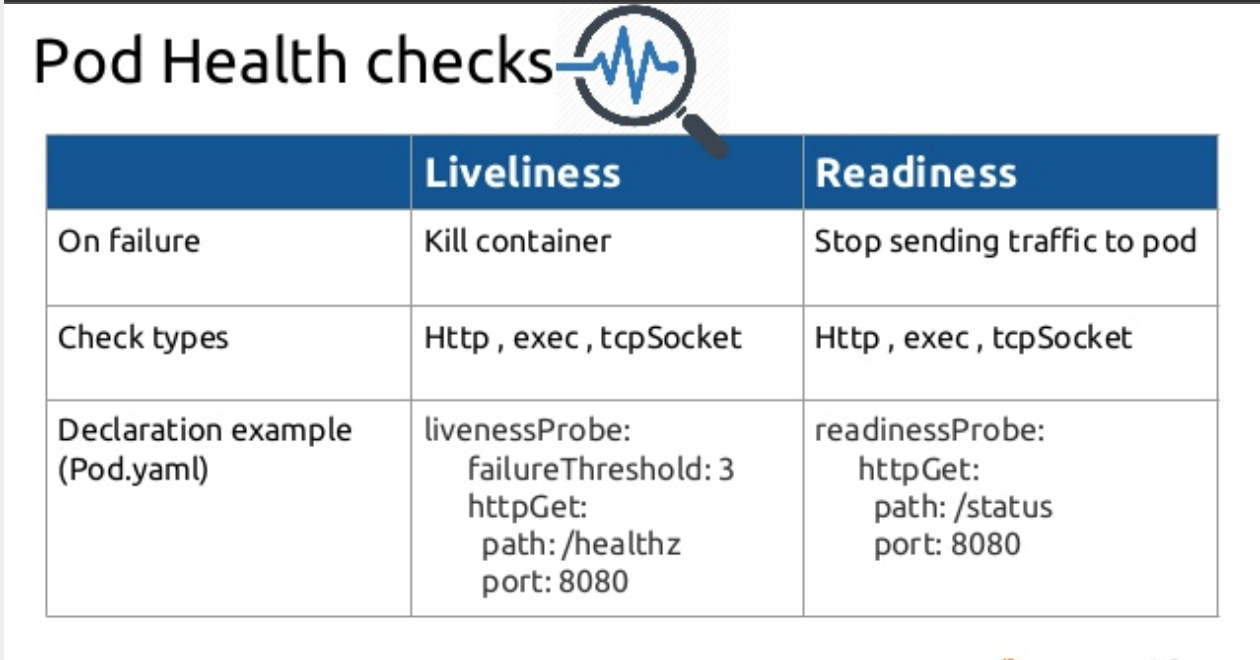
Types of Kubernetes Probes
As you saw earlier, containers are created, started, run, and terminated. So, to figure out the container’s health in the different stages of its lifecycle, K8s uses two different types of probes.
LivenessProbe
Kubernetes LivenesProbe indicates if a container is running and is executing as desired. The kubelet is responsible for killing the container and starting up a new one. If the LivenessProbe is not specified, the default state is Sucess.

Kubernetes LivenessProbe (Source ~ Wideops)
For instance, if an application stops responding and cannot advance because of a deadlock, the Kubernetes LivenessProbe recognizes the broken state. Therefore, the Kubelet then terminates and restarts the container. Even if the application carries defects that cause further deadlocks, the restart will increase the container’s availability. It also gives some time to recognize the faults and fix them later.
Also Check: Our blog post on Kubernetes Dashboard. Click here
Readiness Probe
ReadinessProbe tests run all through the container lifecycle. For example, K8s uses a readiness probe to determine whether the application is ready to serve the requests. Hence, in case of a failure, the container stops accepting traffic.

Kubernetes ReadinessProbes (Source ~ Wideops)
A pod is ready when all of its containers are ready. For instance, if a container needs to perform initialization tasks, like indexing files and populating database tables. Hence, only after the startup process completes, the container will start to serve or receive traffic. Throughout this time, the Kubernetes readiness probe will fail; as a result, Kubernetes will route requests to other containers.
Also Read: Our blog post on Kubernetes Operator. Click here
How to Create Kubernetes Probes?
There are three methods of implementing Kubernetes liveness and Kubernetes readiness probe:
- Running a command
- Opening a TCP socket
- Sending an HTTP request
For our demo, we will be checking how to implement LivenessProbe and ReadinessProbes for running a command.
Busybox Container with a Kubernetes LivenessProbe
Once you deploy the below YAML and configure a command probe, the kubelet executes the touch /tmp/healthy command in the target container. Kubelet considers your container healthy and alive if the command succeeds. Contrarily, Kubernetes terminates and restarts the container.
apiVersion: v1

kind: Pod

metadata:

  labels:

    test: liveness

  name: liveness-exec

spec:

  containers:

  - name: liveness

    image: k8s.gcr.io/busybox

    args:

    - /bin/sh

    - -c

    - touch /tmp/healthy; sleep 30; rm -rf /tmp/healthy; sleep 600

    livenessProbe:

      exec:

        command:

        - cat

        - /tmp/healthy

      initialDelaySeconds: 5
So, the configuration above describes a single container pod with the initialDelaySecondsand the periosdSeconds keys inform kubelet to perform a liveness probe every 5 seconds and wait 5 seconds for the first Probe.
The job of the Kubelet here will run the touch /tmp/healthy command in the container to execute a Kubernetes LivenessProbe.
Below is the output when you perform a describe command:
$ kubectl describe pod liveness-pod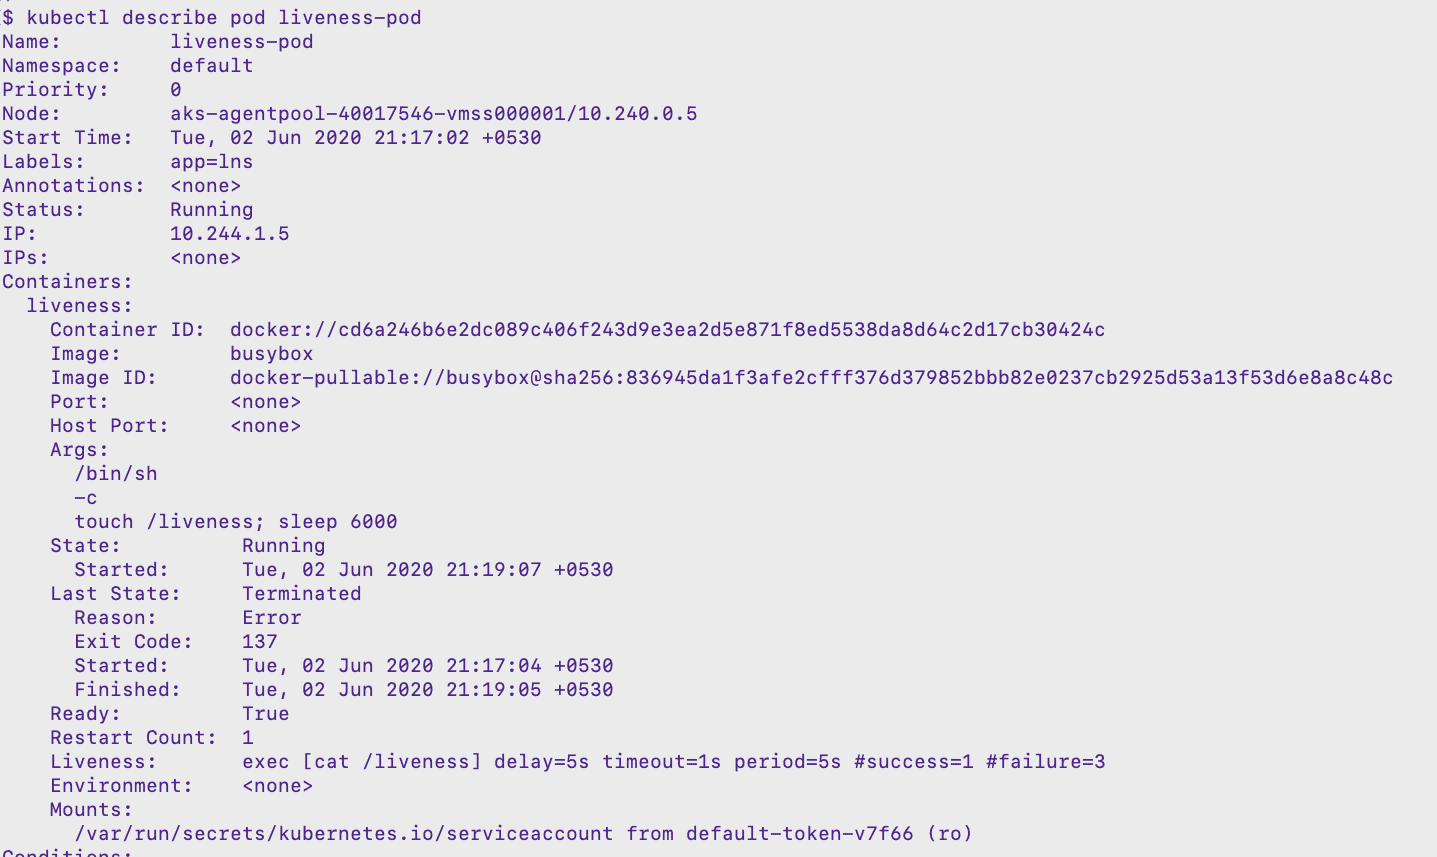
Check Out: Our blog post on Kubernetes Configmap. Click here
Busybox Container with a Kubernetes Readiness Probe
Once you deploy the below YAML and configure a command probe, the kubelet executes the touch /tmp/healthy command in the target container. Kubelet considers your container is ready to accept and serve traffic. Contrarily, Kubernetes terminates and restarts the container.
apiVersion: v1

kind: Pod

metadata:

  labels:

    test: liveness

  name: liveness-exec

spec:

  containers:

  - name: liveness

    image: k8s.gcr.io/busybox

    args:

    - /bin/sh

    - -c

    - touch /tmp/healthy; sleep 30; rm -rf /tmp/healthy; sleep 600

    readinessProbe:

      exec:

        command:

        - cat

        - /tmp/healthy

      initialDelaySeconds: 5
So, the configuration above describes a single container pod with the initialDelaySeconds, and the periosdSeconds keys inform kubelet to perform a Kubernetes readiness probe every 3 seconds and wait 10 seconds for the first Probe.
The job of the Kubelet here will run the touch /tmp/healthy command in the container to execute a ReadinessProbe.
Below is the output when you perform a describe command:
$ kubectl describe pod readiness-pod
Wrapping Up
So, the health checks using probes are crucial to ensure that your containers are alive and kicking in a cluster. Kubernetes utilizes liveness, readiness, and startup probes to determine when a container needs to be restarted or a pod needs to be removed from service. Therefore, this process assists you in maintaining distributed system services robust and available.
You would have felt probes are not too difficult to set up and use from the above examples. However, since now you know how to do it, don’t wait to get started.
Related Post
- Kubernetes Operator: An Overview, Stateful Application Example
- Kubernetes Prometheus Monitoring
- How To Setup A Three Node Kubernetes Cluster For CKA: Step By Step
- Certified Kubernetes Administrator (CKA) Certification Exam
- Certified Kubernetes Administrator (CKA) Certification: Step By Step Activity Guides/Hands-On Lab Exercise