In this blog, we will be covering about What is Kubernetes Pod which is an important component of Kubernetes. Pods are the smallest deployable unit of Kubernetes where we run our applications.
What Is Kubernetes Pods?
A pod is the smallest deployable artifact that is created and managed by Kubernetes. Pods are compromised of one or more containers (such as Docker containers) working together symbiotically. Pod is a shared execution environment, which means pod has a set of resources that is shared by every container which is a part of the Pod. These resources include IP Addresses, ports, hostnames, sockets, memory, volumes, and more.

How To Create A Pod?
Before you create a pod, you must have set up a 3 node Kubernetes Cluster which will be the first step of creating a basic deployable unit. Setting up a 3 node Kubernetes Cluster is nothing but Installing Kubernetes. Check out the Kubernetes Cluster setup blog which also has a step-by-step activity guide and also a video in it.
Creating Single Container Pod:
We have two ways:
1. Imperative way –
$ kubectl run <name of pod> -- image=<name of the image from registry>2. Declarative way –
 apiVersion: v1
 kind: Pod
 metadata:
   name: <name of pod>
 spec:
   containers:
     - name: <name of the container>
       image: <name of the image from registry>
       ports:
        - containerPort: 7500
       imagePullPolicy: Always
Save this file with the name pod.yaml and run the following command to create it –
$ kubectl create –f pod.yamlCreating Multiple containers Pod:
Using YAML file-
 apiVersion: v1
 kind: Pod
 metadata:
   name: <name of pod>
 spec:
   containers:
     - name: <name of container 1>
       image: <name of the image>
       ports:
        - containerPort: 7500
       imagePullPolicy: Always
     -name: <name of container 2>
      image: <name of the image>
      Ports:
       - containerPort: 7501
      imagePullPolicy: Always
Save this file with the name multicontainer.yaml and run the following command to create it –
$ kubectl create –f multicontainer.yamlKnow more: about Container Orchestration and Management Options
How To Kill Or Delete A Pod?
1. Using kubectl command –
$ kubectl delete pods <pod-name>2. If pod is started via some replicaSet or deployment or anything that is creating replicas then delete that first.
Also read: Kubernetes service by Amazon EKS
Different Models Of Pod
1. Single-container Pod: The “one-container-per-Pod” model is the most commonly used model in Kubernetes. In this, Pod wraps around a single container. If we want to scale our application horizontally (to provide more overall resources by running more instances), we should use single-container Pods.
2. Multi-container Pod: In this model, Pod encapsulates multiple containers and these containers share all the resources. These containers form a single cohesive unit of service.

There are three types of Multi Container patterns:-
1. Sidecar Pattern
2. Ambassador Pattern
3. Shared IPC
Difference Between Pods And Nodes
A node is a worker machine in Kubernetes, previously known as a minion. A node may be a VM or physical machine, depending on the cluster. A Pod always run on Node and Node can have multiple pods. Each Node is managed by the Master and the Kubernetes master automatically handles scheduling the pods across the Nodes in the cluster.
Also check: Difference between Kubernetes vs docker.
Difference Between Containers And Pods
Containers always run on Pods. Pods can contain one or more than one Container. If all containers run within a single pod then they will share the same networking interface, IP address, disk, etc. All containers within the same pod instance will live and die together.

Also Check: how Kubernetes networking policy work? Click here
Pod Best Practice
It is preferred to use “one container per pod” since running many containers as a part of a single Pod can negatively impact the performance of your Kubernetes workers.
If we are using multi-container pods then we’re likely to violate the “one process per container” principle. This is important because with multiple processes in the same container, it is harder to troubleshoot the container as logs from different processes will be mixed together, and becomes harder to manage the processes lifecycle.
For example, running both the front-end server and the backend server for your service in a single Pod with two containers would not be recommended, and instead should be run as separate Pods.

Check Out: Our blog post on Kubernetes role-based access control. Click here
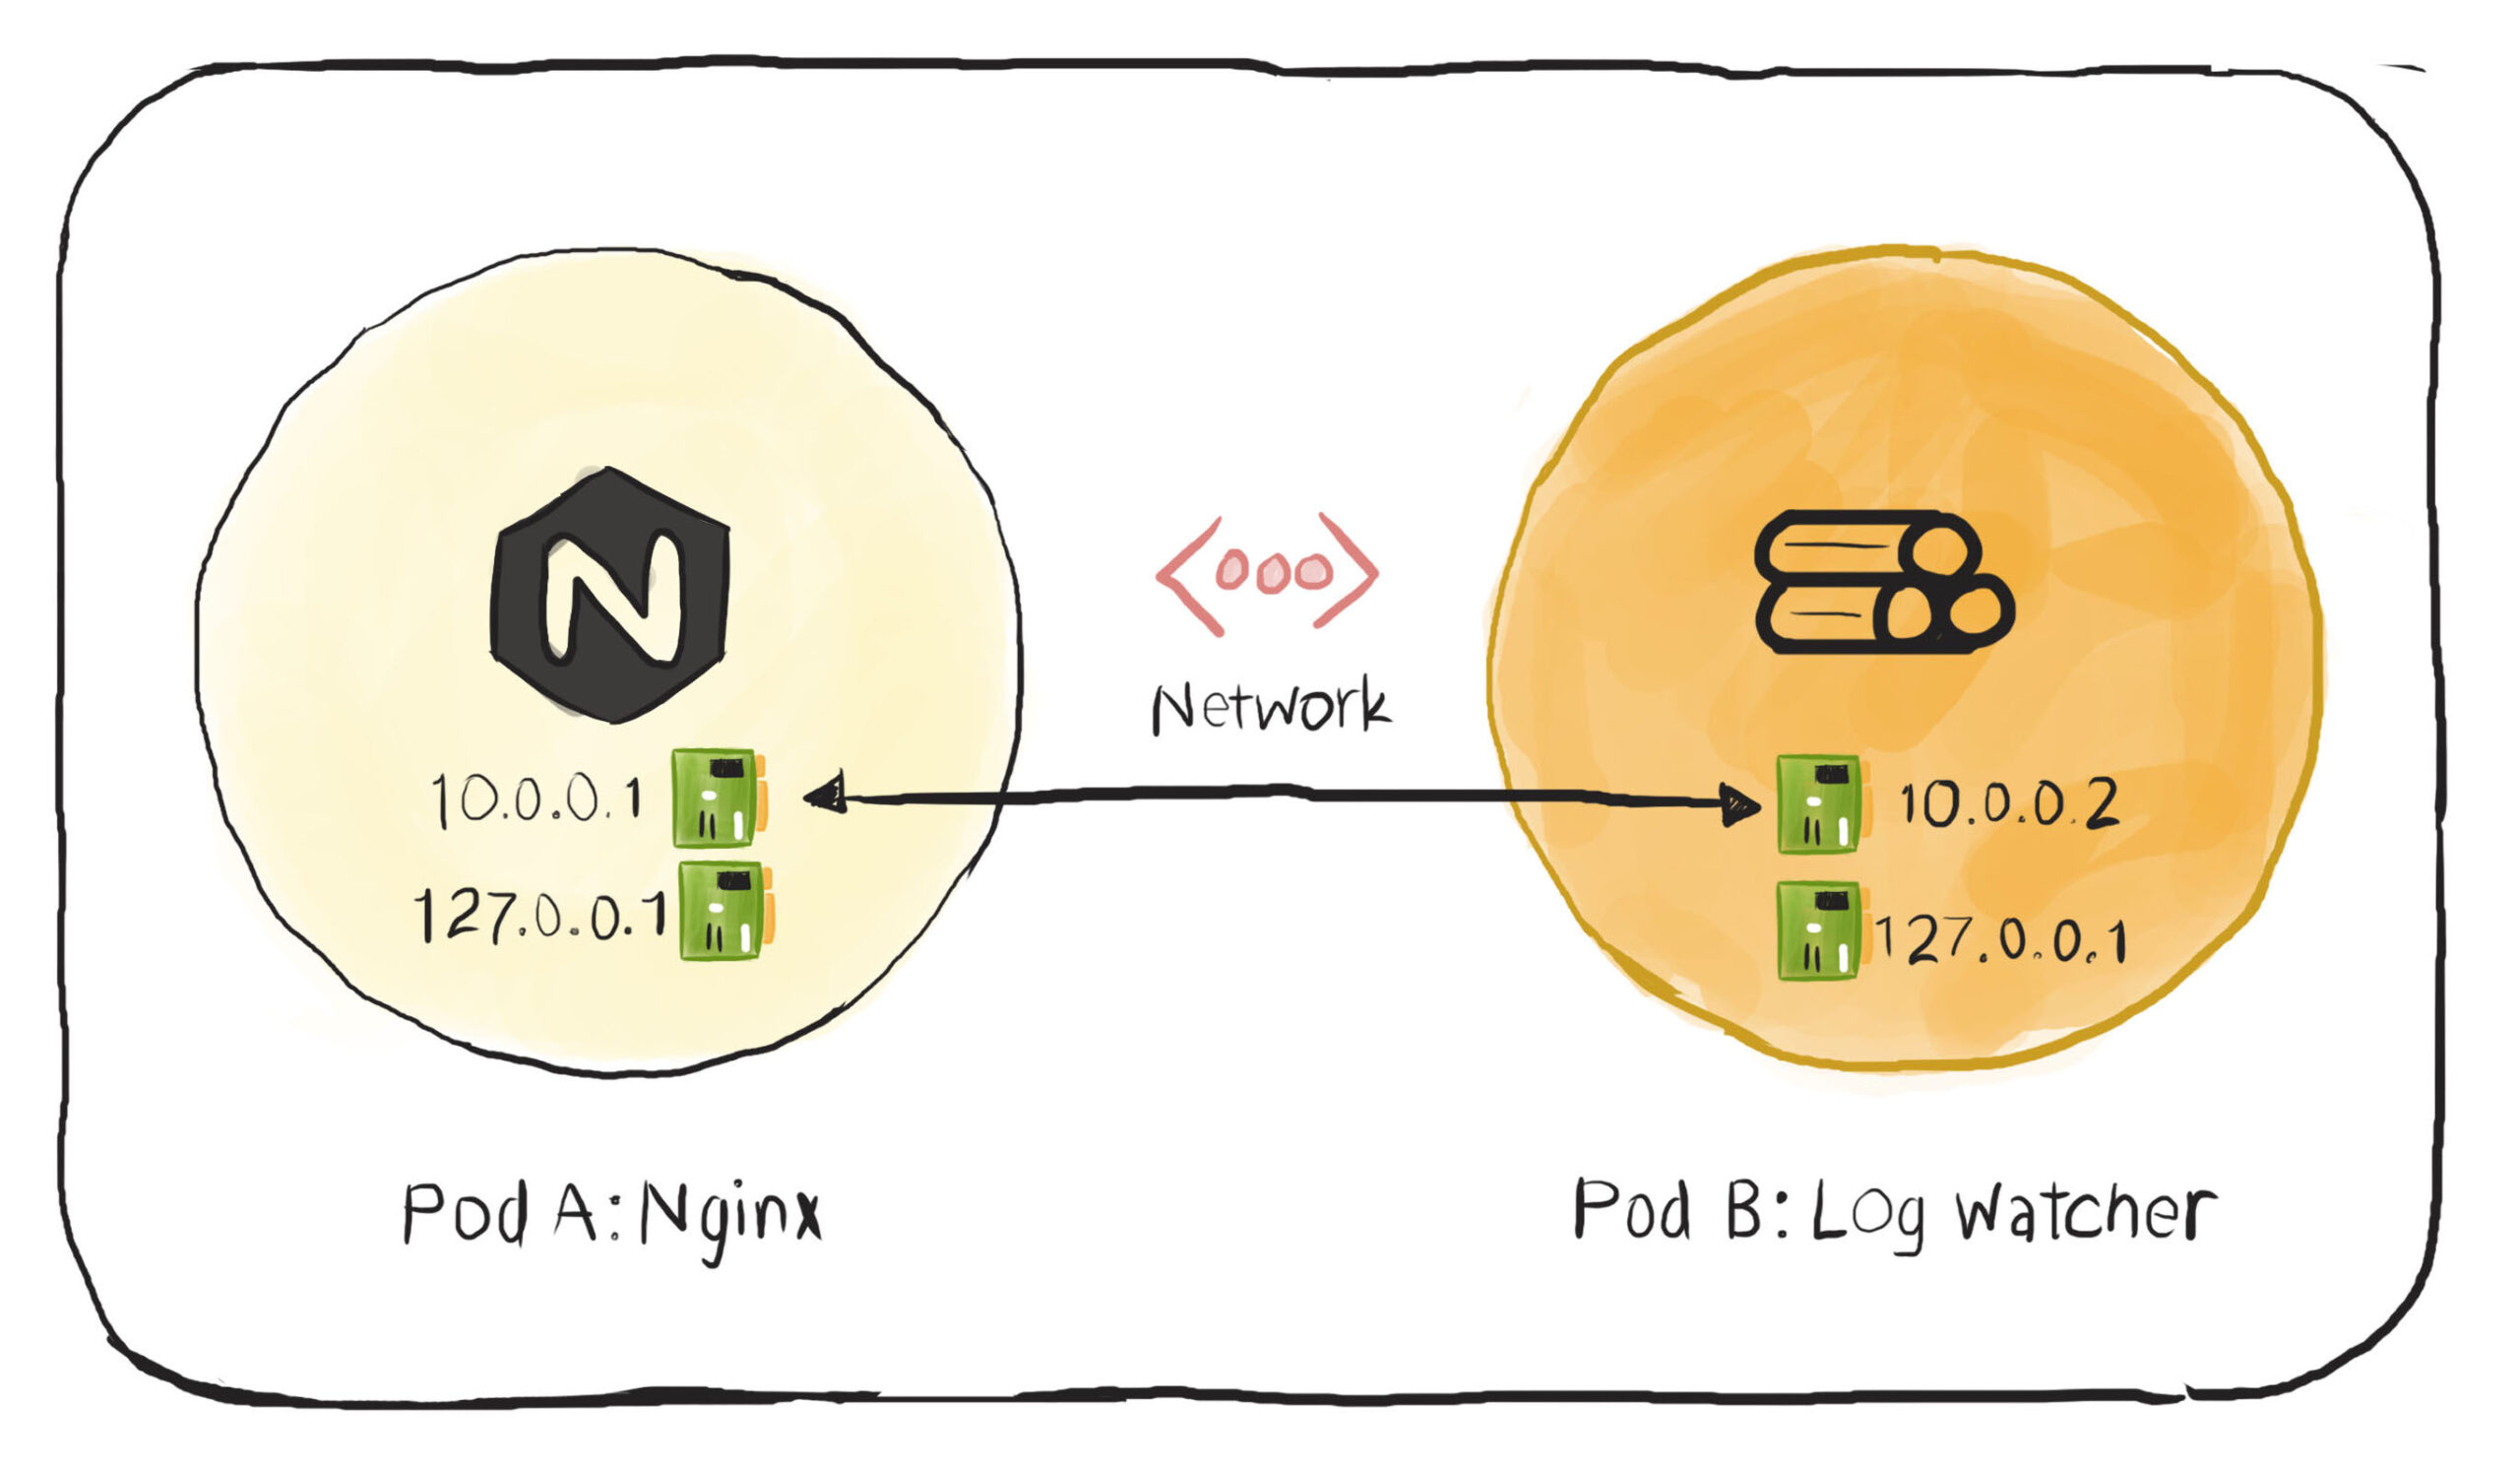
Pod Networking
Each Pod creates its own network namespace. This includes; a single IP address, a single range of TCP and UDP ports, and a single routing table. If a Pod has a single container, that container has full access to the network namespace of the pod. But if it’s a multi-container pod, then all containers will share the network namespace.
Container-to-Container communication works via the Pod’s localhost adapter and port number.
For inter-pod communication, every Pod gets its own cluster IP address, so every Pod can communicate with every other Pod within the same host using CNI (Container Network Interface).
To make our Containers available to the outside world, we can expose them. If we have multiple containers in the same pod, then we can expose multiple containers on individual ports.
Also read – AKS Cluster, it is a Kubernetes cluster, which is created on the Azure Kubernetes Service (AKS) by Microsoft is one of the leading managed K8s services.
Health Checks
Any application running as a container in Kubernetes, automatically keep alive for using a process health check. The Health check ensures that our application is always running. If it isn’t, Kubernetes restarts it.
Liveness Probe – Liveness probes are defined per container which means each container inside a pod is health-checked separately.
Also Check: Our previous blog post on Kubernetes networking
Readiness Probe – Readiness probe describes whether a container is ready to serve the user request or not. Containers that fail are removed from service Load Balancers.